Step into my grow room
- Thread starter MrFlux
- Start date
MrFlux
Well-Known Member
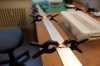
It's the aluminium T-profiles, 1m long, 30x30x3mm.what heat sinks are you using?
Chronikool
Well-Known Member
I do like heatsinks that are a little different to the norm. Custom made to fit the room. ") Working on a new design at the moment.
Working on a new design at the moment.
Greengenes707
Well-Known Member
It's just so expensive to get a extruded multi-finned bars of the length of the canopy...then to get enough of them for the width.
I have always wondered how the simple T is working for you. I see you have the fans blowing down the lines. Do you have an idea of the jT's? Or just general thoughts on heatsinks. Your design is the closest of all the diy members to what I would want to do with my own, and heat sinks have been a weak spot in my plan.
I have always wondered how the simple T is working for you. I see you have the fans blowing down the lines. Do you have an idea of the jT's? Or just general thoughts on heatsinks. Your design is the closest of all the diy members to what I would want to do with my own, and heat sinks have been a weak spot in my plan.
Chronikool
Well-Known Member
No need to go for a multi-finned heatsink...aluminium panels...GO!It's just so expensive to get a extruded multi-finned bars of the length of the canopy...then to get enough of them for the width.
MrFlux
Well-Known Member
Excellent question GG, cooling is always the hardest part. If I replace the word heatsink with radiator then perhaps it will become more familiar what is happening. The T bars form a radiator that the air can freely move through. There is nothing to obstruct the airflow like with normal heatsinks. Sort of like the difference between a breeze, or blowing through a straw. Even a little breeze going through the bars is already cooling a lot. The inverted T shape is completely exposed to the laminar airflow. The fin of the T also connects right to where it is most needed, namely the center of the COB.It's just so expensive to get a extruded multi-finned bars of the length of the canopy...then to get enough of them for the width.
I have always wondered how the simple T is working for you. I see you have the fans blowing down the lines. Do you have an idea of the jT's? Or just general thoughts on heatsinks. Your design is the closest of all the diy members to what I would want to do with my own, and heat sinks have been a weak spot in my plan.
The bars are getting about 20C above ambient at the warmest point furthest away from the fans.
You could easily make an open structured panel by fixing the bars together. Active cooling won't even be necessary, the bars will create their own convective air flow. Of course it will help to run the emitters soft.
Btw I hereby christen it as the T-light design
MrFlux
Well-Known Member
The fans help a lot with cooling but are not strictly required. In the first few days there was an unscheduled test, thanks to Chinese QC, where the fan power stopped working. Passive cooling saved the day. I did some tests with the upgraded light and passive cooling still works well enough. The bars will get hot, about 70C, but they can handle that. Both the plants and lights will survive it. The funny thing is that the ambient temp will actually drop: All the hot air is pooling at the top instead of being circulated around, and the exhaust fan can then more easily suck it off from the top of the chamber.Yeah I agree, that's what I like about his design == simple and cost effective. Seems that active cooling is necessary though, wonder what the max wattage is per meter and maintain proper jt?
As for the wattage per meter, I try to stay under 25W of dissipating power. That figure is more historical because I used a 25W soldering iron strapped to a bar for the first thermal tests.
MrFlux
Well-Known Member
AKA the Hans option? Btw I always wondered how effective a fan can be when it can't really blow properly. Won't a little standoff improve things?No need to go for a multi-finned heatsink...aluminium panels...GO!
Chronikool
Well-Known Member
Yip....not as thick at the hans thoughAKA the Hans option? Btw I always wondered how effective a fan can be when it can't really blow properly. Won't a little standoff improve things?
I have thought of 'risers'....but dont know how tall to make them...any ideas on this?
MrFlux
Well-Known Member
Just try it out some distances and see what you like best.Yip....not as thick at the hans though
I have thought of 'risers'....but dont know how tall to make them...any ideas on this?
MrFlux
Well-Known Member
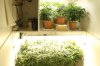
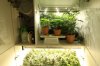
Welcome back to the jungle

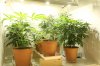
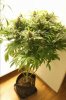
Fading on the ICE plant (on the right) is happening a lot sooner than before.
This clone was shown before, I said it was an ICE but it turns out to be C99. The cup is 250ml.
Just to find out what all these Californians are talking about I popped two Blue Dream seeds (from HSO).

Fading on the ICE plant (on the right) is happening a lot sooner than before.
This clone was shown before, I said it was an ICE but it turns out to be C99. The cup is 250ml.
Just to find out what all these Californians are talking about I popped two Blue Dream seeds (from HSO).
nevergoodenuf
Well-Known Member
Caretak3r- You could take 2 L's and bolt them together with a 5 mm spacer for even better cooling than a T.
MrFlux
Well-Known Member
C-channel (U profile) would work great.still really digging your cab design. T profile doesn't seem to be carried by the two big hardware stores here in the states - aluminum angle and C-channel is readily available. Do you think either would as good a job as the t-profile?
I don't see the attraction here. The COBs can't be put in the center because of the airgap from the spacers. If they are staggered then you might as well use two loose profiles.Caretak3r- You could take 2 L's and bolt them together with a 5 mm spacer for even better cooling than a T.
Btw you can use JB weld to glue profiles together to create larger heatsinks.
hydrojoe88
Active Member
Awesome set up dude. I'm about to build one of these myself. Just wondering how to mounted them to the heatsink? Also I'm gonna be using 25 vero 10 4000k. Would the mean well driver you used worked for me and give me that awesome efficiency?
MrFlux
Well-Known Member
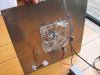
Yes, that driver works great for 5 parallel strings of 5 Vero's each. I've used this little driver to sort the Vero's by their forward voltage. If you don't sort the Vero's beforehand nothing bad will happen but the strings will be running at different currents.Awesome set up dude. I'm about to build one of these myself. Just wondering how to mounted them to the heatsink? Also I'm gonna be using 25 vero 10 4000k. Would the mean well driver you used worked for me and give me that awesome efficiency?
Here is a picture from the mounting process. I use silicone thermal glue.
Pro tip: Place the Vero with one edge onto the heatsink first, then press it down entirely. This will squeeze out the air below. Then make small circular movements while pressing, so as to squeeze out excess glue. In the beginning this will go smooth, later this will give a metal-to-metal grinding feeling when the excess glue is gone.
Good luck.
MrFlux
Well-Known Member
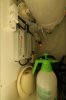
Last week the cheapo driver that powers the veg room failed. It's replacement failed within a couple of hours. No harm was done to the plants but I've really had it with the cheapo's. So time to get something better, in this case the shiny HLG-60H-C700A
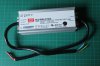
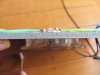
The driver board has been totally reworked and is now much simpler than it was before. 12V fan power is provided by a Mean Well LPV-35-12. Everything is 100% Mean Well now. As a side bonus I can listen to FM radio again, there is no more radio interference.
An advantage of parallel driving is that there are a lot less wires going out.
With the new driver the power in veg room is adjustable, from 32 to 74W (AC). This is really useful for controlling the veg speed of the plants. For example right now I want them to grow fast because things in the flower room are going faster than expected.
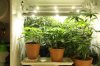
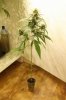
Blue Dream seedlings

ICE is nearly ready
Cindy is so sweet


The driver board has been totally reworked and is now much simpler than it was before. 12V fan power is provided by a Mean Well LPV-35-12. Everything is 100% Mean Well now. As a side bonus I can listen to FM radio again, there is no more radio interference.
An advantage of parallel driving is that there are a lot less wires going out.
With the new driver the power in veg room is adjustable, from 32 to 74W (AC). This is really useful for controlling the veg speed of the plants. For example right now I want them to grow fast because things in the flower room are going faster than expected.
Blue Dream seedlings
ICE is nearly ready
Cindy is so sweet
Positivity
Well-Known Member
Dimming is the shiznit..
Going on vacation? Turn them down to life support mode..really useful
Going on vacation? Turn them down to life support mode..really useful