Six lights for six plants. Organic No-Till 4400 watt indoor grow

kratos015

Well-Known Member
Sick build!!!!! Hate the crop cover though. Would love to learn no till organics. Nice grow so far bro!!!
Thanks man! If you don't mind my asking, what is it you don't exactly like about the crop cover? Just curious! Really not much to no-till organics though, if I can do it than I feel like pretty much anyone can do it! Just take a worm farm, some compost piles, and a good soil mix/amendments. With no-till you can seriously just keep top dressing for years, but eventually it gets to a point where your entire no-till bed/pot turns into complete compost and you'll have to start again. Thanks for the kind words and for stopping by :D
 

714steadyeddie

Well-Known Member
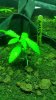
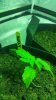
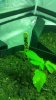
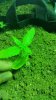
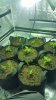
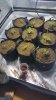
What's up guys? Not all too much to report as of yet as nothing all too exciting has been happening over on my end. Pretty much just waiting for the seedlings to get established, but it looks like they finally have after a few weeks. Got myself ten seedlings ready to go, they consist of the following

- Berry Bomb (x2) [Bomb Seeds]
- Original Amnesia [Dinafem]
- Purple Trainwreck [HSO]
- Cluster Bomb [Bomb Seeds]
- Lemon Amnesia [Barney Farm]
- Critical + 2.0 [Dinafem]
- Jack Herer (x3) [Breeder unknown/bagseed]

I'm for sure going to be running the first 5 strains in the shed once it's ready, I just don't know if I'll be putting Jack Herer or Critical + 2.0 in as the 6th strain at this moment. I suppose at this point it just kind of depends on what strains look like they'll do best under the 1000 watters. I want my heaviest yielding/stretching plants to go under the 1000 watters because I know they'll cover a 4x4 scrog easily, everything else will go under the 600 watters in a 3x3 scrog. I know that both the Berry and Cluster Bomb strains are supposed to be pretty big yielders, so those will likely get the 1000 watt lights while the PTW/Amnesia/Lemon Amnesia get 600 watt lights. I'm thinking one of the 3 Jack Herer plants will end up under the last 600 watter.

I know the Critical is supposed to be an amazing yielder, but it's supposed to be like Big Bud in the sense that you get an enormous yield of mediocre quality. I'm thinking the Cluster and Berry Bomb strains will be a lot better in quality and almost similar in yield. I may end up flowering out the Critical+ in the tent I'm currently vegging in, but the problem with that is that I'd need to buy another light, another inline fan, more ducting, and then move the tent into one of the bedrooms with the swamp cooler in it for cooling. So unless I can save up another $300+ for the needed equipment, the Critical may not end up being flowered out at all.

However, I can still save it as a mom along with the rest of the strains I've got under my belt. I'm almost hoping that one of the Jack Herer seeds ends up being a male because I want the pollen to cross it with the Critical+ 2.0 and maybe even the Berry Bomb.

I'm waiting another 5 days until payday so I can get more of the bubble insulation that I need to finish up the shed. Then after that it's just a matter of plugging everything in and putting it all in their designated spots. Based on what I'm seeing in terms of growth from the seedlings, I have at least another 4 weeks to go before they're ready for the shed, maybe even 6.. depends on the growth they give me.

View attachment 3924255

View attachment 3924253

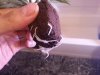
Just wanted to give you guys an update though was all. Been a pretty slow couple of weeks, but I'm attributing that to the fact that I started the seeds in 2 gallon pots instead of solo cups like I normally do. Takes the seedlings a lot longer to establish themselves in a 2 gallon pot as opposed to a solo cup, so that's probably why I'm not seeing the kind of growth that I'm used to at this point in the grow. I can't think of anything else, because at this point I'm not seeing any signs of problems. Temps never get over 78 and under 70, humidifier is set to 50-55% RH, soil seems legit too. Smells so good after every watering, plus if you look close enough at the soil you can see life. Only bugs I've come across are the good guys that come with quality soil. Everything that is usually an issue in a grow is not a problem for me at the moment, so I'm thinking my slow growth is because it took the seedlings so long to get their roots established. The last few days I've checked on them I've noticed significant growth above, so I think they're finally happy with where they're at :)

As always, would love to hear any and all comments and/or questions. And thanks for stopping by for today's update :)
Nice work. I just harvest an amnesia. I had an ok pheno. Smoke was good, bag appeal was there as well. Good day time smoke.

I'm gearing up for an organic grow too. I'll be paying close attention to once you get into your top dressings and teas!

Good stuff
 

kratos015

Well-Known Member
Nice work. I just harvest an amnesia. I had an ok pheno. Smoke was good, bag appeal was there as well. Good day time smoke.

I'm gearing up for an organic grow too. I'll be paying close attention to once you get into your top dressings and teas!

Good stuff
I hope you post a journal or something when you do go organic, I'm sure you'll be quite pleased with your results because I know I sure was! Makes growing so much more simple, and the quality/flavor is just unlike anything I've ever had before. All of the organic bud I grew had the most intense flavor, and pretty much every strain had an earthy undertone. The only thing I can think of that provided the earthy undertone was the living soil/humus. I've had plenty of "organic" bud but it didn't have that undertone in the flavor department and wasn't very smooth.

So stoked to hear you not only had good results with the Amnesia, but that it was a good day time smoke too! I'm in desperate need of good day time sativas, I have a very hard time focusing and the right strain makes me unstoppable when it comes to focus. Otherwise, my mind is a total clusterfuck. Hoping mine turns out as well as yours did!

No need to wait until I top dress to know what it's going to be though! It isn't anything too special and certainly isn't anything I pioneered, pretty much most of the information I'm taking advantage of came from Clackamas Coots (or CC), the mix I'm using is his as well as a lot of what I'm doing. He certainly knows his stuff, and I've seen his soil mix blow others out of the water for various reasons. And that really surprised me at first because the NPK ratios are rather modest, especially when compared to Sub's Supersoil. But apparently CC says that too much P in your soil mix can actually harm, if not kill a lot of your microbes in the soil. On top of that, I've seen plenty of side by side grows where his soil mix always comes out on top. Watched a youtube series of an outdoor grower comparing CC's mix, Subcool's Supersoil, the Moonshine mix, and the Rev's mix. All 4 mixes did quite well and none of them really did poorly, but CC's mix had much better results than the rest apparently. This is because of the following reasons.

1) CC's mix is much lighter than others in terms of amendments and takes a very "less is more" approach.
2) The amendments used in his mix are readily available and don't get hot (decompose too quickly).
3) The amendments used in his mix do so much more than simply providing NPK to your girls. For example, the crab meal provides chitin, which will pretty much destroy any kind of gnat/aphid/spider mite that would attempt to mess with your babies. Even if by some fluke the eggs managed to avoid the chitin, the hatchlings would certainly die in short order from said chitin. The neem meal is pretty much like constantly having neem oil in your soil, but without all the negatives associated with neem oil. All of the minerals in CC's mineral mix are so much better than other blends too. For example, the Oyster Shell Flour buffers pH just like lime does, but is more readily available/acts faster. On top of that, it's an amazing source of calcium. The gypsum provides your mix with just the right amount of sulfer, which helps in terpene production.

As for what my top dressing/teas will be, it's pretty much all about keeping it simple.

The only times that I see myself actually needing a top dress is when I harvest or transplant pretty much. In fact, I shouldn't even need to top dress until after my first harvest, because the soil in the final containers will be nice and fresh so nothing depleted the nutritional content in them. After I harvest the plants, I'll give them a light top dress, top that with EWC, plant my clovers, and keep things moist until it's time for another transplant. You don't really want to remove the roots/rootball from the no-till pots for two reasons. The first reason is that removing the root ball will disturb your microbiology that you worked so hard to develop. The second reason is because the roots still have some of the nutes in them, so the worms will munch on those and provide my soil mix with some top quality castings by the time I'm ready to transplant new plants into them.

The top dress is pretty much just the same mix of amendments that are in the soil. Equal parts crab/neem/kelp meal with a mix of minerals containing 2 parts basalt, 1 part gypsum, 1 part oyster shell flour. Cover that with some EWC from my worm bins and then just keep things moist.

But pretty much, the only teas I make would be an EWC tea to keep my soil full of life, a sprouted seed tea to provide the soil/plants with enzymes, and the occasional neem meal tea for pest management. Personally, I've found that compost teas end up causing a lot more harm than good, but that's just me. Unless you're making your own compost that you can trust, or getting compost from a source you can trust 110% I'd recommend against it. Most people's ideas of compost teas are throwing alfalfa meal or guano in and brewing a tea out of that and that is just a recipe for disaster. Both of those amendments are hot as it is, but when you brew them into a tea it makes things much worse. I feel like making teas out of anything that isn't EWC, neem meal, or sprouted seeds just tends to throw things out of balance. Using teas caused me all sorts of problems and if your soil is top notch enough, you shouldn't really need teas. There are plenty of ways to re-innoculate your soil without throwing things out of balance/burning your plants. And yes, put enough guano/alfalfa meal in a tea and you WILL burn your plants. I got to find that one out the hard way. If you're looking to re-innoculate your soil with microbes, just brew an EWC tea or look into a product called "Grower's Recharge" and call it a day. If you're looking to replenish the nutritional content in your soil then just make a simple top dress mix and let your worms/microbes do the rest.
 

a mongo frog

Well-Known Member
moving the root ball will disturb your microbiology that you worked so hard to develop. The second reason is because the roots still have some of the nutes in them, so the worms will munch on those and provide my soil mix with some top quality castings by the time I'm ready to transplant new plants into them.
Thats really fucking interesting man. Who taught you all this? Whats your back ground?
 

714steadyeddie

Well-Known Member
I hope you post a journal or something when you do go organic, I'm sure you'll be quite pleased with your results because I know I sure was! Makes growing so much more simple, and the quality/flavor is just unlike anything I've ever had before. All of the organic bud I grew had the most intense flavor, and pretty much every strain had an earthy undertone. The only thing I can think of that provided the earthy undertone was the living soil/humus. I've had plenty of "organic" bud but it didn't have that undertone in the flavor department and wasn't very smooth.

So stoked to hear you not only had good results with the Amnesia, but that it was a good day time smoke too! I'm in desperate need of good day time sativas, I have a very hard time focusing and the right strain makes me unstoppable when it comes to focus. Otherwise, my mind is a total clusterfuck. Hoping mine turns out as well as yours did!

No need to wait until I top dress to know what it's going to be though! It isn't anything too special and certainly isn't anything I pioneered, pretty much most of the information I'm taking advantage of came from Clackamas Coots (or CC), the mix I'm using is his as well as a lot of what I'm doing. He certainly knows his stuff, and I've seen his soil mix blow others out of the water for various reasons. And that really surprised me at first because the NPK ratios are rather modest, especially when compared to Sub's Supersoil. But apparently CC says that too much P in your soil mix can actually harm, if not kill a lot of your microbes in the soil. On top of that, I've seen plenty of side by side grows where his soil mix always comes out on top. Watched a youtube series of an outdoor grower comparing CC's mix, Subcool's Supersoil, the Moonshine mix, and the Rev's mix. All 4 mixes did quite well and none of them really did poorly, but CC's mix had much better results than the rest apparently. This is because of the following reasons.

1) CC's mix is much lighter than others in terms of amendments and takes a very "less is more" approach.
2) The amendments used in his mix are readily available and don't get hot (decompose too quickly).
3) The amendments used in his mix do so much more than simply providing NPK to your girls. For example, the crab meal provides chitin, which will pretty much destroy any kind of gnat/aphid/spider mite that would attempt to mess with your babies. Even if by some fluke the eggs managed to avoid the chitin, the hatchlings would certainly die in short order from said chitin. The neem meal is pretty much like constantly having neem oil in your soil, but without all the negatives associated with neem oil. All of the minerals in CC's mineral mix are so much better than other blends too. For example, the Oyster Shell Flour buffers pH just like lime does, but is more readily available/acts faster. On top of that, it's an amazing source of calcium. The gypsum provides your mix with just the right amount of sulfer, which helps in terpene production.

As for what my top dressing/teas will be, it's pretty much all about keeping it simple.

The only times that I see myself actually needing a top dress is when I harvest or transplant pretty much. In fact, I shouldn't even need to top dress until after my first harvest, because the soil in the final containers will be nice and fresh so nothing depleted the nutritional content in them. After I harvest the plants, I'll give them a light top dress, top that with EWC, plant my clovers, and keep things moist until it's time for another transplant. You don't really want to remove the roots/rootball from the no-till pots for two reasons. The first reason is that removing the root ball will disturb your microbiology that you worked so hard to develop. The second reason is because the roots still have some of the nutes in them, so the worms will munch on those and provide my soil mix with some top quality castings by the time I'm ready to transplant new plants into them.

The top dress is pretty much just the same mix of amendments that are in the soil. Equal parts crab/neem/kelp meal with a mix of minerals containing 2 parts basalt, 1 part gypsum, 1 part oyster shell flour. Cover that with some EWC from my worm bins and then just keep things moist.

But pretty much, the only teas I make would be an EWC tea to keep my soil full of life, a sprouted seed tea to provide the soil/plants with enzymes, and the occasional neem meal tea for pest management. Personally, I've found that compost teas end up causing a lot more harm than good, but that's just me. Unless you're making your own compost that you can trust, or getting compost from a source you can trust 110% I'd recommend against it. Most people's ideas of compost teas are throwing alfalfa meal or guano in and brewing a tea out of that and that is just a recipe for disaster. Both of those amendments are hot as it is, but when you brew them into a tea it makes things much worse. I feel like making teas out of anything that isn't EWC, neem meal, or sprouted seeds just tends to throw things out of balance. Using teas caused me all sorts of problems and if your soil is top notch enough, you shouldn't really need teas. There are plenty of ways to re-innoculate your soil without throwing things out of balance/burning your plants. And yes, put enough guano/alfalfa meal in a tea and you WILL burn your plants. I got to find that one out the hard way. If you're looking to re-innoculate your soil with microbes, just brew an EWC tea or look into a product called "Grower's Recharge" and call it a day. If you're looking to replenish the nutritional content in your soil then just make a simple top dress mix and let your worms/microbes do the rest.
Thanks for sharing your knowledge. There is information I need to soak up.

It's all about keeping that soil alive and healthy I love it.

Can't wait to see your bloom room rocking.
 

kratos015

Well-Known Member
Thats really fucking interesting man. Who taught you all this? Whats your back ground?
I wasn't actually taught by anyone in particular so much as doing a TON of research.

I'm not quite sure if I'm allowed to post a link to grasscity, but if not I'd appreciate if someone would let me know before an admin does :P

https://forum.grasscity.com/threads/no-till-gardening-revisited.1400505/

Just a thread from a handful of guys that brought organic no-till growing into the marijuana community. It's not so much that CC and the others taught me personally, but I read and absorbed all of the knowledge that they shared on that thread. In fact, it's where a majority of what I've posted about comes from. There is an absolute wealth of information in that thread, anyone that is serious about doing organic grows properly should get themselves a notepad and a pen and take notes as they read that thread from front to back. Like with any threads though, most of the posts are ass-kissing and feuds, but if you have enough patience to sift through the junk you'll find some real nuggets of information in there. I highly recommend reading it. CC got kind of a big head after the following he gained which kind of irks me, but the information is gold nonetheless and I'm not too proud to admit when someone knows more about something than I do, especially when they have the experience to back it up.

I don't really have much of a background in horticulture, biology, botany, or anything like that. I'm just a guy that is incredibly passionate about growing the best bud possible, and starting this year, the best veggies possible :) Whenever I get into something as a hobby, I put my entire ass into being the best that I can possibly be at it. I've been growing for around 5 years, on and off as a legal medical patient in the respective states I've lived in. I used to grow in a 15x20 greenhouse outdoors primarily, and that happened completely by being at the right place at the right time. I was volunteering for a dispensary and one day my boss comes in freaking out because his landlord wants him to get rid of all of the plants that he has vegging. I just so happened to live on half an acre at the time with my in-laws and offered my back yard, to which he accepted. He was so thankful that he let me keep the greenhouse, bought me a used car, and made sure I always had a place to vend to. I grew in that greenhouse for a couple of years while running an incredibly mediocre indoor 2000 watt grow. The quality was there, but my yields were shit because the room was poorly insulated and my 12,000 BTU ac just couldn't keep up. Made so many mistakes for the indoor, I'm quite ashamed, but it motivates me to make sure I prevent others from doing the same.

Outdoor was amazing though, especially after I started using Sub's supersoil. As I was starting this project, I was originally going to do supersoil again, but after all the research I've done it seems CC's mix/way is definitely best as far as I know. Everything that goes into that soil is just incredible, I've personally never had seedlings look this healthy. I'm not usually a guy to change something when I know it works, but when something better comes along and I'm certain of it then I have no problems taking the risk. However, upon doing the research everything just made so much more sense and after reading through that thread I feel like it brought everything completely full circle. I understand the microbes relationship with the soil/amendments now, I understand the roots and their relationship with the soil and the microbes, I understand how when we take care of our microbes in our soil then our plants thrive, I'm not just doing things just because I read it's the best way. I actually understand why I'm doing what I'm doing and why it's such a good method.

Growing organic has just truly been a humble experience because you have these microscopic microbes, earthworms, and other bugs living in your soil. As a result of all these little critters living in your soil, the soil is then able to form a perfect relationship with any plant that grows in said soil. It doesn't matter what you grow, it will come out as good or bad as your soil. It's just amazing to me that some of the tiniest creatures in the world are responsible for creating and nourishing so much life. Really makes you realize just how much man tends to screw things up by trying to intervene :p


Thanks for sharing your knowledge. There is information I need to soak up.

It's all about keeping that soil alive and healthy I love it.

Can't wait to see your bloom room rocking.
It's my pleasure my good man. I got the information for free and don't see why anyone else shouldn't, especially if they're showing an interest in it :D Thanks for stopping in my man! I'll be eagerly awaiting your organic grow journal!
 

kratos015

Well-Known Member
Lights came on a few hours ago so it was time to give the girls a watering again. Ever since switching the T12 out in favor of the 600w MH dialed down to 300w I've been needing to water the girls every day for the last week or so. I take that back, water the soil every day. When doing a living organic soil, it needs to have constant access to oxygen and water. Lack of air should never be an issue if your soil is properly aerated and you're running smart pots. Should anyone decide to venture into a first time living organic grow, keep this in mind. Keep your soil moist! Make sure your soil is moist when you're putting it into your pots, and moisten things up after your pots have been filled. After your pots are filled with your newly made/moist living organic soil, the only thing you need to do is keep the soil moist. If you let your soil dry out, a lot of your microbes will go dormant if not die off so you never want that to happen. You don't really need to soak them, just a nice little shower around the pot to get things moist again. I'm currently using 1 gallon of water to around 18 gallons of soil.

However, it's been over a week since I've given them anything else besides plain tap water (I'm on a well). So today they got their weekly dose of liquid seaweed in addition to some coconut water I bought while I was out of town.

17965036_10210678253465779_765593270_n.jpg

Coconut water is an absolute must in your watering schedule. Much like a SST, it provides your soil with enzymes that will help your microbes and such process all the organic matter we have in our soil, whether you're amending a new batch or if you're top dressing your 4th no-till cycle this is very useful. Coconut water also happens to be loaded with growth hormones that are going to give you thicker stems, more bud sites/shoots and stronger roots! Aloe vera is also very helpful for this process, however I prefer foliar feeding with aloe vera personally. As if all of that wasn't enough of a bonus, coconut water also contains phosphorus, potassium, and a variety of other trace elements. You don't even really need much, I only used 1/5 of that can and stored the rest in a mason jar so I can use the rest of it for the next two weeks. If you use coconut water every week or two, your plants will love you for it.

Tomorrow I'll be hitting the babies with Ful Power, TM-7, and a little Grower's Recharge. I'll update once that's done. For the time being, here's some photos of the girls since yesterday. I'm also gonna go ahead and plant more clovers because I'm gonna want some mulch going for when these babies start getting bigger. You'll notice the ones I pulled are starting to mulch on some of the pots, and in others the clovers that got buried just found their way back to the top :P

17965080_10210678253145771_312277908_n.jpg

17966018_10210678252985767_1239967528_n.jpg

17965306_10210678252785762_40947949_n.jpg

17965904_10210678252545756_1012969795_n.jpg

17918674_10210678252265749_1135495593_n.jpg
 

Attachments

kratos015

Well-Known Member
and this is daily to keep the soil moist? Or is this a watering as in plants need to be watered?
Yes, daily to keep the soil moist. By keeping the soil constantly moist the roots can uptake water at their own discretion :D Most likely why a lot of the big organic growers on these forums have moved on to drip systems and such. I won't be able to look into that until I've got my first harvest under my belt though. :(
 

whitebb2727

Well-Known Member
Lights came on a few hours ago so it was time to give the girls a watering again. Ever since switching the T12 out in favor of the 600w MH dialed down to 300w I've been needing to water the girls every day for the last week or so. I take that back, water the soil every day. When doing a living organic soil, it needs to have constant access to oxygen and water. Lack of air should never be an issue if your soil is properly aerated and you're running smart pots. Should anyone decide to venture into a first time living organic grow, keep this in mind. Keep your soil moist! Make sure your soil is moist when you're putting it into your pots, and moisten things up after your pots have been filled. After your pots are filled with your newly made/moist living organic soil, the only thing you need to do is keep the soil moist. If you let your soil dry out, a lot of your microbes will go dormant if not die off so you never want that to happen. You don't really need to soak them, just a nice little shower around the pot to get things moist again. I'm currently using 1 gallon of water to around 18 gallons of soil.

However, it's been over a week since I've given them anything else besides plain tap water (I'm on a well). So today they got their weekly dose of liquid seaweed in addition to some coconut water I bought while I was out of town.

View attachment 3925041

Coconut water is an absolute must in your watering schedule. Much like a SST, it provides your soil with enzymes that will help your microbes and such process all the organic matter we have in our soil, whether you're amending a new batch or if you're top dressing your 4th no-till cycle this is very useful. Coconut water also happens to be loaded with growth hormones that are going to give you thicker stems, more bud sites/shoots and stronger roots! Aloe vera is also very helpful for this process, however I prefer foliar feeding with aloe vera personally. As if all of that wasn't enough of a bonus, coconut water also contains phosphorus, potassium, and a variety of other trace elements. You don't even really need much, I only used 1/5 of that can and stored the rest in a mason jar so I can use the rest of it for the next two weeks. If you use coconut water every week or two, your plants will love you for it.

Tomorrow I'll be hitting the babies with Ful Power, TM-7, and a little Grower's Recharge. I'll update once that's done. For the time being, here's some photos of the girls since yesterday. I'm also gonna go ahead and plant more clovers because I'm gonna want some mulch going for when these babies start getting bigger. You'll notice the ones I pulled are starting to mulch on some of the pots, and in others the clovers that got buried just found their way back to the top :P

View attachment 3925040

View attachment 3925039

View attachment 3925038

View attachment 3925037

View attachment 3925035
Looking good.

I have thought of using coconut water.

They respond to it well?

Ill give it a try.
 

whitebb2727

Well-Known Member
Yes, daily to keep the soil moist. By keeping the soil constantly moist the roots can uptake water at their own discretion :D Most likely why a lot of the big organic growers on these forums have moved on to drip systems and such. I won't be able to look into that until I've got my first harvest under my belt though. :(
I would be careful. I don't like my soil to get real dry but I prefer somewhat of a dry wet cycle. The soil needs to dry some to allow for ph swing. That enables max nutrient uptake.

I have been eyeballing auto watering systems but where I went perpetual I am growing a lot of small plants being moved a lot.

I thought of building something similar to those glass watering globes out of pvc.
 

kratos015

Well-Known Member
I would be careful. I don't like my soil to get real dry but I prefer somewhat of a dry wet cycle. The soil needs to dry some to allow for ph swing. That enables max nutrient uptake.

I have been eyeballing auto watering systems but where I went perpetual I am growing a lot of small plants being moved a lot.

I thought of building something similar to those glass watering globes out of pvc.
Coconut water is awesome, you should totally try it! A little goes a long way and it's great stuff.

With watering there's a balance, I only water every day because that's how often the tops of my pots start to get dry. At that point I give it a light shower and call it a day. I used to wait a few days between watering and then completely soak the soil, but I prefer doing it this way now because it's the closest I can get to a drip system. I can see how a drip system would be kind of counterproductive for perpetual grows though :P
 

whitebb2727

Well-Known Member
Coconut water is awesome, you should totally try it! A little goes a long way and it's great stuff.

With watering there's a balance, I only water every day because that's how often the tops of my pots start to get dry. At that point I give it a light shower and call it a day. I used to wait a few days between watering and then completely soak the soil, but I prefer doing it this way now because it's the closest I can get to a drip system. I can see how a drip system would be kind of counterproductive for perpetual grows though :P
With organic soils it works with light watering. I do the same sometimes. Its organic so no salts build up.

I tried doing it that way with synthetics and ended up with salts and lock outs.

I grow organic. I was raised that way. We raise a garden every year and can it up. I even went no till on it. Large outdoor no till garden and it works great.
 

714steadyeddie

Well-Known Member
Coconut water is awesome, you should totally try it! A little goes a long way and it's great stuff.

With watering there's a balance, I only water every day because that's how often the tops of my pots start to get dry. At that point I give it a light shower and call it a day. I used to wait a few days between watering and then completely soak the soil, but I prefer doing it this way now because it's the closest I can get to a drip system. I can see how a drip system would be kind of counterproductive for perpetual grows though :P
How much do you dilute the coconut water ? I just got a can and want to try it on on my flowering ladies
 

kratos015

Well-Known Member
How much do you dilute the coconut water ? I just got a can and want to try it on on my flowering ladies
A little goes a long way. I mean, there'd be no harm in using an entire can in a gallon of water I suppose. It's just that it isn't necessary. I believe my can was 500 ml, put 100ml in a gallon of water and saved the other 400ml. That's because they're still little seedlings though, as they grow i'll up the dose to 200ml per week. Depends on the size of your girls really :D
 

714steadyeddie

Well-Known Member
A little goes a long way. I mean, there'd be no harm in using an entire can in a gallon of water I suppose. It's just that it isn't necessary. I believe my can was 500 ml, put 100ml in a gallon of water and saved the other 400ml. That's because they're still little seedlings though, as they grow i'll up the dose to 200ml per week. Depends on the size of your girls really :D
Cool i ended doing 3/4 cup in 3 gallons of water. These girls are in flower. Excited to see them react to it.
 

Yodaweed

Well-Known Member
Haven't been able to grow since 2015, finally was blessed with the opportunity to start up again.

I've been living in small mobile homes for the last few years, so growing was never even an option for me. However, the place I recently moved into has a 10x15 shed that's wired for 40 amps. Not only that, but there's a 50 amp RV hook up right next to the shed, and even another nearby outlet outdoors wired for 20 amps leaving me with a plenty of power to do something bigger than I've ever dreamed possible.

I've started with 15 seeds as of yesterday, each in 2 gallon pots. The clover has been doing rather well in the pots for the last 3 weeks or so that the box has been in operation. The soil in the pots were fed with a weekly dose of liquid seaweed, TM7, Growers Recharge, and Ful-Power, in smaller doses than recommended. So within a few days I should have some sprouts going :)

The 15 plants will not all be going in the room, as I'll only be using one plant per light in a no-till scrog set up. So the 15 will be narrowed down to 6. The 15 seedlings consist of 7 different strains, some of which I have experience with and others that are new to me.

- Amnesia Haze
- Green Crack
- Purple Trainwreck
- Blueberry Headband
- Kush Bomb
- Cluster Bomb
- Berry Bomb

I've run the HSO strains in the past outdoors and was very pleased with the results in both quality and yield. The other 4 strains are completely new to me, but were chosen due to their heavy yielding genes that will all provide wonderful flavor for the various concentrates I'll be making.

Thanks for reading :)

View attachment 3915362
View attachment 3915363 View attachment 3915364
Which seedbank you use? Great pick for strains too, that amnesia and green crack are some fire smoke and love the purple trainwreck and blueberry headband.
 

kratos015

Well-Known Member
Which seedbank you use? Great pick for strains too, that amnesia and green crack are some fire smoke and love the purple trainwreck and blueberry headband.
I've used Attitude up until now, but I'm thinking the next time I grab seeds I'm gonna give Herbies a try. A lot of the seeds I got from Attitude looked pretty weak and my success rate with them was pretty mediocre. I feel like unless you're buying a 10 pack of seeds that it's pretty much a crap-shoot as to whether or not the seed you get from them is any good. Whenever I get seeds from flowers the first thing I do is try my hardest to squish them, if they don't break they're good to go. However, I was afraid to try that with the seeds I got from Attitude because a lot of them looked weak. Pretty disappointed with them. And you can't really tell them about it because of their disclaimers about them being souvenirs, so I'm SOL pretty much. I'm gonna see how Herbies does for me, I feel like I spend too much money on seeds to start off with a 50% chance of death.

I'm bummed because I was way stoked on the BB Headband, grew it outdoors my last grow a few years back. Didn't have too much flavor because it didn't seem to like the outdoor SoCal heat much, but oh man was the effect incredible. I'm ashamed to say that none of my Green Crack or BB Headbands ended up sprouting though :( The Purple Trainwreck remains to this day some of the best stuff I've ever grown. Had amazing bag appeal, amazing smell and taste, and yielded rather well. Can't wait to see what it's like indoors! Wasn't planning on even running the Amnesia until I lost all of those seeds, so I had to end up popping it with the Critical + 2.0 and they're doing amazing. Thought the Amnesia took 9-11 weeks but the instant I found out it was an 8-9 week I dropped it in a pot asap!

I'm going to pick some up and try it out.

I grow organic. I mostly use self sustaining products from the farm.
For sure give it a try, especially while they're in veg because that's where it really shines! Can't wait to have an organic set up similar to yours though. Bunch of no-till raised beds for veggies and a grip of self-sustaining products that most view as trash after all is said and done. That's one of the more humbling aspects about organics, you take stuff that most people consider trash and turn it into black gold! I was cracking up at myself about how excited I was about all the weeds popping up in our yard, now I actually look forward to picking them! :P


Cool i ended doing 3/4 cup in 3 gallons of water. These girls are in flower. Excited to see them react to it.
Can't wait to hear back with the results my man! Your girls will love it though. Coconut water and aloe are amazing and are an absolute must for organic. When I was first reading about it, someone had a great explanation about aloe/coconut water that pretty much compared those two to a supercharger. Your car can and will have great performance all on it's own, but when you supercharge it the performance gets a huge increase! As I was saying to white though, next time around make sure you give them aloe and coconut water in veg because that's where a lot of the benefits of the stuff really shine. Aloe is super helpful for developing roots in a plant, as well as coconut water to a lesser extent. What makes the coconut water kick so much ass is that it not only adds a shitload of nodes to your plants, but it makes the spacing on them tighter as well.
 

kratos015

Well-Known Member
Sorry I didn't give an update yesterday like I said I was going to. Got too caught up playing Leagues xD

But yesterday the plants got their weekly doses of Ful-Power, TM-7, and Recharge.

18009749_10210706375528813_2062939908_n.jpg

They also got quite a bit of aloe as well for the first time.

In case anyone have never used aloe in their organic line up, I can't recommend the stuff enough. It helps your roots and plants grow bigger and faster, it's like a damn steroid for them or something. I used to clone with the stuff back when I grew in Southern California and I never went back to the crap cloning gels after that. The results you get from Aloe are nothing short of phenomenal. Just soak your root plugs/rapid rooters/etc in some aloe vera infused water for a day. Then rub some of the gel from the aloe onto the part of the clone that will go in the root. Give them a few days and I guarantee you'll see some of the best results ever with cloning. The roots you get from aloe are thick, enormous, and healthy. I actually posted some photos of my results with it back in 2014 that I found for you guys to see that I'm not full of it.

20130527_114643.jpg

20130527_114652.jpg

20130527_130009.jpg

I always clone every time I top a plant, good way to recycle it and such. But before aloe, my success rate with it was pretty low. Apparently, most of the rooting hormones in the plant are in the lower branches and not the upper branches and that's why it's more difficult to take clones from the top of the plant.. unless you have aloe vera!

18009826_10210706374408785_1454720076_n.jpg

18009278_10210706374568789_357557277_n.jpg

All I really did here was cut up some aloe and peel the skin off with a knife so it's just the gel. At this point you can either blend the stuff up, or infuse it into the water via double boiling and a whisk. I had to do that because my blender is broken :/

After that, I cut up a few aloe slices so I could rub some of the gel on the stems of my girls that were buried with extra soil.

17974847_10210706375728818_1842903376_n.jpg

18009334_10210706376128828_61841659_n.jpg

Just rub some of the gel on the stems and cover with dirt and eventually roots will grow from there. Anyway, that's really all I got done yesterday. Got a couple other photos though.

18009542_10210706376408835_1337141398_n.jpg

18034597_10210706376728843_605980652_n.jpg

And these are just a couple of photos from before adding the coconut water and aloe. Also, you may or may not be able to notice the bottom right plant isn't actually bud but a bell pepper sprout. One of my Jack's didn't make it, so my wife jumped at the chance to put her bell pepper into the pot to take it's place. We'll probably leave it in that pot for the duration of it's life, don't really need too many bell peppers and since we're still newbies with growing veggies AND it's a new environment for us this year is pretty much just going to be more about harvesting knowledge than anything else :p
 
Top