Real Organics

Grandpa GreenJeans

Well-Known Member
Hey there, you mix rock dust/oyster flour with your food before feeding? I have glacial rock dust oyster flour, been feeding strawberries.. Add a real small amount huh?
I'd do yes. I also add oyster, egg and crushed shrimp shells to my container for used coffee grounds. The acidity of the grounds actually helps in softening the shells making it easier for the bacteria to make it juicy and slurpable. Soak some fish bones in vinager and they'll soften up.

The rock dust is minimal in comparison to what I'd put in soil, but it's good for grit too and I think the general health of the worm. Just pay attention to what they eat quickly and what sits around for a while. But also make sure you know the weight of your worms and feed them .5 of their weight daily. Worms that have plenty of space, good temps, fresh air/gas exchange, proper moisture/pH, and their prefered diet will breed like you wouldn't believe. If you provide this then you can add food daily.
 

calliandra

Well-Known Member
You did the right move in saving the bin. Too much moisture OR overfeeding is the cause of anerobic bins. Browns are the key to fixing this. Coco coir, peat, newspaper, burlap, cardboard, potting soil are all browns. When you add too much food and the worms let's say don't like it that much, it builds and spoils, then goes very acidic/anerobic and the bin dies off. This can also invite unfriendly pests like mites, gnats, flys and maggots. Mites especially in very acidic conditions. Oyster shells flour or powdered egg she'll helps buffer the bins pH to neutral.
Temperature is very important too with worms, we want them too breed and eat, and they will as long as the temps remain between 50-80F. Play with small amounts of different food scraps. Worms really like grains, fruit, berries, veggies and melons. Coffee grounds are a favorite for most too. Find what your worms like and they will go crazy multiplying and eating.
Here's some publications I found helpful.
http://www.compostjunkie.com/composting-worms.html#bedding
http://www.wormfarmingrevealed.com/wormfarming.html

I hope I help some
Oh yes, thanks tons! - it's a great help to know I'm going in the right direction, plus your many pointers -- and those resources you linked there look like a great read-in too :D

I checked on the bin this morning and the stink is now subsiding completely and NO more dead worms or runoff in the runoff tray. YAY!
Also, I'm now baking my stash of egg shells so I can grind them easily (no idea where I picked that up lol) and add some to the bin - as to amounts, I'm figuring, sprinkle a handful? Do I just topdress?

The temps in my cellar are around +8°C - that's a bit under 50°F, so a bit cold for them to be active... I think I'll move them into the apartment tonight.

From what I saw, there are probably like 20-30 worms left in there. So my idea is to go easy on them and just leave the bin alone for a week or so before beginning to add more food and allowing them to repopulate. Maybe I'll just add a bit of mycorrhizae that have appeared in my hopefully-to-be-no-till soil. :mrgreen:
2015-11-19_soil-mold.jpg btw. I posted this in another forum ( I haven't ever seen mycos appear on relatively "naked" soil surface like this outdoors, always only under thick mulch - which makes sense - so I was in doubt whether this is a good thing) and was chided for leaving stuff on my soil (and warned Bad Things Will Happen if I don't remove those leaves lol).
As I'm currently a bit insecure of the extent to which I can simply transfer what I do outside to my indoor closet, I quickly fled back to the Organics forum and don't think I'll be going "out there" again until I really know what I'm doing :-P

You see, my original plan was to help my friend multiply her worm population to an extent that I can have a handful and start my own -- to get good EWC for my no-till (snicker snicker!).
I'm currently on my 2nd closet grow (scrogging Northern Lights #5 x Haze) and using my intuition (gathered from growing veggies outdoors on the one hand and reading around extensively in the Organics forum on the other ;) ). I'm using recycled soil from my first grow, and although I didn't add any of the more exotic stuff I've read of in the recipes being posted, the way the girls are doing it seems the soil's ok - whether I get a backlash for my carelessness later on is yet to be seen ;)
Here's how they look right now (day 36 of veg)
2015-11-25_d36_top.jpg Yes, 2 plants in there for ridiculous reasons - something I won't be doing again haha

Cheers!
 

Grandpa GreenJeans

Well-Known Member
Worms are so awesome, its amazing what they can shred and how they turn a pathogenic mess into useful compost... The digestive action of the worms reduces pathogens,(like e. coli) so.. healthy and well aerated soil has lots of worms...
I've seen alot of people putting worms in the ROLS. I'm in the process of working on a 5 tier wooden farm, and when I have to dump my Rubbermaid, I'm thinking I'll throw a handful of worms in each of the 20 gallon smart pots I have.
I just love mother nature's way!
 

Grandpa GreenJeans

Well-Known Member
Oh yes, thanks tons! - it's a great help to know I'm going in the right direction, plus your many pointers -- and those resources you linked there look like a great read-in too :D

I checked on the bin this morning and the stink is now subsiding completely and NO more dead worms or runoff in the runoff tray. YAY!
Also, I'm now baking my stash of egg shells so I can grind them easily (no idea where I picked that up lol) and add some to the bin - as to amounts, I'm figuring, sprinkle a handful? Do I just topdress?

The temps in my cellar are around +8°C - that's a bit under 50°F, so a bit cold for them to be active... I think I'll move them into the apartment tonight.

From what I saw, there are probably like 20-30 worms left in there. So my idea is to go easy on them and just leave the bin alone for a week or so before beginning to add more food and allowing them to repopulate. Maybe I'll just add a bit of mycorrhizae that have appeared in my hopefully-to-be-no-till soil. :mrgreen:
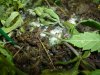
View attachment 3551105 btw. I posted this in another forum ( I haven't ever seen mycos appear on relatively "naked" soil surface like this outdoors, always only under thick mulch - which makes sense - so I was in doubt whether this is a good thing) and was chided for leaving stuff on my soil (and warned Bad Things Will Happen if I don't remove those leaves lol).
As I'm currently a bit insecure of the extent to which I can simply transfer what I do outside to my indoor closet, I quickly fled back to the Organics forum and don't think I'll be going "out there" again until I really know what I'm doing :-P

You see, my original plan was to help my friend multiply her worm population to an extent that I can have a handful and start my own -- to get good EWC for my no-till (snicker snicker!).
I'm currently on my 2nd closet grow (scrogging Northern Lights #5 x Haze) and using my intuition (gathered from growing veggies outdoors on the one hand and reading around extensively in the Organics forum on the other ;) ). I'm using recycled soil from my first grow, and although I didn't add any of the more exotic stuff I've read of in the recipes being posted, the way the girls are doing it seems the soil's ok - whether I get a backlash for my carelessness later on is yet to be seen ;)
Here's how they look right now (day 36 of veg)
View attachment 3551120 Yes, 2 plants in there for ridiculous reasons - something I won't be doing again haha

Cheers!
I'm sorry I should have mentioned to bake all egg and shrimp shells. The egg shells become very brittle and crush up easily.
In my experience any shells take longer to disappear unless they are well powdered or finley crushed.
No not a handfull, you only have minimal amount of worms so they won't be eating that much. Start out lite and increase the amount of food you give based on how fast it disappears. Grow your population first. Always cover up your food additions, worms feed from underneath.

Nice, I love it when I see nice white puffy mycelium. I don't believe it's of benifit in the worm bin as vermicomposting is a bacterial dominated function. In my bins I've always seen the food scraps get gooey and this is what the worms slurp up. I've never seen any mycelium growing. My soil tho, that's another story. I'd go and grab that puff of mycelium and throw it in when you brew AACT. I've been known to colonize organic items like leaves, stems, barley, rye berries, spelt, red wheat and oat goats first in a separate Styrofoam container and toss in the AACT. Why wait for spores to germinate right.

Proceeding with caution is a good idea when introducing anything outdoors to indoors. You don't know what's hiding, and in a closet sized grow you could be biting off more than you can chew if problems arise. But your plants look very nice and healthy, and from the picture I'd say you should have no problems flowering out. The exotic shit is not needed. Everyone has their way and others like to step outside the box and add a buffet of ammendments. Provide the basic NPK- CA Mg Su- trace and you'll be fine. They really do look great!!!
 

Vnsmkr

Well-Known Member
I've seen alot of people putting worms in the ROLS. I'm in the process of working on a 5 tier wooden farm, and when I have to dump my Rubbermaid, I'm thinking I'll throw a handful of worms in each of the 20 gallon smart pots I have.
I just love mother nature's way!
I had red wrigglers in some of my 1 gallon pots. But doesnt the forest floor have worms? Theres your answer ;)
 

Grandpa GreenJeans

Well-Known Member
I'm a tad disgruntled today, I noticed in one of my 20gal fabrics a cantaloupe seedling sprouted. (Cantaloupe was in the bokashi I made). However when I went to pluck it out, I noticed a tiny green speck on the stem just under the cots. It was a fucking green pear aphid. Just 1, but that don't mean shit as I know we'll enough that they asexual reproduce and can give live birth 20 times per day. In addition to this I also noticed (after roughing up the surface of the 20 gal pot) a tiny worm. I inspected my sticky traps and confirmed fungus gnats, pulled out the 30x's loop and sure enough, it's gnat larvae. I'm not fucking happy at all!! Gonna have to run out and grab some DE, BTI and imidacloriprid (pyrithium). I hope the hydro shop is open today.

I inspected every leaf on all the seedlings and their good, no sign of aphids. Also the auto is good to but there's alot of leafs and she's in tone flower phase sonics just DE, BTI and neem for her followed by a 2 " layer of sand on top.
 

calliandra

Well-Known Member
I'm sorry I should have mentioned to bake all egg and shrimp shells. The egg shells become very brittle and crush up easily.
In my experience any shells take longer to disappear unless they are well powdered or finley crushed.
No not a handfull, you only have minimal amount of worms so they won't be eating that much. Start out lite and increase the amount of food you give based on how fast it disappears. Grow your population first. Always cover up your food additions, worms feed from underneath.

Nice, I love it when I see nice white puffy mycelium. I don't believe it's of benifit in the worm bin as vermicomposting is a bacterial dominated function. In my bins I've always seen the food scraps get gooey and this is what the worms slurp up. I've never seen any mycelium growing. My soil tho, that's another story. I'd go and grab that puff of mycelium and throw it in when you brew AACT. I've been known to colonize organic items like leaves, stems, barley, rye berries, spelt, red wheat and oat goats first in a separate Styrofoam container and toss in the AACT. Why wait for spores to germinate right.

Proceeding with caution is a good idea when introducing anything outdoors to indoors. You don't know what's hiding, and in a closet sized grow you could be biting off more than you can chew if problems arise. But your plants look very nice and healthy, and from the picture I'd say you should have no problems flowering out. The exotic shit is not needed. Everyone has their way and others like to step outside the box and add a buffet of ammendments. Provide the basic NPK- CA Mg Su- trace and you'll be fine. They really do look great!!!
Ah!! good thing I checked back here before running downstairs with the eggshell-meal :D
A sprinkle it will be for starts, and no fungi.

I'm starting to get skippity excited about exploring the ins and outs of AACT too - makes total sense what you're saying about adding the mycos there!

I'm soo glad I decided to go no-till so soon - what an enriching adventure this is!
And how great to be able to learn from your experience in the process! Thanks!
 

Grandpa GreenJeans

Well-Known Member
I use neem cake pellets in all my pots deeper down layered in
I wanted to add need cake this round but I have to order it online as my hydro shop doesn't carry much in the relm of organic ammendments. Lots and lots of bottle tho-lol so I opted for the hydrobolic clarified neem extract for foliar use.
 

Grandpa GreenJeans

Well-Known Member
Ah!! good thing I checked back here before running downstairs with the eggshell-meal :D
A sprinkle it will be for starts, and no fungi.

I'm starting to get skippity excited about exploring the ins and outs of AACT too - makes total sense what you're saying about adding the mycos there!

I'm soo glad I decided to go no-till so soon - what an enriching adventure this is!
And how great to be able to learn from your experience in the process! Thanks!
That's exactly why I started this thread. I have alot of experience and knowledge to share but I'm not a master by any means. We can all grow and learn together, as your only as strong as your weakest link.
I'm glad your worm bin is comming around again. It's so rewarding to me to be able to DIY and see results all while learning and gaining experience.
 

Grandpa GreenJeans

Well-Known Member
I've been cooking since 5:30 am and figured I'd bake some shrimp shells and knock out some worm food in the champion juicer with all my scraps.
Got 5 lbs of shrimp to make and bake. Some shells for the worms to put through the juicer and the rest is for transplanting. Happy Thanksgiving all!20151126_112334.jpg 20151126_114203.jpg 20151126_113325.jpg 1448560224698.jpg
 

Grandpa GreenJeans

Well-Known Member
I stay busy, all thanks to my juicer.
First I'll prepare all my ingredients
20151127_075150.jpg


Then I use a turn crank sifter for homemade marine meals. I want powder not flakes.
20151127_075222.jpg 20151127_075358.jpg

The juicing takes less time than the preperation as this champion juicer is a maceration beast!!

20151127_081852.jpg

A high quality maceration juicer will make pomace that looks like this. Very little liquid is left in the pomace and has a fairly dry texture.
20151127_081705.jpg


Mmmmmmm, all that nutritive juice. I'm not drinking it, but I'm sure it will make a very nice liquid fertilizer via fermentation.
All those natural sugars!!!!
20151127_081657.jpg


So here's the final volume of pomace. This is extremely nutritious also, and with all this surface area, these scraps don't have to be frozen first. They disappear fast in the bin!

20151127_084233.jpg


I filled up a full coffee can with the juice. It's already loaded with fungi and bacteria as these scraps were starting to spoil and that's why I used them. Durring fermentation the enviroment that was once suitable for microbes, now becomes inhospitable and they retreat into spore and cyst form. They'll reawaken once conditions are favorable. Ie... diluted and feed to soils where the pH is ideal.


The juice has to sin in the fridge so the foam settles. Otherwise with all that 02 incorporated, not only will fermentation be delayed because fermentation is an anerobic process, but also it will overflow out of the fermentation vessel as C02 is a byproduct.

20151127_084302.jpg

Nothing goes to waste!! Reduce, reuse, recycle.
 

Grandpa GreenJeans

Well-Known Member
Seedlings are growing better now. I was forced to spray them with Azamaz and soil drenched them as I'm finding several pests from my outdoor compost I used in their mix. Aphids, gnats and I'm pretty sure I saw a couple mites crawling around in the soil.
I use several different approaches in my IPM program. Botanical, Biological and synthetic systemic.

Some will argue that the buds will have pesticides in them if you aren't 100% organic. However I'm not the guy you want to be arguing with about pesticides. ALL pesticides have a "half life" in soil as opposed to foliar, and there are factors that can futher reduce this residual half life".

I have a 30 day "half life" for my synthetic. So opted to use bifenthrin as a soil drench on the 20 gal fabrics. I actually used 3 approaches for the soil drench. I prefer multiple modes of action such as,...
Botanicals
**Anti-Feedant**
Insects feed less or not at all on treated plants. Foliage is not damaged and insects ultimately starve to death.

**Insect Growth Regulator (IGR)**
Insects fail to mature and reproduce eliminating populations over time.

**Anti-ovipostitory**
Insects do not lay eggs on trees and plants. The likelihood of insect infestation is greatly decreased in treated plants. This adds a preventitive aspect to your IPM program.

**Repellent**
Insects prefer untreated plants

Biological treatment relies on bacteria or fungi. I choose Bacillus Thungernous as its renowned for entering the pest and exploiting it from the inside out, thus effectively killing all that it come in contact with, and larvae. Exception for benificial insects, it doesn't harm them.

And finally a broad spectrum systemic/ contact treatment that kills on contact by absorbing through the exoskeleton or being ingested.
I like pyrethroids and Imidacloriprid. Both have a time window to be used and this is critical for safe harvests. Hit them when their young and they will outgrow the synthetic systemic treatment and this is where the botanical and biological treatment will pick up and excel.

They're starting to take off now...
1448718980530.jpg
 

Grandpa GreenJeans

Well-Known Member
I like to refer to the terminology Death drench and Life drence.
The death drench is exactly just that, it kills all microbes and insects, including benificials. However this is completely un-condusive to organic growing as the plants rely on aerobic microbes to break down and assimilate nutrients for them.

After the death drench, you let the soil dry out as much as possible without stressing the plant and depriving of needed water. Then comes the life drench, and it's just AACT. Restore the benificials and increase the enzymes within the soil. Enzymes help clean the soil and they will very effectively reduce/remove any residual traces of the death drench.

Once you get to the life drench stage, your pest problems and plant vigor will improve.
 

Grandpa GreenJeans

Well-Known Member
Back to the organic/veganic--

I have some solids that were processed with the pomace, these are contained mainly within the foam that still resides. That's ok because it's all going to be liquid when it's done.

I'm topping off the fermentation vessel with coconut water and adding some more natural sugars for a continued energy source for the EM and mostly for ensuring a complete fermentation/extraction of all nutrients, vitamins, amino acids. By ensuring a complete depletion of all exhaust able values, the extract is now considered "stable" and has a shelf life of 6months to 1 year, if stored in a cool dry, dark place.

**Note**
If you don't "finish" the fermentation it could explode when sealed, as co2 is a byproduct durring active fermentation.

Ferment in a likewise place as you would for storage. I have found fermentation can be enhanced to finish early if in warmer temps, but I prefer a longer contact... it makes me feel better I guess and my plants like it. 2-3 weeks is average from start to finish but depending on ingredients, sucrose levels, surface area of ingredients and temps it could take 4-6 weeks. Always make sure you lid is cracked so C02 can escape but nothing can enter. (Like bugs)
1448723793935.jpg
 

Kind Sir

Well-Known Member
Back to the organic/veganic--

I have some solids that were processed with the pomace, these are contained mainly within the foam that still resides. That's ok because it's all going to be liquid when it's done.

I'm topping off the fermentation vessel with coconut water and adding some more natural sugars for a continued energy source for the EM and mostly for ensuring a complete fermentation/extraction of all nutrients, vitamins, amino acids. By ensuring a complete depletion of all exhaust able values, the extract is now considered "stable" and has a shelf life of 6months to 1 year, if stored in a cool dry, dark place.

**Note**
If you don't "finish" the fermentation it could explode when sealed, as co2 is a byproduct durring active fermentation.

Ferment in a likewise place as you would for storage. I have found fermentation can be enhanced to finish early if in warmer temps, but I prefer a longer contact... it makes me feel better I guess and my plants like it. 2-3 weeks is average from start to finish but depending on ingredients, sucrose levels, surface area of ingredients and temps it could take 4-6 weeks. Always make sure you lid is cracked so C02 can escape but nothing can enter. (Like bugs)
View attachment 3552604
I got vita coco, tried it on my plants yesterday. Filled up gallon of h20 and dumped a whole bottle in.
 
Top