Other Side of the Fence...Where the Grass is Always Greener

jondamon

Well-Known Member
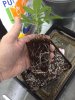
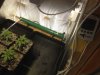
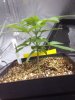
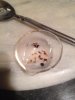
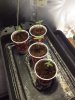
Here's a little update on the seedlings from yesterday.

I haven't been back in the room until last night.

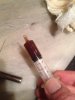
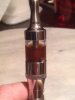
Yesterday was their first feeding at 0.6EC of base nutes.

So to recap.

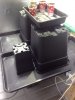
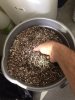
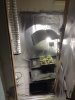
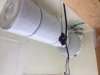
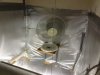
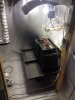
I placed dry seeds into wet coco and put them under my 400w MH. The 400 has been kept around 2ft off the top of the pots.

You can now see its about 12" off the tops.

Many people wonder why I use MH from the get go and to be honest its built out of laziness on my part.

I can't be bothered getting my 24w T5 out of the shed lol.

Yes I'm using more watts than needed but who cares. Lol.


J
 

Attachments

jondamon

Well-Known Member
Man o man we'd slipped back to page 7.

Sorry guys I can't allow that to happen.

So the pics above were Thursday last week.

Pics below are today as of 10mins ago.


All in the same position.

2 back critical+
Middle HSO blue dream
Front auto MOBY dick.


You'll notice the HSO BD has had to be supported she got blown over with the wind from my fan. Poor girl. But she's still doing fine.

Plants are currently being fed every 2 days with EC0.7. PH probably around 6.4 right now going in as I'm not too concerned with pH at present.


Enjoy.


J

P.s don't worry everyone I'll keep this thread alive with updates here and there.
 

Attachments

jondamon

Well-Known Member
Here are some pics from this evening showing my transplanting etc.

I use around 25% perlite with my coco.

No prewash or anything just EC 0.9 of nute mix with 20% runoff.

I fill up my new pots and then back fill around a current pot to create a perfect hole. Then bed them in and water them.

I've included a pic of 2 black pots 1 small 1 large.
The smaller one is the pot being used to move up from the Dixie cup now its about 4litres in size I think (15cmX15cmx20cm).
The larger will be my next transplant and final pot. 18litres. These are bigger than I normally use (11L).

I've got quite a few pics so I'll attach as many as possible per message.

I've also included pics of my room incase there are those watching who haven't seen how my room is setup.


Enjoy.


J
 

Attachments

Last edited:

jondamon

Well-Known Member
I guess it's just you and i for now.
Looks like they didn't miss a beat after the
transplanting.
Looking good J!

CHEERS B.


By back filling around the pot it really helps to lower transplant shock.

If you don't normally transplant this way try it if you can.

The roots are exposed for about 5seconds. Or a little longer in my case for the picture. Lol.

Yeah just seems to be me and thee. Lol.

We'll keep it going.


Hopefully my next update will be me making QWISO oil along with a vape juice out of said oil.


Hmmm can't wait.


J
 

B166ER420

Well-Known Member
CHEERS B.
Hopefully my next update will be me making QWISO oil along with a vape juice out of said oil.
Hmmm can't wait.
J
Lol...backfilling your transplants?Dont we all do it that way?I also put a drop or two of clonex jel in my spray bottle and mist the rootball before i set it in.

I would like to know your process as i believe i am the qwiso king;) and would like to start making my own qwiso hash oil for vaping.I believe I have made up my mind and am going to buy the volcano brand inferno vape pen.
www.volcanoes.com/compare-starter-kits
I have been smoking qwiso hash for the past 2 weeks...no flowers!My pipe doesn't get dirty,so i know my lungs aren't.The house doesn't reek to high heaven like a skunk or other.I don't cough up a lung after a good hit and after only two or three puffs,i'm good.Have you made oil or "e-juice" before??I've only just started researching how to make hash oil and would like to know how you do it and if it works out for you.Peace
 

jondamon

Well-Known Member
Lol...backfilling your transplants?Dont we all do it that way?I also put a drop or two of clonex jel in my spray bottle and mist the rootball before i set it in.

I would like to know your process as i believe i am the qwiso king;) and would like to start making my own qwiso hash oil for vaping.I believe I have made up my mind and am going to buy the volcano brand inferno vape pen.
www.volcanoes.com/compare-starter-kits
I have been smoking qwiso hash for the past 2 weeks...no flowers!My pipe doesn't get dirty,so i know my lungs aren't.The house doesn't reek to high heaven like a skunk or other.I don't cough up a lung after a good hit and after only two or three puffs,i'm good.Have you made oil or "e-juice" before??I've only just started researching how to make hash oil and would like to know how you do it and if it works out for you.Peace

I've made air dried QWISO before but never cooked off the alcohol.

This is the tutorial I'll be following.

https://www.rollitup.org/t/iso-extractions-by-_oakley_.489366/

Never made an ejuice before either.

But I've got my 99% ISO in the deep freeze (been there since Sunday) along with about 7g of dried and cured Caramelo in there too.

I've got some MPG pharma grade.

Some pyrex dishes and beakers, strainers, just waiting on my unbleached filters to arrive then I'm set.

The mrs wants me to cook it in the shed though so that the house doesn't reak like a hospital lol.

If I can get 0.5g out of the 7g I'll make a 5ml MPG and QWISO juice to try.

I'm currently just using an eGo C-twist with Kanger protank3 for vaping.

I tried the globe atomizers for flowers and waxes etc I've tried the cloutank m3 for flowers.

Now I want to try my hand at QWISO oil and vape juicing it.

Then I may turn 8oz or so of my next harvest into oil.


J
 

B166ER420

Well-Known Member
Right on,brother J!
That's a good method to follow.
My only suggestions are that those paper filters are not the best method of filtering as they trap a lot of the goods...terpenes and other essential oils we want for flavor.I use stainless steel filters,they even have some on Amazon for our purposes...hash making.
Also freezing your material is a good idea... but for two weeks!
Hell,I don't even freeze my material anymore as it lets condensation leak into my iso.To be honest I can't wait for winter to make some iso hash runs outside in the cold.I DO put the alcohol in the freezer for a day or so just to make sure it's cold as possible.
I setup my filters over my 9x12 Pyrex dish,put my buds,trim in a gallon size freezer bag.Then pour in just enough chilled iso to cover,mix it around for about 20-30 seconds,snip the corner and drain it through my filter setup,squeezing out every last drop of iso.Then let it evaporate at room temp in my homemade quick evaporating container.I do half ounce of material runs and get about 2-3 grams of iso hash.
 

jondamon

Well-Known Member
Right on,brother J!
That's a good method to follow.
My only suggestions are that those paper filters are not the best method of filtering as they trap a lot of the goods...terpenes and other essential oils we want for flavor.I use stainless steel filters,they even have some on Amazon for our purposes...hash making.
Also freezing your material is a good idea... but for two weeks!
Hell,I don't even freeze my material anymore as it lets condensation leak into my iso.To be honest I can't wait for winter to make some iso hash runs outside in the cold.I DO put the alcohol in the freezer for a day or so just to make sure it's cold as possible.
I setup my filters over my 9x12 Pyrex dish,put my buds,trim in a gallon size freezer bag.Then pour in just enough chilled iso to cover,mix it around for about 20-30 seconds,snip the corner and drain it through my filter setup,squeezing out every last drop of iso.Then let it evaporate at room temp in my homemade quick evaporating container.I do half ounce of material runs and get about 2-3 grams of iso hash.

I'll probably try it your way next time.

Here are some pics.

I harvested about 0.3g from my pyrex beaker (Stupid mistake not having a larger pyrex dish) it was difficult to say the least to get the last few blobs of oil out if the beaker.

So after it had cooled slightly I set up a double boil saucepan and set about making my ejuice.

I got my oil in the little pyrex glass and added 3ml of PG to it and heated it up.


Here's the results.


J


To be fair considering there's so little oil in 3ml of juice it knocks me about.

Its not the greatest tasting in the world but then caramelo wasn't great tasting either. As my mum would say, you can't get pears off plum trees.

But for my first ever attempt at it I'm pretty impressed.

Next round I will use a larger finishing pyrex dish rather than the beaker. As it was very difficult to scrape the beaker ( for some reason I thought I may be able to pour the mix out) anyways enjoy.


J
 

Attachments

jondamon

Well-Known Member
Here's a little update.

All photoperiod plants got topped today at the first 7 bladed leaf set. Leaving the 7 bladed leaves intact and exposing the new growth underneath.

I'm going to be mainlining these 3 for 4 heads.

I've tried mainline training at the 3 blade, 5 blade and now at the 7 bladed leaf set.


I took the tops and have them in plain coco that was watered with straight tap water, sitting in a prop just off to the side of the 4 plants.

I've also began a little LST training on the AUTO MOBY DICK.

This is mainly so that I can control its height while still vegging the photos.

In 2 days I will strip lower growth on the girls to be mainlined.

Then begin the LST work to create the manifold system.

Next weekend I will most likely transplant everything including the auto into the final 18L pots.

Auto has begun flowering now too.

All plants are currently being fed with EC0.9 of my base A/B.


Enjoy.


J
 

Attachments

jondamon

Well-Known Member
Here's a little update.

Pics taken on Friday.

Transplanting in approx 7 hours into the biggest containers I have ever used. 18L.


Auto MOBY is well on its way flowering. I've LST'd a little to control height.

All plants are currently being fed EC 1.1.

J
 

Attachments

Top