pHarmerXxLEDxX
Active Member
Veg update:
Golden Goat mother is desperately needing to be transplanted and trained out!! She is the tallest girl in the garden due to the fact that I cant train her since she is in an awkwardly shaped plastic pot. She will be transplanted into a 7gal fabric pot as soon as the pot becomes available, my last flowering GSC in my 2x4 area is currently occupying it. Should be able to transplant by this weekend though as the GSC is ready to be chopped! I went ahead and top dressed her with about an inch of Vermicompost so she should be just fine until then.
![IMG_20150414_220510_402[1].jpg](/data/attachments/2497/2497232-49e5e2c8052bfda8c2640fe147715ff0.jpg)
Transplanted one of the GSC's in the 1gal pot into a 7gal pot, will be training her out in the next few days. For now I am letting her get used to the transplant and begin to grow again before I do any training.
![IMG_20150414_220544_728[1].jpg](/data/attachments/2497/2497234-e779ab17c3bce044907b64cb1be0d597.jpg)
The other GSC in the 1gal pot is doing fine, going to be keeping her around sort of as a "back up" plant if anything happens to the other GSC girls. I just transplanted one and will be flipping the other to flower so its good to keep extras if you don't plan on cloning the specific cultivar for the upcoming run.
![IMG_20150414_220554_652[1].jpg](/data/attachments/2497/2497235-2416244725cf416322f24fdbff1c66f2.jpg)
The 7gal No-Tills are doing great! The GSC is ready to be flipped to flower and will be moved over here soon. Waiting until I can pick up another Corrugated L piece of steel to hang the lights and I will hang a 260 and flip her to flower.
![IMG_20150414_220521_989[1].jpg](/data/attachments/2497/2497233-0a529eb582bd7cd6423933fedeaf5fb0.jpg)
Bodhi Pura Vida clone is getting nice a bushy, going to train her out a bit and am considering even using her in a SCROG but we shall see!
![IMG_20150414_220647_628[1].jpg](/data/attachments/2497/2497236-0163f7aaf9b04fadc306fb342fa265ee.jpg)
![IMG_20150414_220729_626[1].jpg](/data/attachments/2497/2497237-b56f49b50593e027fcfb3398597dfd18.jpg)
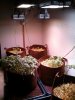
Group shot, still using a single SolarSPEC-260 to cover a 4x4 area. Top dressed everything with an inch layer of Vermicompost.
![IMG_20150414_220744_559[1].jpg](/data/attachments/2497/2497239-33df9db7b81e237ed774f6c392e46118.jpg)
I did a test after reading this article:
http://www.sciencedaily.com/releases/2012/07/120701191636.htm
"Plant scientists have imaged and analyzed, for the first time, how a potted plant's roots are arranged in the soil as the plant develops. In this study, to be presented at the Society for Experimental Biology meeting on 30th June, the team has also found that doubling plant pot size makes plants grow over 40% larger. From their 3-D MRI root scans, the researchers observed that potted plants quickly extend their roots to the pot's walls. It is likely that the plants use their roots to 'sense' the size of the pot, although the details of how the roots relay the message about the pot's size remain the plants' secret. They also looked at 65 independent studies across a wide range of species including tomato, corn, pine tree, cactus, wheat, and cotton plants, and found that all species reach larger sizes when grown in a bigger pot. On average, doubling pot size allowed plants to grow 43% larger."
I took two GSC clones taken from the same mother and the same time and planted at the same time in the same soil. They have been given the exact same thing and have been growing the exact same time. Only difference is one was planted into a 1gal Smart Pot, the other, into a 7gal GeoPot.
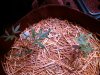
Here is the 1gal Smart pot Transplanted on Jan 5th after a 100day Veg, this shot was taken before transplanting her into a 7gal GeoPot to train her out and continue with her growth:
![IMG_20150414_195041_600[1].jpg](/data/attachments/2497/2497252-c289b1835be536e75f897aaef18b25c0.jpg)
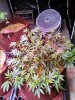
Here is the 7gal GeoPot Transplanted on Jan 5th after a 100day Veg:
![IMG_20150414_195434_309[1].jpg](/data/attachments/2497/2497256-2cd599159e9e73b60d42efa367e8c0ef.jpg)
![IMG_20150414_195452_513[1].jpg](/data/attachments/2497/2497254-39b64cf787fb94d4c27940e317c080d9.jpg)
It was as the article said, about a 40% difference in plant size just from using a bigger pot! After seeing these results I am now moving up to 25gal Root Pouches and they will all be No-Tills. So I will just drop in a clone from a small 2" x 2" square pot into a 25gal pot and the rest is up to the training, lights, and soil!
Golden Goat mother is desperately needing to be transplanted and trained out!! She is the tallest girl in the garden due to the fact that I cant train her since she is in an awkwardly shaped plastic pot. She will be transplanted into a 7gal fabric pot as soon as the pot becomes available, my last flowering GSC in my 2x4 area is currently occupying it. Should be able to transplant by this weekend though as the GSC is ready to be chopped! I went ahead and top dressed her with about an inch of Vermicompost so she should be just fine until then.
Transplanted one of the GSC's in the 1gal pot into a 7gal pot, will be training her out in the next few days. For now I am letting her get used to the transplant and begin to grow again before I do any training.
The other GSC in the 1gal pot is doing fine, going to be keeping her around sort of as a "back up" plant if anything happens to the other GSC girls. I just transplanted one and will be flipping the other to flower so its good to keep extras if you don't plan on cloning the specific cultivar for the upcoming run.
The 7gal No-Tills are doing great! The GSC is ready to be flipped to flower and will be moved over here soon. Waiting until I can pick up another Corrugated L piece of steel to hang the lights and I will hang a 260 and flip her to flower.
Bodhi Pura Vida clone is getting nice a bushy, going to train her out a bit and am considering even using her in a SCROG but we shall see!
Group shot, still using a single SolarSPEC-260 to cover a 4x4 area. Top dressed everything with an inch layer of Vermicompost.
I did a test after reading this article:
http://www.sciencedaily.com/releases/2012/07/120701191636.htm
"Plant scientists have imaged and analyzed, for the first time, how a potted plant's roots are arranged in the soil as the plant develops. In this study, to be presented at the Society for Experimental Biology meeting on 30th June, the team has also found that doubling plant pot size makes plants grow over 40% larger. From their 3-D MRI root scans, the researchers observed that potted plants quickly extend their roots to the pot's walls. It is likely that the plants use their roots to 'sense' the size of the pot, although the details of how the roots relay the message about the pot's size remain the plants' secret. They also looked at 65 independent studies across a wide range of species including tomato, corn, pine tree, cactus, wheat, and cotton plants, and found that all species reach larger sizes when grown in a bigger pot. On average, doubling pot size allowed plants to grow 43% larger."
I took two GSC clones taken from the same mother and the same time and planted at the same time in the same soil. They have been given the exact same thing and have been growing the exact same time. Only difference is one was planted into a 1gal Smart Pot, the other, into a 7gal GeoPot.
Here is the 1gal Smart pot Transplanted on Jan 5th after a 100day Veg, this shot was taken before transplanting her into a 7gal GeoPot to train her out and continue with her growth:
Here is the 7gal GeoPot Transplanted on Jan 5th after a 100day Veg:
It was as the article said, about a 40% difference in plant size just from using a bigger pot! After seeing these results I am now moving up to 25gal Root Pouches and they will all be No-Tills. So I will just drop in a clone from a small 2" x 2" square pot into a 25gal pot and the rest is up to the training, lights, and soil!
![IMG_20150414_220827_812[1].jpg](/data/attachments/2497/2497285-327c980ed7e25b7a93c5a53afe59540e.jpg)
![IMG_20150414_220851_660[1].jpg](/data/attachments/2497/2497287-c4a72b1e5d628b7e8079b81e63ede037.jpg)
![IMG_20150414_220959_027[1].jpg](/data/attachments/2497/2497290-1e1ce8dd17ab30c7f785704828a1ac2a.jpg)
![IMG_20150414_221445_427[1].jpg](/data/attachments/2497/2497291-296b8e5caabe11aba04bbede5abff050.jpg)
![IMG_20150414_215616_918[1].jpg](/data/attachments/2497/2497294-b07d02569e660a8a4c72ef6969166d7d.jpg)
![IMG_20150414_215659_598[1].jpg](/data/attachments/2497/2497295-b51630ac862d5cc8de10459d6ee18c4b.jpg)
![IMG_20150414_215736_445[2].jpg](/data/attachments/2497/2497297-0aa80b01d4323269507400564a8aa5d5.jpg)
![IMG_20150414_220009_445[1].jpg](/data/attachments/2497/2497298-fb48418feee48f4d5b7be2833040fb87.jpg)
![IMG_20150414_220107_781[1].jpg](/data/attachments/2497/2497299-c473f0373d2995972324ecf22f657426.jpg)
![IMG_20150414_220445_307[1].jpg](/data/attachments/2497/2497301-29bf35aa418986a756fda149e4e07b42.jpg)
![IMG_20150418_185908_279[1].jpg](/data/attachments/2498/2498361-8a70668111b6cf4a9f554bfc796bc953.jpg)
![IMG_20150418_190204_554[1].jpg](/data/attachments/2498/2498367-9a6433459a8e9d49b652fd1ea7f16d15.jpg)
![IMG_20150418_190303_248[1].jpg](/data/attachments/2498/2498368-a3fc574242aa50cedb7391605722c0f7.jpg)
![IMG_20150418_190315_181[1].jpg](/data/attachments/2498/2498369-ecdb48ad31140f097772efc8499b1000.jpg)
![IMG_20150418_191159_971[1].jpg](/data/attachments/2498/2498370-b24b2c474fd6dd9451480b7e26e5b4f4.jpg)
![IMG_20150418_190414_401[1].jpg](/data/attachments/2498/2498371-ce85a6c844d4d6341b1bfca7e461f9d3.jpg)
![IMG_20150418_191613_960[1].jpg](/data/attachments/2498/2498372-7384a6202eb58131967f33fc24c79ba6.jpg)
![IMG_20150418_191633_422[1].jpg](/data/attachments/2498/2498373-fbfb0eb355eb0d3d8c9696272c3ee3a2.jpg)
![IMG_20150418_192359_858[1].jpg](/data/attachments/2498/2498374-6c9a290a08a23d399ccad58b2a67bd6d.jpg)
![IMG_20150418_214610_363[1].jpg](/data/attachments/2498/2498391-5c606cdb966e03bfe87e75845cde69cd.jpg)
![IMG_20150419_010857_992[1].jpg](/data/attachments/2498/2498394-d629b7e2ef8d141d27879bd5c38d62eb.jpg)
![IMG_20150419_010930_338[1].jpg](/data/attachments/2498/2498397-d610fdacdc2748dc0adfd64a717dcd4d.jpg)
![IMG_20150419_011010_915[1].jpg](/data/attachments/2498/2498403-9674536cf380f264fc9ad10fe8a46184.jpg)
![IMG_20150419_010940_718[1].jpg](/data/attachments/2498/2498399-f21cf805a236ea78d820b5e52bd0eda8.jpg)
![IMG_20150419_010958_477[1].jpg](/data/attachments/2498/2498401-3c7553471bd5d721e4ec80a8ae4b863b.jpg)
![IMG_20150418_220917_551[1].jpg](/data/attachments/2498/2498393-060df8b8d2503df0ec74879d5f0d9d0f.jpg)
![IMG_20150419_010916_782[1].jpg](/data/attachments/2498/2498395-e0c5c315a8b23bae8af8f2c71427e2f8.jpg)
![IMG_20150419_011125_964[1].jpg](/data/attachments/2498/2498404-eebbc029f1e8e82cd8ca760a0548192e.jpg)
![IMG_20150419_011312_988[1].jpg](/data/attachments/2498/2498405-ed911866b243646b2beb07ed3750ab09.jpg)
![IMG_20150428_145013_404[1].jpg](/data/attachments/2507/2507215-dabfa5336e860bb9be5ae2265cc1d4d6.jpg)
![IMG_20150428_165036_896[1].jpg](/data/attachments/2507/2507216-27c70ff8f7faa3761beca92116b4865a.jpg)
![IMG_20150428_170150_939[1].jpg](/data/attachments/2507/2507217-d631ef03ecc821785061375ba0f443bd.jpg)
![IMG_20150428_170215_966[1].jpg](/data/attachments/2507/2507218-e5d898750a00e935c57e9dc352011690.jpg)
![IMG_20150428_170657_056[1].jpg](/data/attachments/2507/2507219-3c9dd625865b6e6f1086f7faf34c9beb.jpg)
![IMG_20150428_231437_046[1].jpg](/data/attachments/2507/2507220-072339e6db6fa743ba7f0566339cba55.jpg)
![IMG_20150428_231523_964[1].jpg](/data/attachments/2507/2507221-02c4725b0ae7c6fb51e3dc7d9c53a8c5.jpg)
![IMG_20150428_231547_506[1].jpg](/data/attachments/2507/2507225-31f4a0cedb769b74ae1628dabe8b92ff.jpg)
![IMG_20150428_231537_029[1].jpg](/data/attachments/2507/2507222-e674132967fea9986c5f64ac59510703.jpg)
![IMG_20150428_231557_234[1].jpg](/data/attachments/2507/2507226-23cf19133471cbe11edd5942f8a990bf.jpg)
![IMG_20150428_225132_841[1].jpg](/data/attachments/2507/2507243-dc1c515d4ddfb154f9ef96e315458b70.jpg)
![IMG_20150428_225219_102[1].jpg](/data/attachments/2507/2507248-d0e4e4516bdfca51b6b65c071685bbbd.jpg)
![IMG_20150428_225316_239[1].jpg](/data/attachments/2507/2507249-cbdab9da50bf942baf810e6af21a4727.jpg)
![IMG_20150428_225347_769[1].jpg](/data/attachments/2507/2507250-32c6cfbcd23b667b7f0d541121daa4e0.jpg)
![IMG_20150428_225416_773[1].jpg](/data/attachments/2507/2507251-f90fad1a01dd1a75e45d2e728edb992c.jpg)
![IMG_20150428_225449_551[1].jpg](/data/attachments/2507/2507252-ef8c5e40df6f881134de7957c0261962.jpg)
![IMG_20150428_225545_558[1].jpg](/data/attachments/2507/2507253-df323ef5d068d082e35bd9de5bca5760.jpg)
![IMG_20150428_230720_579[1].jpg](/data/attachments/2507/2507254-4ff0dc5fa22ce9f37268e66ead52a433.jpg)
![IMG_20150428_230835_607[1].jpg](/data/attachments/2507/2507255-357424e8da566c212e42cea48b1d5dea.jpg)
![IMG_20150428_231248_734[1].jpg](/data/attachments/2507/2507256-36efb45e5ed2bd12b6f73de2f9e93412.jpg)
![IMG_20150523_210601_707[1].jpg](/data/attachments/2530/2530118-4c868e34ab34095c4a36753611cdafa9.jpg)
![IMG_20150523_210706_405[1].jpg](/data/attachments/2530/2530119-3ca1441b2b573c6ae3b29306237c0f97.jpg)
![IMG_20150525_244753_450~2[1].jpg](/data/attachments/2530/2530128-b4a195a3a1504b0c4ef289214d08f973.jpg)
![IMG_20150525_244800_749[1].jpg](/data/attachments/2530/2530124-8075af0e49603eb0c99ef96f04d63db2.jpg)
![IMG_20150531_015328_008[1].jpg](/data/attachments/2530/2530143-f22b82592ca907a07b5e0298f0b73f4d.jpg)
![IMG_20150531_015336_986[1].jpg](/data/attachments/2530/2530152-252625aa1a965ee03157d3e584a15ab5.jpg)
![IMG_20150531_015400_677[1].jpg](/data/attachments/2530/2530156-28ef796db46a71a74ca870ccd922e1f1.jpg)
![IMG_20150531_015436_320[1].jpg](/data/attachments/2530/2530158-c07258255993a24608099326354dda28.jpg)
![IMG_20150531_015515_640[1].jpg](/data/attachments/2530/2530163-59bc65de51f495c380b09c5bcd62f578.jpg)
![IMG_20150531_015541_656[1].jpg](/data/attachments/2530/2530165-3d2342a98fb2b60f1e84f428b8f53045.jpg)
![IMG_20150505_084104_813[1].jpg](/data/attachments/2530/2530217-3d2d4beb5e4f7d58752a1d73558294de.jpg)
![IMG_20150514_123333_001[1].jpg](/data/attachments/2530/2530224-e94b758a101c4ab5ae912f99650da7b4.jpg)
![IMG_20150514_113930_411[1].jpg](/data/attachments/2530/2530227-d97a71ab8f9975a7d8d7dfc0f821b4fe.jpg)
![IMG_20150514_122802_445[1].jpg](/data/attachments/2530/2530220-8f8fc758b3b943dad33de0d0c9999a72.jpg)
![IMG_20150514_123008_726[1].jpg](/data/attachments/2530/2530221-523769d99c8ccb235beb7f5c48b5a106.jpg)
![IMG_20150514_123116_603[1].jpg](/data/attachments/2530/2530223-dba377087ce20c2993ce6bec15a617cc.jpg)
![IMG_20150514_123424_390[2].jpg](/data/attachments/2530/2530225-e35de3d95642d2be6436b3868d91a8f0.jpg)
![IMG_20150514_123905_640[1].jpg](/data/attachments/2530/2530226-59ca19ba3e54a24398ae1401e753f6aa.jpg)
![IMG_20150514_122429_842[1].jpg](/data/attachments/2530/2530219-aaf3e528984f9784ac4344b9c08c7b37.jpg)
![IMG_20150514_114734_301[1].jpg](/data/attachments/2530/2530218-dfc7146ea19cc2ae4e2b7dc361100166.jpg)
![IMG_20150523_152456_446[1].jpg](/data/attachments/2530/2530795-b2923601e751057facdd591ad5ee8854.jpg)
![IMG_20150523_152505_659[1].jpg](/data/attachments/2530/2530796-552e33b07f8b68353bbf370f6a57185e.jpg)
![IMG_20150524_221235_231[1].jpg](/data/attachments/2530/2530800-c3037b38faf4720b3ca92597ad8d6c3c.jpg)
![IMG_20150524_221520_636[1].jpg](/data/attachments/2530/2530803-50be922ec242441ab8e250845b0f5079.jpg)
![IMG_20150524_221745_910[1].jpg](/data/attachments/2530/2530807-d27aba3ccb4b18e0dbc3db268ec07159.jpg)
![IMG_20150524_221017_920[1].jpg](/data/attachments/2530/2530806-819e5c029b784de389a99211f048318b.jpg)
![IMG_20150524_221140_432[1].jpg](/data/attachments/2530/2530799-06e7fdb36949db0f72631c277fc397c5.jpg)
![IMG_20150524_232213_538[1].jpg](/data/attachments/2530/2530808-f49316c3c9589d1ca8887f75570b84ae.jpg)
![IMG_20150524_234622_277[1].jpg](/data/attachments/2530/2530810-f0e349b63ee9207809b333fa52b3a254.jpg)
![IMG_20150524_234702_055[1].jpg](/data/attachments/2530/2530811-f8808fc1d56d9de04cd6c1859b3e7c3b.jpg)
![IMG_20150531_011332_508[1].jpg](/data/attachments/2531/2531004-9a2bb8cffaa98aa01f1ce8daffea349e.jpg)
![IMG_20150513_211617_350[1].jpg](/data/attachments/2531/2531026-6ddd37e2e77955520203c66512dd1e78.jpg)
![IMG_20150517_212646_826[1].jpg](/data/attachments/2531/2531010-72890d736f187a54beaba62ec2341509.jpg)
![IMG_20150517_212531_450[1].jpg](/data/attachments/2531/2531019-ef5ec319244c114b62e9b846bc14df2a.jpg)
![IMG_20150523_222849_934[1].jpg](/data/attachments/2531/2531012-e2d33eba09f59a317bb32d2e6712938c.jpg)
![IMG_20150523_235023_897[1].jpg](/data/attachments/2531/2531016-f3dcbd5bb6f6ec07b30ef746dc9d265a.jpg)
![IMG_20150531_011407_054[1].jpg](/data/attachments/2531/2531005-363035d4b649f3980eeb5eee6fba6c21.jpg)
![IMG_20150530_230304_822[1].jpg](/data/attachments/2531/2531006-aada0e4d8fb2e71a7a7fb80a37a6d259.jpg)
![IMG_20150531_015704_052[1].jpg](/data/attachments/2531/2531015-5c1426552e188dc9d608b0e9031002dd.jpg)
![IMG_20150601_095312_249[1].jpg](/data/attachments/2531/2531017-24ae860cfb2dd254f583ebb81f708fd2.jpg)


![1431360690739[1].jpg](/data/attachments/2547/2547178-f234988a633bce740802ef7a8b67712c.jpg)


![IMG_20150703_220501_474[1].jpg](/data/attachments/2553/2553206-085193397768bbcb13a2f64a67f0a98d.jpg)
![IMG_20150703_223027_440[1].jpg](/data/attachments/2553/2553205-cfe7900b805684ca8898a9e6d94d8024.jpg)
![IMG_20150704_014048_985[1].jpg](/data/attachments/2553/2553207-2ec9b82c590760583a368bf516416bb8.jpg)
![IMG_20150704_015232_014[1].jpg](/data/attachments/2553/2553209-d753bb294b32b1d6c567f2b8df342a92.jpg)
![IMG_20150704_245830_880[1].jpg](/data/attachments/2553/2553211-3f695d94dbce41e77a0562821264dd3f.jpg)
![IMG_20150704_010001_574[1].jpg](/data/attachments/2553/2553212-aafcf958887224e37eebf6ca79eacecc.jpg)
![IMG_20150704_245945_823[1].jpg](/data/attachments/2553/2553215-bceeab93a63e87b6f39fe63b1eeb26bc.jpg)
![IMG_20150704_010025_115[1].jpg](/data/attachments/2553/2553213-3aff05c7ba8f3052f14ad3bfd1f8bcaf.jpg)
![IMG_20150704_010056_591[1].jpg](/data/attachments/2553/2553214-d6979005330359942da47d8567ccc03a.jpg)
![IMG_20150704_245816_042[2].jpg](/data/attachments/2553/2553210-18987e80d2dd49127d42bee1e809d3d2.jpg)
![IMG_20150704_011608_764[1].jpg](/data/attachments/2553/2553228-3bf8edd3f89c58654511368c0df1d0e1.jpg)
![IMG_20150704_010253_290[1].jpg](/data/attachments/2553/2553223-0264b8f06986ac2d5ad3a397e7e1a70f.jpg)
![IMG_20150704_010314_254[1].jpg](/data/attachments/2553/2553225-ec5871f7b089ecab4455b8f71968661f.jpg)
![IMG_20150704_010152_026[1].jpg](/data/attachments/2553/2553221-a3a7c5cd738c93df27f81976ea466296.jpg)
![IMG_20150704_011434_981[1].jpg](/data/attachments/2553/2553227-1a02071cd98a7ffc147ed497b47c2951.jpg)
![IMG_20150704_010351_815[1].jpg](/data/attachments/2553/2553222-8feb3471097e20f80b489c173b2bca19.jpg)
![IMG_20150704_010242_125[1].jpg](/data/attachments/2553/2553232-b84e4fe41a7fa07c5d0506ee697d2039.jpg)
![IMG_20150704_011426_214[1].jpg](/data/attachments/2553/2553226-a42ecc03398db7bd2b94e68db68e2c35.jpg)
![IMG_20150704_011716_733[1].jpg](/data/attachments/2553/2553229-b5562b6bfc7f0c1868eb19cf3d9e5ee0.jpg)