ONE MORE TIME Around FOR THE OLD MAN in The Wardrobe Grow
- Thread starter Tim Fox
- Start date
Tim Fox
Well-Known Member
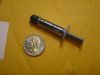
Its a real TRIP MAN!!! tiny as hell, seeing them in person is very differant than photos on RIU, its also going to be a real head turner to see them lite up, I think the pictures online dont convery the true brightness and power of the cxa cobs, SOO, I put them carefully right back into the box after I photographed them, no way on earth and I working with these while I am stoned, and I started this beautiful sunny morning with a nice bowl looking into the sunrise, and its still working its magic on my bodyThose cobs really are small buggers eh? Especially for the amount of the light they produces, still amazes me to this day
Zoltan32
Well-Known Member
i thought the same exact thing, almost to the point i had to double check what i ordered. Also, i dont have a little soldering pen, I used my big ass soldering gun to attach the wires to the cobs. Hovering this big gun over the tiny cob was a sight to see.
My drivers are supposed to be here today, they were delayed due to the weather. hope to power mine up tonight!
also, the one cob I set onto the heatsink with just the factory thermal paste has set on pretty good, I couldnt easily pry it up without slipping a little razor underneath it. So i feel pretty confident the kapton tape is going to hold them in place.
NorthernHize
Well-Known Member
Shouldn't be an issue with the laptop tape, however be sure to anchor the wires attached to the cob to something near the cob. You don't wunna be reaching in you grow area doing maintenance, watering, raising or lowering your light and the wire gets caught up on something and moves slides or tears the cob off the heat sink.i thought the same exact thing, almost to the point i had to double check what i ordered.
My drivers are supposed to be here today, they were delayed due to the weather. hope to power mine up tonight!
also, the one cob I set onto the heatsink with just the factory thermal paste has set on pretty good, I couldnt easily pry it up without slipping a little razor underneath it. So i feel pretty confident the kapton tape is going to hold them in place.

Tim Fox
Well-Known Member
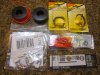
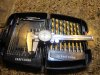
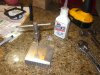
the last part arrived in the mail last night, the thermal paste is here, I am heading to the hardware store this moring to get some tiny screws for mounting the cob holders, first I need to check my tap and die set and drill bits to make sure I have what I need before I go. this is copied from CaptianMorgans thread on cxa3070 build, I am going to drill and tap for #5-40x1/4" socket head screws. going with #38 drill bit and a #5-40 tap.
Tim Fox
Well-Known Member
 Alright back from the hardware store, another $12 dollars ( not bad ), but Like Captain Morgans build on here each of these cobs is going to ad up to close to 100 bucks by time I am done, but I am excited to light one up, I am expecting to see some real power, Like years ago when I used to grow with 400 watt Metal halide bulbs, looking at those bulbs for a couple of seconds was about all you could do, they reminded me of an arc weld, I may get at least one of these lite up tonight, but I am looking forward to the day maybe next week when I can light both cobs up along side the mars 300 and get a view of the whole light spectrum
Abiqua
Well-Known Member
Last night I went with 20 Ga Solid Gauge copper....I was using 16AWG strand before and I kept having the wires tug out of the ideal holders and seems others have have the SAME problem recently......I highly suggest the littler gauge for them...worked like a charm!HEY what size wire do I buy to plug into the cob holders? they are ideal holders
NorthernHize
Well-Known Member
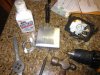
I can't tell you how many heat sinks I have with 3-4 holes in them. LolSTUPID CHEAP ASS CHINA DRILL BIT BROKE OFF IN MY COB HALF WAY IN,, now its stuck in there, no choice but to twist the holder and drill 2 new holes, going to leave the broken drill in there, not worth diggin it outView attachment 3370361
Abiqua
Well-Known Member
Tim, maybe this will help....You really only need to make 4mm deep drill holes then tap...4mm if that, more like 3mm..Since the holder is like 2mm thick...and the screws are only 6mm total...
Kinda too late, but it looks like you figured it out...My problem is always breaking screw heads off....and then I sand them down and start again, lol....
Looks good, toughest part mostly out the way!
Kinda too late, but it looks like you figured it out...My problem is always breaking screw heads off....and then I sand them down and start again, lol....
Looks good, toughest part mostly out the way!
Tim Fox
Well-Known Member
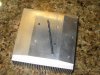
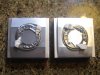 there you have it, both head sinks drilled, tapped and the holders screwed down tight, all 4 contact points are hitting the heat sink underneath, ,, ANY IDEAS on putting on the thermal paste?, thick, thin? I have to work the next 2 days, so when i get time its thermal paste and wires,
Zoltan32
Well-Known Member
looks good, ill probably go that route after this grow, i felt a little rushed. What i would do to apply the paste; take some tape to line out the area of the COB, then spread the paste inside with a razor as thin as you can, apply COB, the excess will spread on the tape, then peel off the tape and set down the holder. Some will say one small dot in the middle and set press down.
Abiqua
Well-Known Member
Less is more.....spreading to the thinnest possible in theory is where the least thermal impedance comes in [the whole reason for the thermal paste]....View attachment 3370372 there you have it, both head sinks drilled, tapped and the holders screwed down tight, all 4 contact points are hitting the heat sink underneath, ,, ANY IDEAS on putting on the thermal paste?, thick, thin? I have to work the next 2 days, so when i get time its thermal paste and wires,
that being said, COB's aren't too finicky...I have seen installs range from just below gloppy to thin lizzy...lol...my experience initially was from mounting CPU's to heatsinks for Computer builds.....here is it recommended to obtain the thinnest possible line, because again, we are trying to minimize thermal impedance with the paste, basically smoothing out stresses in the metal face of the contact area between heatsink and the LED metal slug on the back of the LES [light emitting surface].
I advocate for the thinnest line you can achieve, but I don't think it matter whether you apply it to the heatsink or the cob 1st...personally I like the cob, in my mind seems easier to control the amount of surface area....
I little piece of cardboard makes an excellent spreader, I don't recommend the razor, because you could just cause needless damage.....
How does it feel to be on the cutting edge.....those holder mounts look bad azz
