winkdogg420
Well-Known Member
*MY PICS ARE OUT OF ORDER AND I COULD ONLY POST 10 SO I COULDNT SHOW ALL THE PICS I TOOK BUT THERE SHOULD BE ENOUGH HERE TO HELP OUT PEOPLE WITH CLONING PROBLEMS!
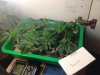
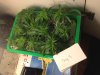
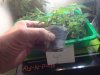
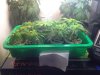
Ok I know there are a thousand ways to clone and I have had decent results over the last 30-40 sets of clones I've grown but not perfect, usually 90-95% success but ugly clones that take a while to bounce back after transplant . I have even built bubble cloners and a fog cloner with 60-75% success but my clones are always ugly when the roots form . This has been my best set ever so I thought I would share my process! First thing first KISS(keep it simple stupid)! I mixed up some of my own soil mix and changed a few things about how I was cloning in the past ! Below is a list of what I used and pics showing the progress of the little girls!
-Soil mix = 1/2 Dollar Store Potting soil(surprisingly nice) & 1/2 MG Perlite
-Containers = 5oz plastic cups with the tops cut off and 4 holes in the bottom
-Sharp Scissors
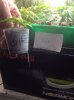
-Poland Springs Water (most times it reads 6.5-6.9 ph )
-Cloner = A tomato starter mini green house from Walmart
-Lighting = 4 26 watt cfls in my veg cabinet (I swapped one out with a 60 watt incandescent for warmth)
-Cuttings = Advance Seed Co. "Critical" And "Skunk 47"
-Nutes for foliar spray Fox Farms Big Bloom and RX Green Solution cloning solution
-Clonex cloning gel
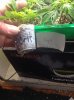
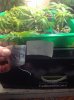
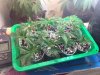
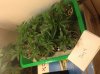
I started by taking my cuttings from the lower middle of the plant , most say go right to the bottom but then your moms look like stop signs or lollipops! I cut them and put them right into a cup of Poland Springs Water with a few drops of RX Green Solutions cloning solution and let them sit for 10-15 min while I mixed the soil in a large bag and added enough Poland Springs water to make it moist but no where near mud! I then filled the cups and tapped them on the table to settle the soil but not packed tight . I then poked a hole in the soil of each cup with a chop stick to prepare to move the clones in . I took the clones out of their "bath" and trimmed all but the top sets of leaves dipped them in Clonex Gel and put them into the soil. Once inserted I tapped the containers again to settle the soil around the stems without packing them tight (important)! The big difference between this and all my other clones was the foliar feeding , I started on day one and sprayed twice a day until day 11 when all were rooted! Some started rooting at day 6 but 100% by day 11 was my best ever ! I also noticed very little slowing in growth , almost no sagging or color change! My veg cabinet is usually lit by 4 26 watt (100 watt equivalent) cfls ant they support up to 4 mother plants and my clones but I swapped one out with a 60 watt incandescent for the warmth . Out of 30-40 sets of clones ive grown over the years these were by far the healthiest and happiest clones ever! I know this is nothing new but I thought it might help others get faster , healthier , nicer clones . This is with two completely different strains and both rooted between days 6 and 11 at a 100% success rate .

Winkdogg
Ok I know there are a thousand ways to clone and I have had decent results over the last 30-40 sets of clones I've grown but not perfect, usually 90-95% success but ugly clones that take a while to bounce back after transplant . I have even built bubble cloners and a fog cloner with 60-75% success but my clones are always ugly when the roots form . This has been my best set ever so I thought I would share my process! First thing first KISS(keep it simple stupid)! I mixed up some of my own soil mix and changed a few things about how I was cloning in the past ! Below is a list of what I used and pics showing the progress of the little girls!
-Soil mix = 1/2 Dollar Store Potting soil(surprisingly nice) & 1/2 MG Perlite
-Containers = 5oz plastic cups with the tops cut off and 4 holes in the bottom
-Sharp Scissors
-Poland Springs Water (most times it reads 6.5-6.9 ph )
-Cloner = A tomato starter mini green house from Walmart
-Lighting = 4 26 watt cfls in my veg cabinet (I swapped one out with a 60 watt incandescent for warmth)
-Cuttings = Advance Seed Co. "Critical" And "Skunk 47"
-Nutes for foliar spray Fox Farms Big Bloom and RX Green Solution cloning solution
-Clonex cloning gel
I started by taking my cuttings from the lower middle of the plant , most say go right to the bottom but then your moms look like stop signs or lollipops! I cut them and put them right into a cup of Poland Springs Water with a few drops of RX Green Solutions cloning solution and let them sit for 10-15 min while I mixed the soil in a large bag and added enough Poland Springs water to make it moist but no where near mud! I then filled the cups and tapped them on the table to settle the soil but not packed tight . I then poked a hole in the soil of each cup with a chop stick to prepare to move the clones in . I took the clones out of their "bath" and trimmed all but the top sets of leaves dipped them in Clonex Gel and put them into the soil. Once inserted I tapped the containers again to settle the soil around the stems without packing them tight (important)! The big difference between this and all my other clones was the foliar feeding , I started on day one and sprayed twice a day until day 11 when all were rooted! Some started rooting at day 6 but 100% by day 11 was my best ever ! I also noticed very little slowing in growth , almost no sagging or color change! My veg cabinet is usually lit by 4 26 watt (100 watt equivalent) cfls ant they support up to 4 mother plants and my clones but I swapped one out with a 60 watt incandescent for the warmth . Out of 30-40 sets of clones ive grown over the years these were by far the healthiest and happiest clones ever! I know this is nothing new but I thought it might help others get faster , healthier , nicer clones . This is with two completely different strains and both rooted between days 6 and 11 at a 100% success rate .
Winkdogg
Attachments
-
 954.1 KB Views: 2
 -
 765.3 KB Views: 2