new cabinet I built, getting back at it again.

Tim Fox

Well-Known Member
The Cree CXA's not only double the output of lumens versus the bulbs, they also about double the efficiency, so it will take them half the power to emit twice the light of the bulbs...

I think 3x CXA3070 3k's would really rock.....at 1.4 amps....with reflectors, probably helps canopy penetration but the overall light density across the canopy will diminish.....without reflectors, 3 cobs running @ 1.4 amps gives you about 160 watts, while canopy penetration will diminish a bit, but you will have excellent coverage at almost 40 watts/ per sq. ft...

The other thing might be to run just two CXA's but maybe at like 75w's apiece.....efficiency drops a tad when running at 1.7 amps or so, but you could really penetrate your canopy and still have excellent light spread as well....

just for reference....my tiny cab 27" x 19" has 2x CXA3070's and 2x Vero 29 all 3k.....going to be ran @ 500ma, for about 84 watts across 3.4 sq. ft....but only 32" of height.... I would run more wattage usually to give me about 35 watt/ sq ft, but my efficiency is averaging about 50% with all four cobs at that current, so no need :peace:
do you have LINKS you can post on those drivers, would be helpful for us home builders who can solder and drill but not fully into the specs , so its super easy, buy this cob and wire it to this driver and this heat sink / fan,, then plug it in and go.
 

Zoltan32

Well-Known Member
do you have LINKS you can post on those drivers, would be helpful for us home builders who can solder and drill but not fully into the specs , so its super easy, buy this cob and wire it to this driver and this heat sink / fan,, then plug it in and go.
this right here describes me to the T, lol... I think ill follow this guys layout, 1st post. (this is the one you linked to on your build thread)
https://www.rollitup.org/t/diy-led-grow-lights-with-cree-cxa3070-cobs-and-cpu-coolers.805681/

3 of these for the drivers.
http://www.jameco.com/1/1/45675-lpc-60-1400-lpc-60-60w-single-output-switching-led-power-supply.html
2 of these 3000k
http://www.mouser.com/ProductDetail/Cree-Inc/CXA3070-0000-000N00Z230F/?qs=sGAEpiMZZMu4Prknbu83y0bObCPMgyC/l6eQby5L/DGQDb9TViwpOg==
1 of these 5000k
http://www.mouser.com/ProductDetail/Cree-Inc/CXA3070-0000-000N00Z450F/?qs=sGAEpiMZZMu4Prknbu83y0bObCPMgyC/AAZag4DB6D4TpVpI9Ddrqg==

then basicly any CPU heat sink with fan... probably just going to use the thermal adhesive and consider these permanent individual lights. i have a fan power supply. and then misc wire and connections... ive got soldering under control too. Then just wire them all into one pigtail, to plug into an outlet??no switches or anything, just one plug to go in the timer.

thanks alot guys, hope to have this back up before the following weekend...
 

Zoltan32

Well-Known Member
I think 3x CXA3070 3k's would really rock.....at 1.4 amps....with reflectors, probably helps canopy penetration but the overall light density across the canopy will diminish.....without reflectors, 3 cobs running @ 1.4 amps gives you about 160 watts, while canopy penetration will diminish a bit, but you will have excellent coverage at almost 40 watts/ per sq. ft...

The other thing might be to run just two CXA's but maybe at like 75w's apiece.....efficiency drops a tad when running at 1.7 amps or so, but you could really penetrate your canopy and still have excellent light spread as well....
I have brushed into how these different amps are achieved, but haven’t fully comprehended it yet. lol. this is achieved by using a different driver eh?? i dont have an endless budget, but im open to whatever for this build. one driver per light... or if i can split it up and run two on one, and one on another... at this point, if you were to tell me 'buy this' I would.. :D
 

Abiqua

Well-Known Member
I have brushed into how these different amps are achieved, but haven’t fully comprehended it yet. lol. this is achieved by using a different driver eh?? i dont have an endless budget, but im open to whatever for this build. one driver per light... or if i can split it up and run two on one, and one on another... at this point, if you were to tell me 'buy this' I would.. :D
My biggest rule of thumb is to buy a driver with a little extra room in voltage...because of the Constant current nature of the LED drivers.....Voltage is the most important need with amperage varying according to how much wattage or efficiency you want to achieve....

99% of the time, most people power their cobs with individual drivers or a driver with enough voltage to run in Series....

So with series wiring, add your voltages together, while amperage stays the same......

You can run multiple cobs in parallel, but you will need a good knowledge of signal buffering to do this......So mainly people stick with either Driver/Cob or wiring multiple cobs in series.....


The LPC's are great drivers and will 60-1400's are a great choice for running a single Cree @1.4A....They are also a little pricey for their efficiency 86-88%....

My 1st choice @1.4 amps would be the
Meanwell HLG 185H-1400A/b/C

The 1400 will power 3 Cree Cobs in series....... and is about the same price as 3x LPC 60-1400
The HLG 185-1050 will do 5 cobs in series, I believe, but @ just over 1 amp....1050 mA...

@Tim Fox
The links above that zoltan posted would have made mine redundant, those are great starting points, + whatever I just posted....
Lastly, for running at a higher current....

The Meanwell HLP 80-42/48 is an open frame driver, that will go up to about 2.1 amps.....with a single Cree 3070, that is good for just over 75 watt or so.....2.1 x 37V = 77.7 watts....


Also spendy, but worth it, Inventronics drivers, mostly available at Future Lighting Solutions....... .com
 

Abiqua

Well-Known Member
do you have LINKS you can post on those drivers, would be helpful for us home builders who can solder and drill but not fully into the specs , so its super easy, buy this cob and wire it to this driver and this heat sink / fan,, then plug it in and go.
Well, just about most of the that information has been plugged to death over the LED forum.....

I listed the
Meanwell HLG 185 H series
Inventronics
and the
Meanwell HLP 80-42 or 48...
as well as LPC's that zoltan mentioned

all available at places like

Jameco
Powergate
Mouser
Future Lighting Solutions

Start there....I would rather answer specific questions you have [if I can answer them] then have you running all over blindly.....

I understand the sentiment about not fully understanding the specs ...So if I had a flow chart for selection It would go something like this


What diode/Cob do I want? ----What is the Voltage/Amperage....-Find a suitable driver with current within range [datasheet for min/max output amperage for COB] ---

Find a heatsink ---passive or active cooling? Extruded or CPU coolers?

How will I wire, holders or soldering? --- Ideal chip lok for Cree, Molex wire holders for Bridgelux Vero's.....

How will I mount? All are recommended to be mounted with M3 6mm .4/.5 pitch hardware, although the Kapton tape method by SupraSPL is tried and true....even for larger wattage [50+]

Tell me what I left out! please...because it would encourage me to be of more help :peace:
 

Zoltan32

Well-Known Member
i read about all the mounting methods, the ocd side of me would love to mount them with holders to make everything proper... but i guess im kinda in a crunch, ill probably use paste and tape... that way if i decide to make it more proper, or add lights, ill have some flexibility down the road. i appreciate the knowledge yall post, i think ive been through quite a bit of your posts on the subject Abiqua. You really cover everything pretty well, we all just process it differently. Im sure ill rush thru this and one day a lightbulb will go off in my head. Usually once i get things in my hand and start putting it together, it all make sense.

have i tracked down the right driver? http://pge.powergatellc.com/product-model_info.php?products_model=HLG-185H-C1400A
 

Abiqua

Well-Known Member
i read about all the mounting methods, the ocd side of me would love to mount them with holders to make everything proper... but i guess im kinda in a crunch, ill probably use paste and tape... that way if i decide to make it more proper, or add lights, ill have some flexibility down the road. i appreciate the knowledge yall post, i think ive been through quite a bit of your posts on the subject Abiqua. You really cover everything pretty well, we all just process it differently. Im sure ill rush thru this and one day a lightbulb will go off in my head. Usually once i get things in my hand and start putting it together, it all make sense.

have i tracked down the right driver? http://pge.powergatellc.com/product-model_info.php?products_model=HLG-185H-C1400A
Yes that is the correct driver...There are three versions of this driver: A, B, C....A is 10v dimming source, B is PWM dimming and C is both....no price difference I think....These drivers are top notch and maintain efficiency....

Note: This is also a great driver for in the future: as you can see it put out 143 volts [Max] @ 1.4 amps....and 3x Cree CXA3070 AB 3k's would be 37.3 volts x 3 = 111.3 volts and unfortunately you have about 30 volts still unused if ran in series, just below what you would need for a 4th cob to be added to the circuit...Sucks! .eventually the NEW Cree CXB 3070's run at a slightly lower voltage and 4 will be able to fit onto this driver....and at 1.4 amps they are around 50% efficiency, so about 8% increase in light output over the CXA 3070's......

Maybe also consider running the 185H-1050C I believe that you can do 5 cobs in a series string off this driver....Each cob puts out 39 watts instead of 52 watts @ 1.4 amps....I think more cobs would give you superior coverage, but because of your height and penetration, reflectors probably would be a good idea, but maybe not needed either....

This is positivity's CXA 3070 grow
http://rollitup.org/t/diy-led-grow.738671/

He wavers back and forth over using reflectors....I would dissect this thread a bit for an idea about penetration vs. canopy coverage from COBS, if you haven't already :peace:

You are right about different processes, one thing I can say for certainty, is start with the Diode, because that is your light source and READ the datasheet...Surprising, most parts are fairly easy to read even for the layman, but all the hidden gems are inside :)
 

sunny747

Well-Known Member
well Ive been making some changes, and trying various fan layouts. Seems like my temps are going to hover in the low 80's. it will hang in the high 70's for awhile at startup and again when outside air temps start dropping at night. I feel like this would be fine, but summer temps are going to be a little bit higher, which gives me no room for leeway.
-Could run a window unit to keep the room cooler, which really doesnt sound that bad the more i think about it, but ongoing costs $$$.
-Do a 'cool tube' type setup for the bulb (which might also be necessary anyway once plants start running out of room).
-Orrrr... ive spent time reading on these LEDs, and this DIY thread is looking very temping... initial thoughts would be to run the cree cxa3070, 2 3000k and 1 5000k. and just follow the DIY thread here: http://rollitup.org/t/diy-led-grow-lights-with-cree-cxa3070-cobs-and-cpu-coolers.805681/
-I also initially looked at the marshydro lights (400w mars II), which looks like it would cost roughly the same amount, but im under the impression this DIY light would be much better.

I think the LED is the best option, i would hope my current exhaust system would be plenty, and just let the A/C in the house take care of the rest. House is usually kept around 72*-74* Should be able to ride out this metal halide for the rest of veg, and maybe have a LED ready for flowering.

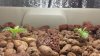
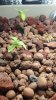
ive been cleaning everything out, and soaking the crap out of these clay pellets... well be re-installing everything after a little more soak time.
anyway, enough reading, heres some recent pics.

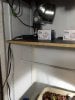
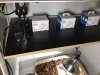
I rigged up some semi passive intake fans in a cardboard box, lolol :). the fans are old and pretty slow moving, but it actually dropped temps a couple degrees when i stuck it over the intake area. will be making something a little more permanent. Also, put some foam panel on the back of the door.
View attachment 3353885 View attachment 3353887 View attachment 3353888 View attachment 3353889 View attachment 3353890

Great work on the cab. I only got half way through the entire thread, but wanted to mention that I have a very small grow cab. 2x1 x 3ft tall. I can run a 150w hps in there using only a small air purifier as ventilation and it stays about 2 degrees above room temps of 72 degrees.. Two 150's really changes things though and it gets hot.
 

Tim Fox

Well-Known Member
Thanks for the data, all good
Well, just about most of the that information has been plugged to death over the LED forum.....

I listed the
Meanwell HLG 185 H series
Inventronics
and the
Meanwell HLP 80-42 or 48...
as well as LPC's that zoltan mentioned

all available at places like

Jameco
Powergate
Mouser
Future Lighting Solutions

Start there....I would rather answer specific questions you have [if I can answer them] then have you running all over blindly.....

I understand the sentiment about not fully understanding the specs ...So if I had a flow chart for selection It would go something like this


What diode/Cob do I want? ----What is the Voltage/Amperage....-Find a suitable driver with current within range [datasheet for min/max output amperage for COB] ---

Find a heatsink ---passive or active cooling? Extruded or CPU coolers?

How will I wire, holders or soldering? --- Ideal chip lok for Cree, Molex wire holders for Bridgelux Vero's.....

How will I mount? All are recommended to be mounted with M3 6mm .4/.5 pitch hardware, although the Kapton tape method by SupraSPL is tried and true....even for larger wattage [50+]

Tell me what I left out! please...because it would encourage me to be of more help :peace:
 

NailtheSnail

Active Member
get your cobs ordered from digikey they ship fast, if your going with 3 of them sure make one of them a 5000k ,if only running 2 of the cobs 3000k will impress you
With digikey do you know exactly what one I should be looking at getting?
Sorry to hijack thread just been looking allday and Would like to purchase 2 3000ks for flowering in a microgrow
 

Abiqua

Well-Known Member
With digikey do you know exactly what one I should be looking at getting?
Sorry to hijack thread just been looking allday and Would like to purchase 2 3000ks for flowering in a microgrow
Nail what we have been discussing:

Bridgelux Vero 29 3000k 80cri
http://www.digikey.com/product-detail/en/BXRC-30E10K0-L-03/976-1151-ND/3913138

Which are out of stock at the moment, most likely because the V2.0 is about to be released which increases output over the current versions....90 cri is in stock, but usually HIGH cri, acts like a photon filter for certain spectrums....

I have though about flowering with 4k, but not enough time yet, so that is a possibility with Vero's 4K's are nice Veg/Flower spectrum, minus maybe a tad of the red peak of 3k/3.5k

The Cree CXA3070 Z4/AB 3000k COB
http://www.aliexpress.com/store/product/CREE-CXA3070-Original-CREE-diodes/324035_32254336293.html

Is available from KingBrite on AliE, these are a good deal. Finding them stateside for this price is unrealistic....
 

Zoltan32

Well-Known Member
Well i made my order, i ended up just ordering everything right off the original list i made. Went with the 3 individual drivers. They ended up being a good bit cheaper, and i was having issues finding the right one that wasn’t on delayed shipping or of a comparable price. I also ordered some of these heat sink mounts http://www.amazon.com/gp/product/B0071RSMKA/ref=oh_aui_detailpage_o01_s00?ie=UTF8&psc=1, i hope i can make use of them. In the link, it comes with two pieces, i wont be using the flat piece the cpu would normal sit in. just wanted the heat sink clips.
ive got a pretty good idea on how im going to install everything, want to mount everything on a piece of MDF. paint it white. Mount these brackets across the middle, and cut holes for the lights . then clip the heat sinks in place. and mount the drivers on the top side.
Hope everything gets here before the following weekend, my plants are pretty small still, and seem to be enjoying the 2 100w cree bulbs. Its quite a bit cooler now... 67-70* and i started running an small humidifier. its been super dry with the heat running in the house, like 20-30% humidity. finally got it to creep up to 40% after the humidifier ran all night.
 

Tim Fox

Well-Known Member
Your making good choices, you light idea sounds great, I love how the cobs can y be set up for your grow, can hardly wait to see it
Well i made my order, i ended up just ordering everything right off the original list i made. Went with the 3 individual drivers. They ended up being a good bit cheaper, and i was having issues finding the right one that wasn’t on delayed shipping or of a comparable price. I also ordered some of these heat sink mounts http://www.amazon.com/gp/product/B0071RSMKA/ref=oh_aui_detailpage_o01_s00?ie=UTF8&psc=1, i hope i can make use of them. In the link, it comes with two pieces, i wont be using the flat piece the cpu would normal sit in. just wanted the heat sink clips.
ive got a pretty good idea on how im going to install everything, want to mount everything on a piece of MDF. paint it white. Mount these brackets across the middle, and cut holes for the lights . then clip the heat sinks in place. and mount the drivers on the top side.
Hope everything gets here before the following weekend, my plants are pretty small still, and seem to be enjoying the 2 100w cree bulbs. Its quite a bit cooler now... 67-70* and i started running an small humidifier. its been super dry with the heat running in the house, like 20-30% humidity. finally got it to creep up to 40% after the humidifier ran all night.
 

Zoltan32

Well-Known Member
Heres some pics of the little gals. I started a group of seeds about 2 weeks ago... of the 10 these are the 5 that made it. Ive been using collected rain water with no added nutes (untill today). PPM of the rain water was around 70-80, after PHing and letting it run for a few days it rose up to ~120ppm. Ive really dialed in the PH after the last reservoir change; 5.7-6.1 has held for a few days. I think the PH was way off the first week.

these two turned out the best:
green2side.jpg green2top.jpg
these 3 are the odd balls... not really sure what happened to the little one. it looked really bad last week, but im letting it be for now as it was a runt from the get go. The tall lanky one took off like crazy in my germination box and It didnt properly set into the rapid rooter (I guess?). then the third one is doing fairly well. these got messed with quite a bit as i was experimenting with the box and grow medium, so im really not surprised.
othersside.jpg otherstop.jpg
i went ahead and started a few more just to up my odds. these germinated really fast. this is day 2.5 on them... All 5 cracked, but I have one that is not doing much. Theyve been sitting on top of my cable box to germinate, ill probably leave them in here till the cotyledons pop out and get some roots poking out.
germs.jpg

I just added a few ML of dyna grow to give them a little taste, did a test after and got ~240ppm, I only added 7 ml to my 8 gallons. This is my first grow actually using a PH pen and TDS meter. Never messed with PPM before, and used PH strips for my last grows. I figure ill have 8-10 plants to choose from come flower time. maybe ill have so many females i wont know what to do with myself..... kinda like highschool.... :lol:
I received some heatsinks in the mail today, which is kinda boring when you’re still waiting on the actual LEDs :D
 

Zoltan32

Well-Known Member
Well ive done about all I can till the rest of my things get here... hoping for a magical Saturday delivery, but its looking like monday or tuesday. :???:

Decided i really didnt like the auto shades for reflective material, so its white now. Moved the outlet up to the very top, so i dont have to worry about dripping water on it or something. I got some adjustable shelf tracks that i will now use to raise/lower everything. Cut up a shelf to mount everything on, which has plenty of room to add more lights and what nots. Its the same length and width as the grow space, plenty of room around the edges for the exhaust to pull air through. I like how this is going to divide the top and bottom sections. I may make some holes to vent air around the drivers/heatsinks.
shelfside.JPGshelftop.JPG
Lastly i did some soldering on the Cree's, went pretty well considering its the first time ive ever soldered onto a board. Just waiting on the drivers to arrive, to see if they work! :peace:
alllight.JPGclosesolder.JPG

* just noticed, i better take some heat shrink and slide it down to cover up that end the best i can. probably dont want them to encounter the heatsink if they get bent or something.
 
Last edited:

Tim Fox

Well-Known Member
Oh Sweet , your grow box is going to be kick ass, I just ordered my cree cobs /drivers/ and pc heatsink fans yesterday morning, your solder job looks really good, I was too chicken and ordered the solderless cob holders, but now I have to drill and tap the heat sinks, I think your way may be better/easier? , are you going to use thermal paste and tape or thermal glue? these cobs are top of the line lighting for small spaces
 

Zoltan32

Well-Known Member
Ive drilled and tapped things before (working on cars comes with another hobby of mine) aluminium is easy in that its soft to drill and tap, but its much easier to cross-thread. Ideally you’d drill the holes in a press and hand tap them, its going to be difficult to get a straight shot with a hand drill. With that said, it doesn’t have to be perfect, worst case your bolt head wont sit perfectly flush on the holder. If i had access to a press and a little more time, Ild do it too. With the holder you have the ability to attach reflectors eh?

Im using paste and kapton tape, looks like it works and definitely alot easier. So im going to give it a whirl. Im not sure why i see everyone pollish the crap out of their NEW heatsinks (unless it old/used) Mine look to have a factory coating of thermal where the cpu normal sits. and this COB is almost the exact same size, Im probably just going to plop a little on and tape it down. bongsmilie
 

Tim Fox

Well-Known Member
Ive drilled and tapped things before (working on cars comes with another hobby of mine) aluminium is easy in that its soft to drill and tap, but its much easier to cross-thread. Ideally you’d drill the holes in a press and hand tap them, its going to be difficult to get a straight shot with a hand drill. With that said, it doesn’t have to be perfect, worst case your bolt head wont sit perfectly flush on the holder. If i had access to a press and a little more time, Ild do it too. With the holder you have the ability to attach reflectors eh?

Im using paste and kapton tape, looks like it works and definitely alot easier. So im going to give it a whirl. Im not sure why i see everyone pollish the crap out of their NEW heatsinks (unless it old/used) Mine look to have a factory coating of thermal where the cpu normal sits. and this COB is almost the exact same size, Im probably just going to plop a little on and tape it down. bongsmilie
I wondered the same thing, and I ordered the exact same heat sinks as you, in the description of the item it lists the thermal paste, and I wondered if maybe it came with some on there, thanks for the heads up , now it makes me wonder as well about the polishing because my lazy butt is already dreading the drilling and tapping let alone lapping and polishing, hopefully nothern lights or Apique will have the answer on that one. those cob holders were only like 1.80 each, and I am considering just using the thermal glue paste and stick them on there and call it good,??
 

Zoltan32

Well-Known Member
On another note, what are you guys doing about water? I'm sure with soil its much easier to manage, but I'm going to need ~10 gal every week or two.

I have a 2nd small pond pump I use to drain the container into 5 gal buckets. And the other way around to fill. I leave the buckets outside to collect rain water currently.

My idea is to take some sort of inline filter, stick it in the cabinet, attach a tube on the outlet to drop in the resivoir. Then I can just fill my buckets with tap water, hook my pump up and filter/fill at the same time. Just gotta find the right filter setup.
 

Zoltan32

Well-Known Member
Ya I hear ya on that. I'm curious to what others have to say as well. I've never polished a heat sink for a new processor install on a computer.
I'm just going to keep an eye on the tape, the paste is kinda tacky as it is. Especially after it heats up from use.
 
Last edited:
Top