Been lurking around for a while. I finally decided to try growing. I dont actually consume, I have a significant other who consumes for medical reasons. Oddly enough, I dont smoke and have not in more than 20+ years.
I asked a friend for some extra seeds and purchased a bunch of hydro equipment. I am diving right in.
I purchased a 12 disk seedling tray and heating mat. I followed the instructions and had little shoots coming up within 2 days. After a week, 8 seeds sprouted and 4 did not do anything.
This is where my problems started, the shoots quickly hit the top of the seedling tray. So, I took the top off and put them in my dark room tent and turned on my metal halide light, keeping the light a good three feet above the seedlings.
I think the tent was too dry and I almost lost all of the seedlings. After one day it appered that two seedlings died and others were developing black tips. I quickly back-tracked. I purchased a taller seedling tray and put everything in there, recreating the environment in the small tray on a larger scale.
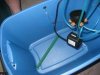
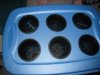
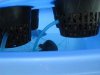
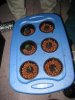
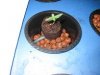
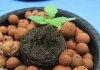
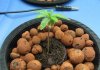
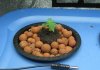
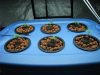
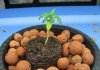
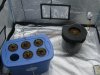
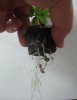
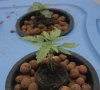
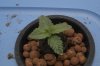
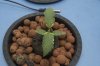
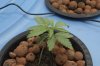
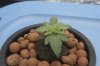
I have 5 seedlings that look like they might make it. If you look closely at the leaves, you can see the tips of the feeder leaves are black. Hopefully, since the first set of true leaves is out the plants will survive. On the left you can see my orignal tray (I put 4 new seeds in the remaining disks and am trying to germinate them). The black wire is a temperature / humidity probe for when the cover is on. I put the 5 living disks in a bowl so I can see how much moisture is under the disks and the extra water just laying around the bowl is to keep humidity up.

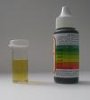
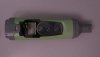
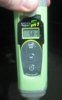
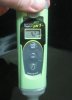
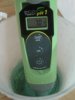
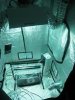
This is the setup from a little further away. You can see that there is also a humidifier in the room. I was having real troubles with humidity. Where I am at the ambient humidity is around 8%. The manual dial you can see in the picture shows the humidty now around 70%, I am letting it creep back down now.

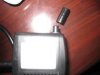
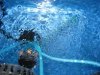
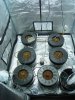
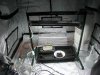
This is my dark room with the metal halide turned on. This is the location I was running it from (3 or so feet) above my seedlings. I think it was just to intense and overheated the plants. I have two fresh air intakes at the bottom of the tent with an exhaust fan at the top. In addition, the metal halide lite has a 6" fan on it keeping it from heating the tent. My digital thermometer showed the temp at plant level to be in the high 70's to low 80's. I will note more when the plants are bigger.

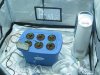
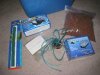
Last but not least, my bubbleponics system arrived today (this was my motivation to post this).

There were several posts around about this system, lots of opinions. Basically it came down to this. It seemed I should be able to build one for cheap, but I was uncomfortable since I did not know what I was doing. So, ordered this to see how it works and decide if I should build or buy the next one.
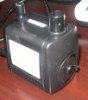
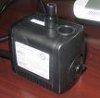
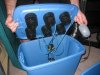
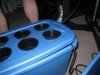
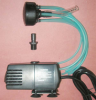
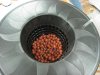
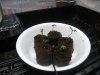
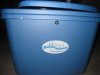
The whole system with shipping was $125, let me save you $75. You can see all the parts here, 6 Gallon Sterilite tote (blue bucket), baggie of hydroton (red clay balls), air pump (box in front), bubbler (green stone), Water pump (box in back), Rockwool cubes (white blocks in baggie) and DIG Six outlet adjustable drip emitter (google it). Total purchase price Less than $50 bucks.

I dont begruge someone making a profit, but 150% markup kind of hurts my feelings.
That said, I would purchase it again, if you dont know what you are doing, there is nothing like getting the first kit with all the pieces. You can always home build the next one. In all fairness, their website pretty much tells you everything they use comes from wal-mart / home improvement stores, so its not like they are trying to deceive you.
I asked a friend for some extra seeds and purchased a bunch of hydro equipment. I am diving right in.
I purchased a 12 disk seedling tray and heating mat. I followed the instructions and had little shoots coming up within 2 days. After a week, 8 seeds sprouted and 4 did not do anything.
This is where my problems started, the shoots quickly hit the top of the seedling tray. So, I took the top off and put them in my dark room tent and turned on my metal halide light, keeping the light a good three feet above the seedlings.
I think the tent was too dry and I almost lost all of the seedlings. After one day it appered that two seedlings died and others were developing black tips. I quickly back-tracked. I purchased a taller seedling tray and put everything in there, recreating the environment in the small tray on a larger scale.
I have 5 seedlings that look like they might make it. If you look closely at the leaves, you can see the tips of the feeder leaves are black. Hopefully, since the first set of true leaves is out the plants will survive. On the left you can see my orignal tray (I put 4 new seeds in the remaining disks and am trying to germinate them). The black wire is a temperature / humidity probe for when the cover is on. I put the 5 living disks in a bowl so I can see how much moisture is under the disks and the extra water just laying around the bowl is to keep humidity up.
This is the setup from a little further away. You can see that there is also a humidifier in the room. I was having real troubles with humidity. Where I am at the ambient humidity is around 8%. The manual dial you can see in the picture shows the humidty now around 70%, I am letting it creep back down now.
This is my dark room with the metal halide turned on. This is the location I was running it from (3 or so feet) above my seedlings. I think it was just to intense and overheated the plants. I have two fresh air intakes at the bottom of the tent with an exhaust fan at the top. In addition, the metal halide lite has a 6" fan on it keeping it from heating the tent. My digital thermometer showed the temp at plant level to be in the high 70's to low 80's. I will note more when the plants are bigger.
Last but not least, my bubbleponics system arrived today (this was my motivation to post this).
There were several posts around about this system, lots of opinions. Basically it came down to this. It seemed I should be able to build one for cheap, but I was uncomfortable since I did not know what I was doing. So, ordered this to see how it works and decide if I should build or buy the next one.
The whole system with shipping was $125, let me save you $75. You can see all the parts here, 6 Gallon Sterilite tote (blue bucket), baggie of hydroton (red clay balls), air pump (box in front), bubbler (green stone), Water pump (box in back), Rockwool cubes (white blocks in baggie) and DIG Six outlet adjustable drip emitter (google it). Total purchase price Less than $50 bucks.
I dont begruge someone making a profit, but 150% markup kind of hurts my feelings.
That said, I would purchase it again, if you dont know what you are doing, there is nothing like getting the first kit with all the pieces. You can always home build the next one. In all fairness, their website pretty much tells you everything they use comes from wal-mart / home improvement stores, so its not like they are trying to deceive you.
Attachments
-
 17.3 KB Views: 41
 -
 15.1 KB Views: 42
 -
 24.5 KB Views: 42
 -
 15.9 KB Views: 41
 -
 11.5 KB Views: 40