My First DIY Cab Grow: Using the K.I.S.S. Method

notballin

Member
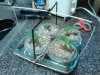
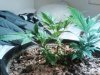
New toys came in. ONA Gel (Linen smell) and the Dyna-Gro Bloom. I decided to put everything together.

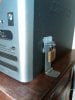
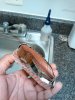
I'm using 4 tablespoons of the ONA gel in the fan-bucket that I made earlier in this grow. It's diluted with water (to the point where a few of the gels begin to float a bit).

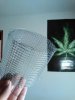
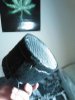
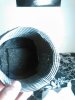
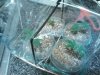
I decided to heir on the safe side and use a carbon air filter as well, though. I had some activated carbon and some spare kitchen cloth laying around. Throw in some duct tape, cardboard, needle, and thread and you get the following results:

IMG_20131009_220331.jpgIMG_20131009_220353.jpgIMG_20131009_220614.jpgIMG_20131009_221413.jpg

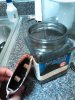
A re-usable carbon air filter, measured to fit at the end of the exhaust cap. Anything that does get through the activated carbon gets killed by the ONA Gel.

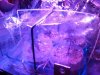
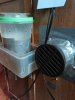
I'm satisfied with it so far. I've smoked a few bowls today and 5 to 10 minutes after I take a hit, all I smell is linen...

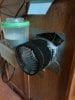
I had to turn the air bucket speed to low (the PC fan came with a speed controller attached to it).

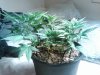
EDIT: As you all can see, I scratched the co2 idea. This should be enough to produce high quality plants. I'll probably come back to the co2 idea later (with a more advanced design that can measure output).
 

notballin

Member
Update. The above carbon filter idea was garbage. It limited airflow and I doubt it'd get the job done. So I decided to step my game up and make this:
IMG_20131012_170616.jpgIMG_20131012_183339.jpgIMG_20131012_183348.jpgIMG_20131012_184524.jpg

Wire mesh and a HEPA Pre Air Filter (already contains activated carbon). Leaves room for airflow, no leaks, the back is wrapped with plastic wrap just in case, and it's easy to take apart and replace.
-I've put so much work into this already. I figured "what's another hour or two to make sure I do it right????

On the box side of things, I've discovered the magic of Gorilla Tape. I used it to reinforce the lining of my box. I also added a bottom latch (to ensure the door stays sealed... it's an old slightly uneven cabinet that's held together by brute force and some superglue) and a latch to the side of the PC.

IMG_20131012_184832.jpgIMG_20131012_185718.jpg

Exhaust is running well now, temps stable at 80, and still no light leaks that I can see (even when it's dark).


As far as the plants go... pictures matter more than words:
IMG_20131012_185756.jpgIMG_20131012_185851.jpgIMG_20131012_190818.jpg

I begin flowering at the end of next week.
 

notballin

Member
SQEiGdOh.jpg

Are these preflowers?

-I really hope Keeper's a female... it performed so well during veg under high stress.

EDIT: Same thing's happening to the Peppermint Kush and Duckfoot. Happy days. This must mean they're waiting for me to flip the switch.
 

NoSalt

Member
Pic isn't clear enough for me to tell. The green pointy things growing off the stem at every node are stipules, and both male and female plants have them. Between the Stipule and new branch forming off the main stem is where the preflowers will be located. Female preflowers are kind of teardrop shaped, formed from plant material, called a calyx, with 2 hairs that are normally white sticking out the top, called pistils. Try to upload a better higher res. Photo.
 

NoSalt

Member
Just realized how much it resizes and shrinks photos when uploading... ouch. Here are some examples of female preflowers. I'm guessing that pic you uploaded WAS good quality.
Screenshot_2013-10-15-01-39-43.jpgScreenshot_2013-10-15-01-42-11.jpgScreenshot_2013-10-15-01-47-57.jpg
 

notballin

Member
I'm back. Had to go out of town. Long story short, I needed a way to water the plants when I wasn't home...

http://www.amazon.com/Hydrospike-Hs-300-Worry-free-Automatic-Watering/dp/B002558KJQ
was my solution. I didn't think they'd work, but I came back from the trip with plants that were damn near double in size. I just need to make sure I use a large enough water tank next time.

First up, some clone pictures. I took a few clones, placed them in a water bottle, and went to work constructing a cheapskate cloner. Decided to use 50/50 perlite and vermiculite. The frame is made of coat hanger (you'll notice a trend with using coat hangers with me), rubber bans, a zip-tie at the joining point on the top, and some plastic wrap. The containers are tub-a-ware individual containers with 4 drain holes at the bottom and 4 water intake holes at the very lower portion on each side of each container. The idea is to fill with water (that has a tiny bit of liquid kelp in it) and let them do their thing.

Pictures:

sCo6ju7h.jpgT0kA8uGh.jpgpNFoNarh.jpgg2IAkQWh.jpgBCDYNfgh.jpgk8u8exjh.jpg

From what I've learned from my quest to "demystify cloning," if they can root by just sitting in a bottle of water, I'm sure this will work wonders.

All of these clones are from my Peppermint Kush plant. I plan on throwing 2 into flower next run for yield, and breeding two (collodial silver on one) for femenized seeds.

Now for pictures of the plants. Good vibes all around... I flipped for flower at midnight (light schedule is noon to midnight on, midnight to noon off), and now it's just a waiting game.
Note: I removed a lot of the lower foliage from each plant to ensure they'd focus on developing strong cola's. It's a stealth grow, so I figure this is the best way to get a decent yield.

IMG_20131019_170910.jpgIMG_20131019_171110.jpgIMG_20131019_171329.jpg
From left to right: "Keeper" (unknown bag seed, looks to be sativa dominant), Peppermint Kush Femenized (Barney's Farm, Indica Dominant), and Duckfoot (unknown bagseed, grows like an indica, looks like a Sativa).

I'll keep everyone posted!

Small edit: The water will be kept clean with a few drops of hydrogen peroxide (the perlite and vermiculite will wick the water up as it needs it) and there's a flap with holes that I'll lift once a day to ensure proper gas exchange (fresh air).
 

notballin

Member
Just something I've been thinking about that people might like.

If you have a small spray bottle and want to foilar feed your plants (no worries, the moment I see pistils, the feeding stops), you can use q-tips to measure out a proper amount. Dip a q-tip in your selected solution, then dip and swash it around in the bottle.

Beats measuring it out and then dumping what you can't use.

EDIT: I've also been looking into soil moist. It could have a double use. Mixing it with ONA and water in the bucket to prevent the water from evaporating so fast, and could probably have some application in a dixie cup grow (since dixie cup grows strain on watering). I'll come back with pictures of the ONA idea later.

RE:EDIT: 1/2 cup Soil Moist + 1/4 cup ONA Gel + 3 cups water = really strange looking ONA paste. It seems to be working wonders and I'll let everyone know how long it lasts before I have to do anything to it. This looks promising, though.
 

n0tmycupoftea

Well-Known Member
Everything looks great so far and awesome find on the hydrospike. I remember someone on another forum having your dilemma and creating one with a water bottle, some kind of tank and some kind of pump. Also great job on the cloner.
 

Sensi Sensei

New Member
Great job notballin. Thank you for the knowledge and inspiration. I'm in the process of building my own stealth box and was championing CFL until this post. I always thought that LEDs were too expensive but you've shown me otherwise. I see that you're using two kinds of LEDs. Would you be more specific about them, you mentioned using "e27red/Blue60 grow lights" in an earlier reply. How many of one as opposed to the other you're using and what wattage each, and what are the advantages. Thank you much for your info and keep up the great work.
 

notballin

Member
Great job notballin. Thank you for the knowledge and inspiration. I'm in the process of building my own stealth box and was championing CFL until this post. I always thought that LEDs were too expensive but you've shown me otherwise. I see that you're using two kinds of LEDs. Would you be more specific about them, you mentioned using "e27red/Blue60 grow lights" in an earlier reply. How many of one as opposed to the other you're using and what wattage each, and what are the advantages. Thank you much for your info and keep up the great work.
Thank you for the compliments!

http://www.amazon.com/gp/product/B00CXTQRWQ/ref=oh_details_o03_s00_i00?ie=UTF8&psc=1
is the light I'm using in my cabinet. It's strange that they're no longer available, because they seem to work very well. It's a 12 Watt and it has a heatsink that dissipates heat. They're cooler to the touch than CFL's. I couldn't really get into specifics, short of it has 2 large blue diodes and 10 large red diodes. They're making my babies punch out 7 bladed leaves and they don't heat the box, so I'm happy with them.

http://www.dhgate.com/product/e27-red-and-blue-60-led-3w-hydroponic-plant/151484158.html
Is where I got the 5w equivalent's from. They're nowhere near as good as the ones I linked above, but they're excellent for a PC grow box because of their size. They do generate a bit more heat (no heatsink) than the first light I linked, but they're still cooler overall to the touch than a CFL is.
 
Top