Alright, I have made a lot of progress since my last post. I completed the 12 gallon DWC tub, I had to go to a local pet supplies store to get a larger air pump. I spent $20 on it and it has two outputs and a control knob, I hooked it up to the air stones and they both came to life. I was unsure if they were producing adequate bubbles and aeration so I let the hydroton pots sit in there for an hour to verify the pots were getting the water.
I tested the PH and it was neutral for the most part, I will be getting more accurate meters for the nute solution shortly. I added my first round of nutes and started at 1/4 strength. The bucket is 12 gallons, I don't have it filled all the way so I am assuming 10 gallons.
I didn't want to put all of my eggs in one basket and transplant all of the babies at the same time and them all die lol So I transplanted two healthy looking ones last night and let them drink in the 1/4 solution and see how they were in the morning before transplanting the other ladies. Everything seems to be going good at the moment, I have been checking every couple of hours and I can already see them perking up.
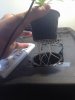
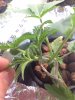
1. New air pump, going into the side of the bucket. You can see the water level line as well. STILL NO LEAKS

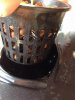
I also have a humidifier back there because the room was really dry.
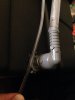
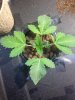
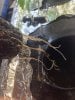
2. The first plant I transplanted, this is the next morning after drinking nutes all night. I see some roots coming out!!!
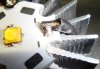
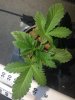
3. A shot just to show you the top of the bucket, with 4 babies in net pots. One about to be transplanted and my seedling dome.
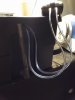
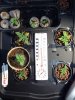
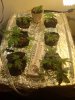
4. An overhead shot, the temps are right around 70 as well as humidity. Everything felt a little cold, so I moved the lights a little closer to keep them warm.
Still no update on that fucking driver from China

Guess we still wait........

") Some of the joints held and some did not.
Some of the joints held and some did not.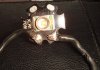

 Some are a little smaller but they were all sprouted within a few days of each other. I started them in Peat moss pellets and a few of them I removed from the pellet when I placed it in the net pot, and some I left them in the pellets thinking that if they became a problem later I could remove them. I ripped some roots out of the ones that I removed the pellets. All of the root growth that poked through the netting was severed, I can see the stunting and consider this a lesson learned
 So I was thinking of adding two more LEDS and was considering what spectrum to get. So far total I have (3) 100w CFL 5000k bulbs, (2) Vero 10 5000k LEDs (not yet hooked up), (1) CXA3070 3000k LED. I was thinking of getting one more Vero 29 or CXA3070 maybe CXA3050 in the 2700K and one in the 5000K just to fill out the spectrum a little while adding a significant bump in power. On second thought since I am only using one DWC tub, maybe instead of adding another 5000K light that maybe I should get another 3000K and get a 2700K to use only when flowering. Once again any input much appreciated!
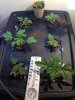
 I noticed how warm the black lid was and the res temps were rising, I wanted to do something right now. This is a band-aid and will soon be replaced with the aluminum foil duct tape!

