endersedai
Member
Hi all! Been creeping the forum for a while, gaining some good knowledge! Decided to build my own COB lights based on what I've seen people say in the forums.
Parts List
15 x Citizen CLU048-1212 3500k 90CRI GEN5
15 x Ideal Holders/Adapters
15 x LEDiL Angelina reflector
15 x 133mm Heatsinks
Arctic Thermal pads
5 x Mean Well HLG-185H-36B
100k ohm Linear Potentiometer (20pk)
18awg solid core wire (White and Black spool @ 100' in length each)
Wago 222-415 LEVER-NUTS 5 Conductor (40pk)
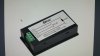
5 x DROK Digital Multimeter DC 6.5-100V 20A
10 x (5.3" X 3.3" X 1.6") PROJECT BOX (TB-4)
5 x (1" x 1") Aluminum 90 Angle @ 8' in length
5 x Stainless Steel 1/4"-20 threaded rod
Stainless Steel Nuts and Washers for 1/4"-20 thread (100pk each)
1/16" diameter galvanized steel wire w/crimping loops to hang fixtures
Self Drilling Lath Screws #8 x 3/4" (1lb box)
Rust Oleum Metallic Spray Paint - Dark Steel (used aprox. 5-6 cans)
5 x Power cords
5 x Outlet w/ fuse & SPST Switch (IEC320 C14)
TechFlex F6N0.25BK Flexo F6 General Purpose 1/4-inch Braided Cable Sleeve (20ft roll)
Tools On Hand
Orbital Hand Sander - 80grit and 120grit pads
20v Cordless Drill
Miter Saw w/Aluminum cutting blade
Dremmel w/ez attachment and Metal cutting blades
Screwdrivers
Drill bits
Wrenches
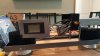
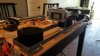
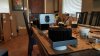
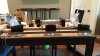
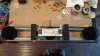
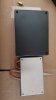
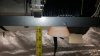
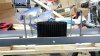
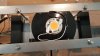
After considering how I should build my lights, I decided to build fixtures that contained 3 lights each. I decided to do this based on what Cobkits said about the Citizen 1212's being most efficient at ~50w. Paired with the driver I am using, 3 lights on it gives me a little over 50w per light when wired in parallel. I also felt that 3 gave good spacing on a 3ft long fixture. The fixtures ended up being aprox. 3'x5.5"x8" (LxWxD).
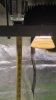
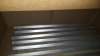
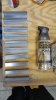
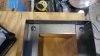
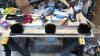
I first cut the 90 angles to size. Used my hand sander to sand off burrs and remove the coating. Started with 80 grit and then went to 120 grit. The spray paint I choose to use is a primer and paint. I only did 1 coat, but when applying I would wait a couple of minutes and apply another coat (can suggested this). I am pleased with the results.
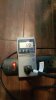
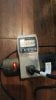
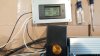
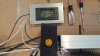
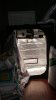
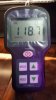
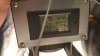
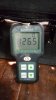
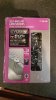
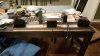
Images of the Kill-A-Watt and the Volt/Amp/Watt Meter show the min and max of the potentiometers ability.
I do have a few things left to do, some things I've yet to receive (crimping loops for the 1/16" wire to hang the fixture).
I REALLY enjoyed this project so much. Would love to make some extra $$ on the side doing it if I can. Would appreciate comments about your thoughts on this too.
Parts List
15 x Citizen CLU048-1212 3500k 90CRI GEN5
15 x Ideal Holders/Adapters
15 x LEDiL Angelina reflector
15 x 133mm Heatsinks
Arctic Thermal pads
5 x Mean Well HLG-185H-36B
100k ohm Linear Potentiometer (20pk)
18awg solid core wire (White and Black spool @ 100' in length each)
Wago 222-415 LEVER-NUTS 5 Conductor (40pk)
5 x DROK Digital Multimeter DC 6.5-100V 20A
10 x (5.3" X 3.3" X 1.6") PROJECT BOX (TB-4)
5 x (1" x 1") Aluminum 90 Angle @ 8' in length
5 x Stainless Steel 1/4"-20 threaded rod
Stainless Steel Nuts and Washers for 1/4"-20 thread (100pk each)
1/16" diameter galvanized steel wire w/crimping loops to hang fixtures
Self Drilling Lath Screws #8 x 3/4" (1lb box)
Rust Oleum Metallic Spray Paint - Dark Steel (used aprox. 5-6 cans)
5 x Power cords
5 x Outlet w/ fuse & SPST Switch (IEC320 C14)
TechFlex F6N0.25BK Flexo F6 General Purpose 1/4-inch Braided Cable Sleeve (20ft roll)
Tools On Hand
Orbital Hand Sander - 80grit and 120grit pads
20v Cordless Drill
Miter Saw w/Aluminum cutting blade
Dremmel w/ez attachment and Metal cutting blades
Screwdrivers
Drill bits
Wrenches
After considering how I should build my lights, I decided to build fixtures that contained 3 lights each. I decided to do this based on what Cobkits said about the Citizen 1212's being most efficient at ~50w. Paired with the driver I am using, 3 lights on it gives me a little over 50w per light when wired in parallel. I also felt that 3 gave good spacing on a 3ft long fixture. The fixtures ended up being aprox. 3'x5.5"x8" (LxWxD).
I first cut the 90 angles to size. Used my hand sander to sand off burrs and remove the coating. Started with 80 grit and then went to 120 grit. The spray paint I choose to use is a primer and paint. I only did 1 coat, but when applying I would wait a couple of minutes and apply another coat (can suggested this). I am pleased with the results.
Images of the Kill-A-Watt and the Volt/Amp/Watt Meter show the min and max of the potentiometers ability.
I do have a few things left to do, some things I've yet to receive (crimping loops for the 1/16" wire to hang the fixture).
I REALLY enjoyed this project so much. Would love to make some extra $$ on the side doing it if I can. Would appreciate comments about your thoughts on this too.
Attachments
-
 3.6 MB Views: 90
 -
 3.7 MB Views: 88
 -
 4 MB Views: 95
 -
 1.8 MB Views: 89
 -
 1.9 MB Views: 91
 -
 3.4 MB Views: 91
 -
 4.4 MB Views: 95
 -
 3.7 MB Views: 94
 -
 3.8 MB Views: 95
 -
 3.4 MB Views: 95
Last edited: