Knott Collective
Well-Known Member
We've developed some very simple, low cost, scalable and reusable gear that we utilize for drying. We employ cardboard boxes and coat hangers. Available at Home Depot, the 3 cubic foot "medium" box is just right. You've probably got way too many coat hangers already.
We try to slow the drying process with 10-14 days as a target. We've found that slowing the drying process results in a much better outcome. Here on the west coast our humidity can get ridiculously dry, sometimes in the single digit range. If we dried our buds in these conditions in as little as three days we would have an inferior product.
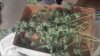
When harvesting we pull the fan leaves and cut branches to form a "V" so they can be hung upside down for the drying process. We cut them to a length that fits the boxes without allowing the tips to strike the ground and this length is perfect for the trimmers. Easy for them to handle. We can also easily move the boxes to a remote trimming facility away from the main facilities (for security reasons).
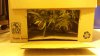
Here's a box ready to move to the trimmers:
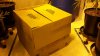
OMG - it's full of Super Lemon Haze!
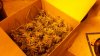
We make flaps on the sides of the boxes that we can open up and regulate the amount of air circulation. First day/night the flaps are all open to knock the moisture content down below 85% or so but then we close them up and go as slowly as possible. We sort of "burp" the boxes every day or two and check the progress.
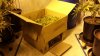
The branches are cut so they don't drag the ground. As you might see we do not finish trim at this point. The sugar leaves will wrap down around the buds as it drys and this keeps much more of the aroma in the product. In my humble opinion the boxes seem to have a similar effect - they keep all the stanky goodness concentrated as the drying process transpires. The nose on this Lemon is off the charts.
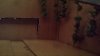
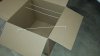
Last run of Lemon was especially productive. We ran out of boxes and we've got a lot of them. Had to run down to HD and get a dozen more. I took a shot as the guys were putting them together. At this point the flaps are not cut but you can see the holes made in the side of the boxes. They're 3" apart and a few inches below the top. Easy to cut and bend a coat hanger, then stick the bent ends in the holes in the box. We tape the flaps down on the hangers to keep them in place. Easy, easy. easy.
Every run is slightly different. We watch the progress carefully and try to go into the 5 gallon airtight buckets at about 65-70%. We also "burp" the buckets and slowly settle into the perfect 60-62%. Works for us. may work for you.
Please take what you need and leave the rest.
Peace & Out.
We try to slow the drying process with 10-14 days as a target. We've found that slowing the drying process results in a much better outcome. Here on the west coast our humidity can get ridiculously dry, sometimes in the single digit range. If we dried our buds in these conditions in as little as three days we would have an inferior product.
When harvesting we pull the fan leaves and cut branches to form a "V" so they can be hung upside down for the drying process. We cut them to a length that fits the boxes without allowing the tips to strike the ground and this length is perfect for the trimmers. Easy for them to handle. We can also easily move the boxes to a remote trimming facility away from the main facilities (for security reasons).
Here's a box ready to move to the trimmers:
OMG - it's full of Super Lemon Haze!
We make flaps on the sides of the boxes that we can open up and regulate the amount of air circulation. First day/night the flaps are all open to knock the moisture content down below 85% or so but then we close them up and go as slowly as possible. We sort of "burp" the boxes every day or two and check the progress.
The branches are cut so they don't drag the ground. As you might see we do not finish trim at this point. The sugar leaves will wrap down around the buds as it drys and this keeps much more of the aroma in the product. In my humble opinion the boxes seem to have a similar effect - they keep all the stanky goodness concentrated as the drying process transpires. The nose on this Lemon is off the charts.
Last run of Lemon was especially productive. We ran out of boxes and we've got a lot of them. Had to run down to HD and get a dozen more. I took a shot as the guys were putting them together. At this point the flaps are not cut but you can see the holes made in the side of the boxes. They're 3" apart and a few inches below the top. Easy to cut and bend a coat hanger, then stick the bent ends in the holes in the box. We tape the flaps down on the hangers to keep them in place. Easy, easy. easy.
Every run is slightly different. We watch the progress carefully and try to go into the 5 gallon airtight buckets at about 65-70%. We also "burp" the buckets and slowly settle into the perfect 60-62%. Works for us. may work for you.
Please take what you need and leave the rest.
Peace & Out.
Last edited: