StoneDHedgE
Well-Known Member
Just voided the UL and CSA if it even is. Fire happens.....probably no insurance.
If a fire happens inside the tent next to me, I don't need to be growing anyhow. I've been around long enough to know what's right and wrongJust voided the UL and CSA if it even is. Fire happens.....probably no insurance.
Hold on, what quick connectors are we talking about here? Because the daisy chain thing that came with it, I don't use. The ballast are connected directly into my timer. That's actually what the OP was about... anyone knowing where to get the "master controller" for this thing lolMore or less agree with both of you: you can make really good gains in bang for buck by sourcing some cheap parts in china but you shouldnt think they have the same performance as original diodes, no matter what brand name attached to it. A good idea is to try to work out power per diode and diodes per dollar. If you can get some thing cheap and run it at less than .2w per diode your usually in the clear as long as you have some kinda of heapsinking, usually a backing alu sheet is enough.
For op: another important thing to look out for in these cheapo lights are those quick connectors. If they dont make perfect contact theres sometimes a bit of arching electricity which can cause them to melt and possible fire risk. Seen it on a few mid range lights here over the years, not sure if it was Mars or spiderfarmer.
Wagos, quick connectors and drivers: i source it from any local place. Boards and strips: if i can get a decent deal on alibaba i go for that generally. The HLG r-spec deal on recently is really good especially if youre US based. But for me it works out better to buy china and get a spare or two and see the boards and strips as somewhat perishable.
If you want tweaked spectrum it may be better to go with something more reputable.
Sorry. But I disagree. Some of your questions....back me up. You aren't as strong in electrical or electronics as you think.If a fire happens inside the tent next to me, I don't need to be growing anyhow. I've been around long enough to know what's right and wrong
Ok, i didnt realize you werent using them. Just friendly advice not in any way an attackHold on, what quick connectors are we talking about here? Because the daisy chain thing that came with it, I don't use. The ballast are connected directly into my timer. That's actually what the OP was about... anyone knowing where to get the "master controller" for this thing lol

I think you can build a controller/ contactor box if you're switching a bunch of drivers at the same time.Hold on, what quick connectors are we talking about here? Because the daisy chain thing that came with it, I don't use. The ballast are connected directly into my timer. That's actually what the OP was about... anyone knowing where to get the "master controller" for this thing lol
I just wanted it for the dimmer. I'm not sure if that's what you're referring to you havingI think you can build a controller/ contactor box if you're switching a bunch of drivers at the same time.
The inrush current is probably pretty high with just two let alone 4-6-8 or more.
I'm using a mechanical timer to trigger the contactor for up to 6 drivers per space.
PM me for more info if you want!


If you paid anything over $20 for that like you paid too much.Scroll to bottom paragraph for the question! Lol
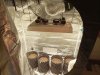
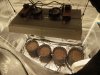
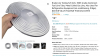
So I purchased these on sale from a guy on Amazon. It's made by a company called Carambola and the model is a "White Rose 2400" or something - it claimed 4000w on the ad, but its not lol. It's basically two 12"x12" aluminum panels, with lots of good quality Samsung LEDs, IRs, etc. mounted underneath (Refer to pictures - im VERRRRY new at this LED thing). Anyhow, they both have their seperate drivers/ballast mounted on top. Both are powered separately with a single split 110v power plug. The two panels are held together using 2 small reflectors on the side, as a makeshift hood. The design is nice though and for the price, I couldn't pass it up... BUT, I knew it would need some upgrading. I've built all of my old HID lights and I'm familiar with electronics, so it was nothing I didn't think I couldnt handle.
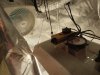
For starters, I knew this would need some upgrading for cooling. With 550+ LEDS, I knew the 1/8" piece of aluminum wasn't a good enough "heatsink", as the seller claimed. I did some test in my new 4x2x5ft tent and confirmed that this thing is BRIGHT AS HELL and puts off mega heat. I probably could've cooked an egg on the aluminum backing, after an hour of being on! So I've taken off the drivers and I'm in the process of applying actual heatsink across the entire top of the aluminum with thermal conductive paste. I also ordered two 4x4" cpu cooling fans, on top of 1" heatsink, to mount in the dead center of both lights. I went a step further and even bought small 2" fans on top of heatsink, to put ontop of the ballast. The ballest are being moved outwards, as well as raised, to make room for the fans that will halfway take their place. The fans have their own 12v power source and will just be on the timer with the LEDS.
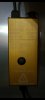
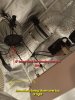
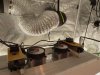
My problem now lies in the dimmer function. The kit originally came with a "master controller" that had a dimmer and the veg/bloom booster switch on it. While this one I have still has the bloom booster switch on top of the ballast housing, no dimmer/master controller came with it (seller gave a partial refund, but zero reason as to why it didnt and no advice on how to get one). Funny part, is that it still came with the daisy chain to connect to the ballast and controller that doesn't exist. And that's where I'm at....
I can't find a controller that uses this type of plug ANYWHERE. I can find extension cords and plugs of the same 3 pin type, but no dimmer or even a name of the type of plug. I figure it's just like any other ordinary potentiometer and just needs a 1-10v connection as the dimmee? The problem is I've only ever hooked pots up with 2 wires for a dimmer. You know? So you can just control the 1-10v to dim the light. These plugs obviously have 3 wires inside (I cut to verify) and its a red, black and yellow. So most pots have 3 pins, can I just connect these 3 wires to a pot's 3 connections and be good to go? Can't be that easy..... I don't have that type of luck!
**UPDATE: After measuring the black and red wire coming off the daisy chain, with both ballast connected, the readout was bouncing around from 10-12v. It was constantly fluctuating. Would that be the two wires to hook to a potentiometer?**
Or what do I do here to just have a simple dimmer? The daisy chain uses 2 male connectors to both drivers, which then goes to a male and another female right next to it? I think this was supposed to be for the other model they offer, which is just another one of these panels added. I could just leave the other female disconnected regardless. But please, help me and refer to the photos!
Gotcha. Here ya go.Nope.
When you switch on a LED driver it conducts a huge draw of current for a sec, and that's really hard on components like your breaker and the contactor is rated for bigger amperage loads than the breaker is typically designed to repeatedly take. Same goes for the switches and timers, etc.
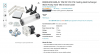
I asked for a clear picture of the driver so I might be able to see things like whether it's a CC or CV driver (or both), operating voltage range and the current region.
You put up what looks like the dimmer box but I think the driver has useful info on it...