Heatsinks for DIY LED lamps
- Thread starter SupraSPL
- Start date
Greengenes707
Well-Known Member
For many price has never held them back. We are seeing people running cxa AB's at 350-900ma...cost is low on the list for some if performance is there even slightly. At high drive currents it might show more. Out of my drivers range though...I need to pick up a >2000ma driver to have on hand.At $18 each, makes it hard to justify considering how little of an advantage pk3 has over pre applied paste on the alpine.
It says pack...to me that implies more than 1. But I do agree even 2 or 3 is still pricey, specially for 1. One sheet can make 2 cxa3070 pads, and possibly 3. They do make bigger sizes that could produce more cxa sized pads.
Much of my point was that pads have just as good of thermal performance if, like anything, you get quality. Paste has better performance across all brands/makes for sure. But the common concept(and historically tested) that paste is better than pads, isn't always true these days.
Pads are also even thickness, which is a plus for repeatable and consistent performance. To add on to consistency...for the professional manufacturing of lights(yes I know it's a DIY thread)...factories prefer pads from my experience(they like expoxies too, lazy fucks). They don't pay for them, so they don't care what they cost, but they are easy and clean enough to have any skill level work with them.
They make enough pads over 10w/mk that pads should be considered an option even for DIY'ers. They are great with holders.
I was also kind of asking if that is a true 17w/mk...and not some adjusted figure.
Last edited:
AquariusPanta
Well-Known Member
@Greengenes707
I like options. The pads add to the list.
Added functionality and simplicity sometimes costs a little more but to some it's well worth the extra expenditure.
I like options. The pads add to the list.
Added functionality and simplicity sometimes costs a little more but to some it's well worth the extra expenditure.
bicit
Well-Known Member
I don't disagree that pads are a worthy consideration, esp in light of supra's testing. Just maybe not those particular ones. you could only get one vero 29 out of a 50x60  . Even for those with deep pockets would probably find that hard to swallow. Smaller chips likely won't get driven hard enough to notice.
Pads certainly simplify assembly. Considering paste can ooze out around the cob holder of the Vero series and onto the les if over applied.
Pads certainly simplify assembly. Considering paste can ooze out around the cob holder of the Vero series and onto the les if over applied.
Thank you bicit.Most people use the total power displacement to be on the safe side. Though you could do the latter as well.
I read over the entire thread twice and couldn't remember if the calculations from theories were for heat or total disipation. I figured most were using total disipation.
SupraSPL
Well-Known Member
Yep for the most part we are using dissipation because we have a wide variety of efficiencies and just looking for a rule of thumb for DIYers to work with. Taking LED efficiency into account is a more accurate method if you happen to know your efficiency at the intended drive current.
randomlygrow
Well-Known Member
AquariusPanta
Well-Known Member
I see fins. What am I looking at?I know this isn't the cheapest, but you get a lot of quality for your money, and passively with some minimal moving air over it, i'd imagine it would be awesome?

here
Abiqua
Well-Known Member
No one has mentioned this, so I will chime in, especially after doing some reading after asking GG707 about his thermal pads and confusing myself that much more...
At DigiKey, when you order your Cobs, there is a few links at the bottom, and with the Vero's were these Loctite thermal pads for $.86
http://www.digikey.com/product-detail/en/1886887/1000-130-ND/4898949
ds: http://media.digikey.com/pdf/Data Sheets/Loctite PDFs/TCF_ 4000_PXF.pdf
1st, I can't seem to find a thermal conductance rating, BUT the thermal impedance is the 1st thing above the text....
Notice @30psi, the thermal impedance is about the same as PK3 thermal paste [0.013 ℃-in²/W]
The whole range of PK1,2,3 respectively is...0.017 * 0.015 * 0.013 ℃-in²/W and all have a thermal conductance of
10.2 W/m-℃
This isn't a knock on PK3 by any means, in fact, with all the positive data provided by Supra and everyone else emulating, I think that these pads have some serious potential...........
Why Care?
Well.....lets start with impedance which might turn out to be the one of the more important #'s for calculating thermal "stuff".....
http://www.arlon-thermal.com/thermal_prop/
Thermal Impedance (q, m2*K/W):
Thermal impedance is defined as the total opposition that an assembly presents to the flow of heat. In practice the assembly represents the material itself and the interface between the material and the surfaces it is in contact with. Thermal impedance can provide the designer with more information than either conductivity or resistance because impedance includes the material interaction with a surface. However, the designer must remember that different surface topographies and pressures will affect impedance. Therefore the impedance measured by a standardized test method like ASTM D5470 will not necessarily translate into the impedance of the material in application. In fact, the impedance measured by one ASTM D5470 test fixture may not equal the impedance measured by another due to differences in the interaction of the material with the test fixtures surfaces. The thermal impedance is the sum of the material resistance and contact resistance.
So Two question arise out of this.....
1st, the phase change for the thermal pads is 45C. I have seen two builds plus my own, where the thermal paste, looks like it doesn't get hot enough i.e go thru phase change. Now I don't know enough to be making a valid opinion here, but it is interesting to see.....
I have a punctuated theory, that says the impedance is too low initially when firing up the COB's and can cause may enough distortion to prevent phase change or the thermal paste possibly has a higher phase change temperature than the silicon pads, Which seems somewhat unlikely, but impedance is based on thickness and the thermal pads seem to have less variability because of tolerances and a low phase change..........
II keep coming back to the advice I first got when installing CPU's, "thinnest line possible"......
#2
Can we measure the psi we apply and how....granted I still don't fully understand the relationship between conductance and impedance and I don't have a thermal cond. # to compare to the PK conductance rating.....
but is there a way to measure the pressure across the Cob surface? Without some research on my part I am clueless, but interested.
For instance, Ideal says to mount the ChipLoks down @ 3.5 "/Lbs. Could you then calculate the surface pressure with the diameter of the hardware and the mounting angles?
Last edited:
churchhaze
Well-Known Member
Conductance and impedance are multiplicative inverses. C = 1 / R
Pressure is force per area, so if you know the area of the cob surface and how hard you're pressing, you know the average pressure. (assuming even pressure)
Pressure is force per area, so if you know the area of the cob surface and how hard you're pressing, you know the average pressure. (assuming even pressure)
#2
Can we measure the psi we apply and how....granted I still don't fully understand the relationship between conductance and impedance and I don't have a thermal cond. # to compare to the PK conductance rating.....
but is there a way to measure the pressure across the Cob surface? Without some research on my part I am clueless, but interested.
For instance, Ideal says to mount the ChipLoks down @ 3.5 "/Lbs. Could you then calculate the surface pressure with the diameter of the hardware and the mounting angles?
SupraSPL
Well-Known Member
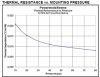
You raise a good point abiqua, and I wish I had some hope for the thermal pads because that would be very convenient and helpful. But I suspect the thermal conductivity of that pad is very poor compared to PK2/PK3 in practice (11.2 W/m) I suspect that graph is showing the thermal performance increasing because the thickness is decreasing as they apply pressure. As you can probably guess, applying pressure to ceramic COBs is not a good engineering practice.
The main reason that thermal performance increases when applying pressure is because of very poor contact between the thermal surfaces. Adding pressure can either decrease the thickness of the TIM layer or bring more of the molecule of thermal surface in direct contact with each other. So the flatter your thermal interface is, the thinner your layer needs to be and the less adding pressure will help. And the better your thermal conductivity is, the less pressure will help.
As you probably saw in the other thread, I did test the theory of adding pressure to improve thermal transfer and the result was negative. It is a very easy test to replicate. I ran a COB hard (using Kapton tape method with thin layer of PK3), monitored the Vf, waited for it to reach thermal stability. Then I added pressure by pressing hard on the 4 corners of the COB with a thermally insulated tool, trying not to block the photon stream too much, and watched for any increase in Vf. I saw none on my Fluke 115. I repeated the test 4 times and I could not get the pressure to decrease Tj to any measurable level. So it follows that there is zero advantage in terms of light output.
However, if you were working on a poor thermal interface in the first place (eg adhesive pad), there may be some potential thermal gains to be had by adding pressure. Next time I order from Digikey I will order some of those pads and see how they perform in practice, good find and good question.
salmonetin
Well-Known Member
...about pads...
http://www.frozencpu.com/cat/l2/g8/c487/list/p1/Thermal_Interface-Thermal_Pads_Tape.html
Premium Thermal Pads -
http://www.frozencpu.com/cat/l3/g8/c487/s1292/list/p1/Thermal_Interface-
Thermal_Pads_Tape-Premium_Thermal_Pads-Page1.html
Fujipoly / ModRight Premium Thermal Pad Blister Pack - VGA Block
- 60 x 50 x 0.5 - Thermal Conductivity 6.0 W/mK - $7.99
Extreme Thermal Pads -
http://www.frozencpu.com/cat/l3/g8/c487/s1730/list/p1/Thermal_Interface-Thermal_Pads_Tape-Extreme_Thermal_Pads-Page1.html
Fujipoly / ModRight Extreme System Builder Thermal Pad Blister Pack
- 60 x 50 x 0.5 - Thermal Conductivity 11.0 W/mK - $8.99
Ultra Extreme Thermal Pads -
http://www.frozencpu.com/cat/l3/g8/c487/s1797/list/p1/Thermal_Interface-Thermal_Pads_Tape-Ultra_Extreme_Thermal_Pads-Page1.html
Fujipoly / ModRight Ultra Extreme System Builder Thermal Pad Blister Pack
- 60 x 50 x 0.5 - Thermal Conductivity 17.0 W/mK - $17.99
...about thermal pastes...
http://www.frozencpu.com/cat/l3/g8/c127/s974/list/p1/Thermal_Interface-Thermal_Interface_Materials-Prolimatech_Compounds-Page1.html
Prolimatech PK-3 Nano Aluminum Thermal Compound - 1.5 Gram
Thermal Conductivity: 10.2 W/m-C - $5.99
Prolimatech PK-2 Nano Aluminum Thermal Compound - 1.5 Gram
Thermal Conductivity: 10.2 W/m-C - $4.99
Prolimatech PK-1 Nano Aluminum Thermal Compound - 1 Gram - $1.50
Thermal Conductivity: 10.2 W/m-C -.................................. 5 Gram - $8.99
saludos
Last edited:
SupraSPL
Well-Known Member
Those top level pads have impressive conductivity, but you end up with a much thicker layer than the PK3, not that it much matters at that high level of conductivity. But what does matter is the price. I buy 30g tubes of PK3 for $37 and one tube is enough paste to mount 60+ CXA3070s, so that is $0.62 ea versus $9 ea and the paste probably performs better due to the thinner layer. The upside of the pads though, much less messy and it provides an adhesion so kapton would not be necessary, although I would probably use the kapton as a safeguard anyway.
According to Prolimatech website, PK3 is 11.2 W/m-℃
According to Prolimatech website, PK3 is 11.2 W/m-℃
Greengenes707
Well-Known Member
I would never trust or use a pad with the kapton tape method. Let alone without it. Paste is more adhesive than pads...specially without decent pressure via screws for pcb's or cob holders. At least the ones I have. There is a laminate to peel off both sides...but its more of a non-skid than adhesive imo.
I too bought the 30g pk3...it goes for days.
I too bought the 30g pk3...it goes for days.
Dawamesk
Active Member
If the heatsink has been properly wet sanded in order to get the flatest surface possible, would the use of thermal paste/pad be still necessary ?
If it would, then is there any kind of trick to apply the paste without messing everything up ? Maybe a drop of paste at the center of the cob and then a bit of pressure will be enough ?
If it would, then is there any kind of trick to apply the paste without messing everything up ? Maybe a drop of paste at the center of the cob and then a bit of pressure will be enough ?
SupraSPL
Well-Known Member
Good info GG, I didn't realize those were not adhesive pads.
Yes the better prepared the heatsink is, the less the performance of the paste will come into play. When I compared a sanded Alpine 11 heatsink with PK3 paste versus stock Alpine 11 with the preapplied paste, there was no difference in temp droop even at very high current. I was shocked by that result, but it is great news for us DIYers.
It is possible to apply PK3 without making a mess. You want to make sure the entire backside of the COB is coated, then press on the corners for 30-60 seconds. The paste will ooze out the side and you will be able to see when the entire thing is covered for sure. The excess paste cleans up easily with alcohol. I recommend wearing gloves and they will clean up with alcohol as well if you want to reuse them.