Fresh-Chilled (not frozen) Bubble Hash

hydra-glide

Well-Known Member
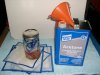
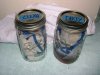
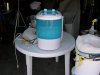
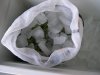
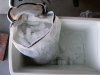
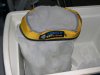
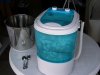
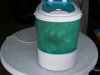
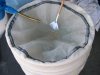
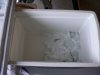
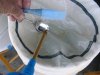
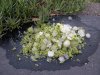
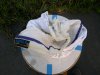
I'm going to use this method on 400g of Vanilla Kush and take some pics of the process first week of October. This is the topic for it. Back in a week with results. No drying, no intense trimming, no waiting. Cannabis should be chilled for no more than 2-3 days. So prep your ice cubes hoard (6 gal) and chilled water (6 gal.). Don't use (convenience store bagged-ice). It melts, and will freeze the contents bag in place. Ice and water will churn around the bag instead.
Of note, this is from Tim/Dani at the page-bottom blog.
https://www.alchimiaweb.com/blogen/fresh-frozen-cannabis-extractions/#comment-132983
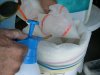
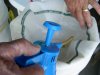
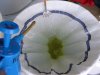
"Since I want the best possible quality in the first run, I wash my buds with water before putting them in the washing machine. I let them chill again in the washing machine for 10 minutes (with water and ice cubes) then I run it for 3-5 minutes.
Second run is normally around 10 minutes, third run 15 minutes (most times I don’t even do a third run, it all depends on what you get on the second and the strain you’re processing).
I’ve seen people doing a very fast first run – just a few seconds – just to clean the buds, but I prefer soaking them in water and gently stirring them for a couple of minutes before putting them in the washing machine."
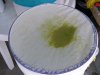
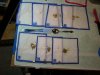
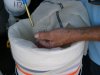
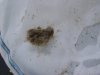
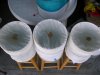
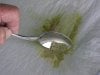
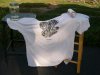
"And since I want top quality in the first run, I don’t even use bags below 73u; I use bags 220, 190, 160, 120, 90 and 73. I use the same water for the second run, and then I use bags, 220, 190, 160, 73, 45 and 25."
 

hydra-glide

Well-Known Member
While we're waiting, let's talk about the subject no one wants to cover, yes, cleaning the 25u screens! You'll need two qt. Mason/Ball jar and a gallon of acetone and a thick white (donor) T-shirt. First squash all of your 25u sheets into the Ball jar (I had at least 10 in mine), then fill 1/3 full with acetone. When you pull the 25u sheets from the mason jar, do so one at a time, replacing the lid each time to keep the acetone from evaporating. Perform this out of the wind. You can shake the wet sheet to toss-off hash remnants, but the real cleaning is done with the white t-shirt. Usually one dunking will remove all traces of hash skid-marks, but some stubborn stains will need re-soaking.
Finally put all of the sheets into a mason jar labeled "clean" for their final rinse.
Note: You can put one 25u bubblebag into a mason jar and do the same agitation and shaking and t-shirt wipe. Don't live with dirty bags. Step up to glory and quick processing of the 25u full melt.
 

Attachments

hydra-glide

Well-Known Member
Here's an update on the fresh-chilled process from Alchimia in Spain, and we're following his lead:
About chilling the material: on my last runs I’ve cut the plants, cut the buds and put them directly in the washing machine (with the ice cubes) to chill, without even putting them in the refrigerator. Let them chill for 20-30 minutes and start the process.
I'll be placing the fresh-cut buds into a 220-zippered cylinder-bag that's being layered with square and half-moon ice cubes, then letting them set for 30-minutes in ice-cube water, before turning the machine of for it's first 10-minute run. We'll have (3) sets of All Mesh bags nested in (3) 5-gallon buckets ready to go, on Saturday October 7th. Photos.
 
Last edited:

hydra-glide

Well-Known Member
We're cranking out some super-fine bubble next Saturday. Fred has a director's chair with wheels. A writer that doesn't take notes. Scary.
http://www.freddickey.net/
Sheriff: How come you all end up with four life jackets?
Bobby: Didn't we have an extra one?
Ed: No, Drew wasn't wearin' his.
Sheriff: Well, how come he wasn't wearin' it?
Ed: I don't know.
Sheriff: "Don't ever do nothin' like this again. (long contemplative pause) "Don't come back up here".
Bobby: You don't have to worry about that, Sheriff.
Sheriff: I'd kinda like to see this town die peaceful.
- wrote and spoke by cousin James
http://www.freddickey.net/about-fred-dickey
 
Last edited:

hydra-glide

Well-Known Member
fc.xx.JPG Bubble-up fresh-chilled Saturday. Back with words and pics later. :peace:

I used 200g of Vanilla Kush. Ripe and sap-runny - it was all that would fit in the 6-gal, 220-zipper bag, with ice layered in. Back tomorrow with the pics.fc.1.JPG
 

Attachments

Last edited:

hydra-glide

Well-Known Member
All in all I suppose the return in hashish was worth the 200g of fresh. Farmer told me that 80% is lost between wet and fully cured cannabis. You've seen the results. The only thing that could redeem the effort, and 200g is all I could fit into the zippered bag, is if the 90, and 43 taste okay. I have found though that bad tasting 90 and 45 can be put into an electric coffee grinder and when blended, the dried-out hash will fluff-up and somehow be cohesive and sticky once again, plus it tastes a whole lot better than the slab-hash it came from. Try it with your worst and see.
Never use "bagged ice", it will melt and seize your zippered back from moving back and forth.
 

Attachments

hydra-glide

Well-Known Member
I found that the best utensils to use for hash transfer are this silicone spatula and a table spoon. Both can be rinsed into the same mesh bag if you're running more than one set of bags.
The first batch was lighter than the second and third, but no chlorophyll came out.
It's necessary to "push" the trichomes stranded on the mesh in towards the center. Having two blue pump spray-bottles helps. The Harvest broom is very helpful when using it at a downward perpendicular angle backed by water-spray. That and spraying while tapping the mesh above it with your fingers. It's like pushing mud along a sidewalk using a hose nozzle.
Here's the Trim Bin brush:
https://www.harvest-more.com/shop/brush/
 

Attachments

Last edited:

hydra-glide

Well-Known Member
fc.19.JPG fc.15.JPG The spay bottles are in constant use. I filled them with chlorine-filtered water. There's the three bubble bag sets and you can see that I could have probably done a 4th run. So keep more ice than 6-gals if you plan on continuing. There's what's left of my 200g of fresh-chilled. I'm letting it dry in the sun. Then I'm going to squeeze it to see if there's any "oil" left in it. If there is.... then I might jump off the roof of my shop (well, from the lower section probably).
••••••••
update: For the first time in my long slog of five (5) growing seasons, I've had a crop grow to ripe-trich fruition - all are now dull-white with a scattering of amber ones. So, I can't say for sure why this latest batch of 45u taste okay. Not harsh on the throat. Odd for me. Full buzz too.
I'll have lunch and try the 90u. If the 90u taste great!, then I'll credit it to being fresh-chilled.
I was surprised to see that in the first 220-mesh bag there was little other than bud-hairs (above). No leaf material. I think that dried-material produces more plant matter. I did notice that in most returns there were dark flecks among the lighter one especially in the 73u (25u above) - a salt & pepper appearance must the same as you'd see with Lebanese hash pollen before pressing.
And a big thanks! to Dani @ Alchimia
https://www.alchimiaweb.com/blogen/fresh-chilled-hash/#comment-133266
 

Attachments

Last edited:

hydra-glide

Well-Known Member
Sage words from Alchimia:
"It’s amazing how the 220, 190 and even 160 bags come out almost clean when you use fresh material, no plant debris at all since plant matter is not ground during the agitation process. I’ve read that you’re drying your resin at sunlight? I’d never do that, it oxidizes and some terpenes evaporate…The way to go when drying resin are freeze dryiers, although they’re expensive. Drying your resin in the fridge will work much better than at room temperature. Cannabis resin is highly unstable, so it’s better to dry it and store it with very low humidity levels and cold temperatures (no-frost refrigerators work great)."
••••••••••••••••••••••••••••••••••••••••••••
Indeed! I tried the 90, the 120, and the 160 and they taste great too! My Indica Kush plant had vegged for 60-days and bloomed for 65-days, so it was fully-ripe.
Imo, the only hash piece that remains stable whether from dry or fresh material is the 25u. It remains malleable. 25u stands alone. The 160, 120, 90, 73, and 45 all became tacky and unmanageable as soon as the room temp hit 74-degrees. You can see the melted slag around the piece of 73u. If you take a more stable piece of hash, something not fresh-chilled, then the hash ball can be pressed into the slag pieces and then abruptly snatched-up and most times a couple of attempts will lift the slag and attach itself to the ball. About the only way you'll get material out of the 25u press-sheet weave. That and freezing it helps.
I have a roll of PTTF I use for low-temp plates, so I cut circles out for the bottom of my brown jars. This way the hash ball won't stick to the bottom, but I must keep everything that's been fresh-chilled in the refrigerator.
Jars: https://smile.amazon.com/gp/product/B010RPA0I4/ref=oh_aui_search_detailpage?ie=UTF8&psc=1
fc.26.JPG
Der Silicone Spatula (I only like the smallest one): https://smile.amazon.com/gp/product/B01KLOWI72/ref=oh_aui_detailpage_o02_s00?ie=UTF8&psc=1
 

Attachments

Last edited:

BigHornBuds

Well-Known Member
Question
Why do u acetone and not ISO 99?

I also dunk my bags in ISO after I remove the glands to clean the screen, this will speed up your straining time greatly .

I also use buckets with the bottoms cut out to make a tower (the bottom bucket still has the bottom) this keeps distance from the screens n speeds up drain time, i put the 1st few bags together as there is almost no drain time. Then depending on strain(gland head size) 120 or 90 gets there own bucket .im using 7 bags to start , then after the 1st run, I'll start cutting out different sizes . (The bigger ones )
 

hydra-glide

Well-Known Member
Why do u acetone and not ISO 99?
I use the 92-alcohol all the time but, the acetone cuts grease quicker. It made a big difference in my 25-bag drain time.
I'd use alcohol to clean my bags after rinsing, but they're wet and that would dilute the alcohol?
••••••••••••••••••••••••••
I also use buckets with the bottoms cut out to make a tower (the bottom bucket still has the bottom) this keeps distance from the screens n speeds up drain time, i put the 1st few bags together as there is almost no drain time. Then depending on strain(gland head size) 120 or 90 gets there own bucket .im using 7 bags to start , then after the 1st run, I'll start cutting out different sizes . (The bigger ones )
Sounds like a plan. Dani @ Alchimia uses only the 190,120, 90 and 73-first. Then on the second, third?, run he uses the 73, 45, and 25. Claims this makes the purest of hash, but also warns of the instability of the resin (just about melts to touch).
I'm thinking of trying your bottomless bucket over a bottom-bucket. It's the accumulation of too much water that makes the job of draining more of a chore.
There's no way I can use my 25u mesh bags today without first twice-rinsing them in the "acetone Ball jar".
Thanks BigHornBuds. Here's a good price on "91" :
https://www.walgreens.com/store/c/walgreens-isopropyl-alcohol-91-first-aid-antiseptic/ID=prod6056576-product?ext=gooPLA_-_Health_Care&pla&adtype=pla_with_promotion&kpid=sku6052670&sst=3b6ee610-775c-435e-91de-ab571297a710
 
Last edited:

BigHornBuds

Well-Known Member
I only use ISO 99% and have a friend at a chemical plant n he gives me 50 ltr drums.

After I remove the glands from the screen, I put it back to original shape, grab it at the top , raise it above my head n swing down hard n fast, the stop at the end pulls enough water out to keep from diluting the ISO very much.

I have ran fresh, I don't anymore,
Dry will pull in more plant material through but That's what the screens are for, I find with wet, the glands will get stuck to plant material easier, in the end running wet hurt the yield and the smoke wasn't much better.
I run 7 screens n a 220 plant bag.

I don't use the zipper bag in the machine
I just let it buck , the cyclone of the water pull the small stuff to the outside anyways.
If I was using a bucket n mixer drill etc, I put the 220 in a bucket but not the others .
Mix n sit , then pull n drain, strain, then pour the water over my tower of buckets,

If using the washer, this is how I setup.
I take my uncut bucket, put 25m
Then the rest of the buckets have the bottoms cut out.
45m gets its own bucket, 70 gets its own
90m gets its own, 120m gets its own.
Then I group 160, 190, 220.
Really helps to have your washer up high because you have a tower. And it can become top heavy. Be careful of how much water u drain out of the machine because it's easy to over fill the tower.

Drain the washer into tower.
220 is alway into the trash, I use a garden hose to wash it into the middle n help any glad that was caught in it gets washed down to proper screen. (My spray head controls the flow n pressure)
I look at the 190, n same rinse, depending on what I see, it could get trashed. Or saved(usually trash) I start saving 160 and so on. I take cardboard and draw grids and label them for screen size n run, and put them there after I get some of the water out,
Just enough so none runs out of the glads when sitting.
Depending on the glads n how sticky the screens are is when I'll start rinsing in ISO

I do a fast run , strain
Then longer etc.
I let the material tell me when I'm done,
If it's still producing I'm still running .

After I'm done, I'll compare the same screen size to each run, I usually will mix the first 3 runs together or 2 n 3 n keep the 1st for special occasions.
I keep the best of the best separate, then will take the lower grade stuff n mix it together in a couple different groups .
To give me low grade hash , as I really like it too, some times good bubble is just a little to much.
But I like to keep a little pipe with ok hash in it for little discrete blasts all day .
I still find it better then the black hash I use to buy .

I think I answered everything
 

hydra-glide

Well-Known Member
If using the washer, this is how I setup.
I take my uncut bucket, put 25m
Then the rest of the buckets have the bottoms cut out.
45m gets its own bucket, 70 gets its own
90m gets its own, 120m gets its own.
Then I group 160, 190, 220.
Really helps to have your washer up high because you have a tower. And it can become top heavy. Be careful of how much water u drain out of the machine because it's easy to over fill the tower.

Drain the washer into tower.
220 is alway into the trash, I use a garden hose to wash it into the middle n help any glad that was caught in it gets washed down to proper screen. (My spray head controls the flow n pressure)
I look at the 190, n same rinse, depending on what I see, it could get trashed. Or saved(usually trash) I start saving 160 and so on. I take cardboard and draw grids and label them for screen size n run, and put them there after I get some of the water out,
Just enough so none runs out of the glads when sitting.
Depending on the glads n how sticky the screens are is when I'll start rinsing in ISO

I do a fast run , strain
Then longer etc.
I let the material tell me when I'm done,
If it's still producing I'm still running .
••••••••••
I like the tower set up, because you're able to make (3, 4) runs without changing-out bags. I have (3) sets of All Mesh bags, in theory, using a tower would eliminate (2) sets of bags from being used until that first 25 bag in the tower clogs-up and threatens an over-fill, then you could at least remove the tower and have the one solid-bottom bucket holding that "clogged-25u". Now with direct-access to the 25u, a slam-shake would make it drain. Remove the drained 25 to the table or to a dedicated "25u slow-drain bucket", then install a fresh 25u bag and replace the tower - ready for run #2.
 

hydra-glide

Well-Known Member
Air-cooled, I like 'em all, but without those car-radiators on the frame's front down-tubes.. Do you have any pics of your tower? How did you cut the bottom of the plastic buckets out? Sawzall and a 24 or 32-tooth blade?
 

BigHornBuds

Well-Known Member
I don't have any pics of the tower, all my gear is put away with out easy access.
But I'll be firing it up in probably a month or so, it's busy at work and hunting season, and always growing plus about 5 other hobbies, so I'm not getting lots of sleep.

I'll take pics when I get a chance to do a run

I used a vibrating saw , I put a welding pipe wrap around the bottom n made a mark.
I drilled a hole to get the corner of the saw started n followed the line.
The one I'm cutting I put a good bucket inside it, to add rigidity because they will start to lose shape the farther you get with the cut.

You can use anything you want to cut it.
But a sawzall would be far from my 1st pick
I'd take a wood hand saw over a sawzall for this application
 

hydra-glide

Well-Known Member
You can use anything you want to cut it.
But a sawzall would be far from my 1st pick
I'd take a wood hand saw over a sawzall for this application

My wife made me buy a "RotoZip" tool kit off a T.V. ad. They're like a hand held big Dremel motor with carbide knurled-surface on an 1/8" bit, and spiral tile cutting bits. I've cut shower/tile access holes with them. The bits don't break as long as the drill motor is 90-degrees to the surface. Seems like my white plastic bucket bottoms would take using that knurled spinning bit. They'll cut as curved a line as your hand can lead it, without kick-back.
The one I'm cutting I put a good bucket inside it, to add rigidity because they will start to lose shape the farther you get with the cut.
Good idea. I think my Roto-Zip will do the trick. Still, the tool is 3" wide, so I may have to cut my buckets from the bottom-side turned up in order to keep my cut at 90-degrees.
I'll copy and print your stacking details and visualize it. I expect that any saw-cut edges inside the perimeter margins, between the cut and sidewall will collect trich-water/hash-sludge?, but I'll try and keep enough rim margin to maintain some reasonable structural strength. Thanks!
 

hydra-glide

Well-Known Member
Here's my (3) 25u bags stuffed into a Ball jar 1/2 full of acetone, and to save a few $, I use 91% alcohol as a final rinse. The bags bottoms were clogged with green, now they're clean. Nothing works finer that a thick, old fashion, 100% cotton, Penny's "Towncraft" T-shirt. I put one section of t-shirt on the receiving side of the bag bottom and the other half of the shirt on the discharge side of the bag bottom and blot heavily. Hardly left any skid marks on the t-shirt. I feel the bag bottoms to see if they're still sticky. If there's any skid marks on the bag bottom, they go into the dirty acetone again. Dirty solution or not, the acetone quickly dissolves the oil.
 

Attachments

Top