VincentVega
Active Member
I just got this timer from a friend, but he didn't have the instructions, so I don't know how to program the darn thing.
Any help...????
Any help...????
Attachments
-
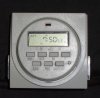 51.7 KB Views: 79
I have the same timer. I kept my instructions.
Here it is, verbatim... broken Engrish & all.
Thank you so much, that was a lot of typing, much appreciated.
I printed it out...
vince
It was nice of you to post all the specs of the timer but I have some input in regard to Line 6.1... Even though the timer can handle a 15 Amp resistive load @120V it cannot however do 15 amps of ballast lighting. It can only give you long reliable operation of 3 Amps of ballast lighting.I have the same timer. I kept my instructions.
Here it is, verbatim... broken Engrish & all.
Instruction Manual
Liquid Crystal Display (LCD) and integrated circuit are used in this digital . The screen of the timer are large display, multi--function, east to use, heavy loading. etc.
The digital timer display the present time accurately. It can control eight groups of on/off switch. It can give out a random timing output when required. There are also many combinations, such as hourly, daily, weekly, group of the week, for the timer on & off selection.
1. Setting of time
1.1 Press "CLOCK" & "HOUR" at the same time for setting the hour.
1.2 Press "CLOCK" & "MIN" at the same time for setting the minute.
1.3 Press "CLOCK" & "WEEK" at the same time for setting the week.
2. Setting of timer program
2.1 Press "PROG" to enter into the setting mode. The display shows "1 ON".
2.2 Press "HOUR", "MIN", & "WEEK" to set the hour &minute as well the day of the week for the timer on.
2.3 Press "PROG" again for setting the off time. The display shows "1 OFF".
2.4 Repeat 2.2 above for the off time.
2.5 Press "PROG" again to enter into the second on/off mode.
2.6 Repeat 2.1 to 2.4 for setting the timer on/off.
There are totally eight groups of timer setting. During time setting mode, press "R" for cancelling the setting time.
Press "R" again for coming back to the previous set time.
3. Combination weekly setting
3.1 During the timer on/off setting mode, press "WEEK" once. The display will show Mo,Tu,We,Th,Fr,Sa,Su. This means it is a daily on/off setting.
3.2 Press "WEEK" again, the week day will show. Set to the required week day. In this setting the timer will only work in the set week day.
3.3 After the display showing Su, the next press will show Mo,Tu,We,Th,Fr. The timer gives the setting only for the working day in the week.
3.4 Press "WEEK" again, the the display will show Sa,Su. That means the timer gives the setting only in the weekend & Sunday.
3.5 Press "WEEK" again, the the display will show the whole week day except Sunday. That means the timer will work on the week day except Sunday.
3.6 Press "WEEK" again, the the display will show Mo,We,Fr. The timer will work in these 3 days.
3.7 Press "WEEK" again, the the display will show Tu,Th,Sa. The timer will work in these 3 days.
3.8 Press "WEEK" again, the the display will show Mo,Tu,We. The timer will work in these 3 days.
3.9 Press "WEEK" again, the the display will show Mo,Tu,We. The timer will work in these 3 days.
Press "R" for cancelling the setting week days. Press it again for coming back to the previous week day.
4. Timer ON/OFF turn on or off mode
4.1 Press "ON/AUTO/OFF". There is an indicator in the display show "ON" or "AUTO' or "OFF" stage.
4.2 Press the indicator to "ON". The timer will give a permanent 'Switch On' output.
4.3 Press the indicator to "AUTO". The timer will be switched on & switched off during the set time.
4.4 Press the indicator to "OFF". The timer is turned off.
5. Special functions
5.1 Press "WEEK" & "HOUR" at the same time. The display will show 'O' at the right hand side. This means the On timing & Off timing will be extended from 2 minutes to 32 minutes randomly.
6. Notes
6.1 Output loading should not exceed 1725W/15A.
6.2 Before use it is recommended to plug the unit into a power mains for a few hours for charging the battery inside the timer.
6.3 The tolerance of the timer is 2 minutes per month.
6.4 'Summer time' can be added to the timer (optional, please contact your dealer).
6.5 This timer is 24-hour display. 12- hour version is available, please contact your dealer.