DiY LED - Frankenstein's Crown

Would you consider trying a DiY, if you haven't already, after viewing this demonstration?


  • Total voters
    23

AquariusPanta

Well-Known Member
I decided to further my crafting skills and bought a few new items from http://shop.stevesleds.com/main.sc.

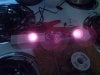
I've never used pure infrared (IR) lighting for plants before, so it's a new concept that I'm ready to put to the test.

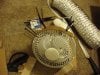
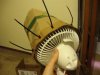
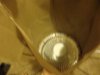
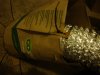
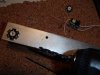
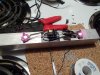
For this piece, *Frankenstein's Dick* (I'm sorry, I really couldn't think of anything else), I chose 2x 3W IR stars, a 3Wx1 driver, and a ten inch aluminum heatsink. Also, you can buy a power cord for the driver for an additional $2, which is worth it in my book.

While the IR stars are labeled 3W, they don't come close to 3W; instead they each run 1.8V @ 560mA (~1W). I noticed that the other LED stars, advertised at Steve's LEDs, labeled as 3W ran at higher voltages (~3.5V), which led me to buy only one 3Wx1 driver (rated at a minimum DCV of ~3.2V and @~700mA).

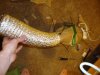
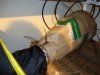
While I ran them in series, the total voltage was 3.7V @ 560mA (~2W). I'm not sure if two watts of IR will do me any good. I'm working with 5'x3'x1.7' and one stocky lady.

PA240024.JPG PA240025.JPG PA240026.JPG PA240027.JPG


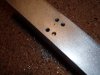
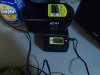
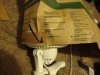
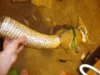
Side Note: Half way in between drilling holes, the battery for the electric screwdriver died on me and I had to take a break to allow it to charge up. I decided to make a PBJ. Gotta keep yourself energized while crafting!

PA250028.JPG PA250030.JPG PA250029.JPG

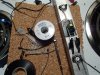
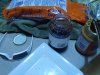
(I did use an electric sander for the outsides of the holes I drilled, and also used prolimatech pro-pk3 from newegg.com as grease for the 2x stars)

(The Pro-PK3 can be hard to remove from your hands. I used a sponge and some dish powder to get rid of it. It worked well.)
 
Last edited:

AquariusPanta

Well-Known Member
Hah I'm already looking back at them and laughing; I can only imagine looking back in a year and reminiscing over these fixtures.

I'm totally with you on the ideal *system*, which provides the user with all the small, intricate things, like digital timers. Just a matter of time De'loomz :wink:
 

SomeGuy

Well-Known Member
good going. you at least built your own light. Sorry that not everything worked out for you. I do have a bit of experience and was able to free-hand some things (drilling/tapping) that others might find pretty difficult the first time out. You will find that things get easier the more you work with them.

fYI.. LOL I did use marine/auto grade RTV. It is plenty of protection on the low voltage side of things but the real deal is that you cannot let it touch the phosphor or other pieces so you must be clean with the application of it all. I will be doing a FR IR trigger soon I think. could probably build two of what you did and have more than enough I would think.

Have fun building! I am working on my next fixture in my head. It will go in the 3x3 tent. maybe in 6 months...LOL Just in time for summer
 

uzerneims

Well-Known Member
Someday, somewhere someone is going to look at these dyi pictures and have a good chuckle. The wires, timers cords etc will some day be incorporated into a'system'
There are some people who already did that, they've made with Arduino, with thermostats, digital relays, wifi, there is posibility with all data to export them as HTML graphs to make them easy readable, like even pH and PPM's (just need a sensors to attach), temps, water tems, the future is here - so that would be really awesome growlight - just log in to your adress, see some pics, graph, everything - growlog + smart light :)
 

epicfail

Well-Known Member
I have arduino control multi-channel lighting on/off timer right now in a test (party cup) cab. Eventually I will be trying to fade them on/off with corresponding PWM fan speed control. I also have the data logging shield for temperature and humidity, eventually it will be ethernet and I will be able to see all the info on my HTPC desktop through Conky in crunchbang linux. I am not in any rush and only work on it when I'm in the mood but things are getting done from time to time. SDS made his last light with built-in overheat protection using a thermocouple and arduino to protect the COBS, it had a display screen with a graph for each led.

http://rollitup.org/t/thinking-of-a-new-light.822679/page-29#post-10495651
 
Last edited:

churchhaze

Well-Known Member
I've been designing a few different ways to turn the 730nm channel on for a configurable amount of time when the light goes out. I designed a system with 74HC00 logic, but might just handle the whole thing with an arduino for more flexibility over the design.

I have a thread on here somewhere showing my design and simulation of the 730nm pulsing circuit. The main idea is to eliminate the need for a separate timer, and the synchronization issues that come with having 2 timers. (anyone who's done some threaded programming knows about the trouble you'll bump into trying to synchronize things using multiple timers.)

I have arduino control multi-channel lighting on/off timer right now in a test (party cup) cab. Eventually I will be trying to fade them on/off with corresponding PWM fan speed control. I also have the data logging shield for temperature and humidity, eventually it will be ethernet and I will be able to see all the info on my HTPC desktop thru Conky in crunchbang linux. I am not in any rush and only work on it when I'm in the mood but things are getting done from time to time. SDS made his last light with built-in overheat protection using a thermocouple and arduino to protect the COBS, it had a display screen with a graph for each led.

http://rollitup.org/t/thinking-of-a-new-light.822679/page-29#post-10495651
 

epicfail

Well-Known Member
(anyone who's done some threaded programming knows about the trouble you'll bump into trying to synchronize things using multiple timers.)
I forgot to mention that the data logger has a RTC circuit built in so multiple timers is not a problem I think (I really dont know), its all done with 24hr time not millis. With a 4 relay module I can turn LED and fan drivers on and off, and plan to control them all through PWM (speed/brightness). Really though I have no experience or training with any of this and have to learn as I go.
 

AquariusPanta

Well-Known Member
I forgot to mention that the data logger has a RTC circuit built in so multiple timers is not a problem I think (I really dont know), its all done with 24hr time not millis. With a 4 relay module I can turn LED and fan drivers on and off, and plan to control them all through PWM (speed/brightness). Really though I have no experience or training with any of this and have to learn as I go.
You mentioned PWM; can you explain to me and others who don't know what that translates to?

I've been designing a few different ways to turn the 730nm channel on for a configurable amount of time when the light goes out. I designed a system with 74HC00 logic, but might just handle the whole thing with an arduino for more flexibility over the design.

I have a thread on here somewhere showing my design and simulation of the 730nm pulsing circuit. The main idea is to eliminate the need for a separate timer, and the synchronization issues that come with having 2 timers. (anyone who's done some threaded programming knows about the trouble you'll bump into trying to synchronize things using multiple timers.)
I admit that I had issues on the first night when trying to synchronize both the timer for main lights and the time for the far red but the next night I had IR come on ~15 seconds after light off, which works fine. I've seen some crazy growth since using IR though.

Although digital timers (harbor freight) can be troublesome to use, mechanical aren't that difficult to use and are far cheaper (~$10).

Churchy, I like where your head is with all of this because if I possessed similar knowledge, I'd be wanting to make use of it. But looking at everything mentioned, it's so much easier to use a mechanical or digital timer, regardless of hassle. I suppose if you don't like 15 or 30 minutes increments, offered by mechanical timers, than digital might float your boat.

There are some people who already did that, they've made with Arduino, with thermostats, digital relays, wifi, there is posibility with all data to export them as HTML graphs to make them easy readable, like even pH and PPM's (just need a sensors to attach), temps, water tems, the future is here - so that would be really awesome growlight - just log in to your adress, see some pics, graph, everything - growlog + smart light :)
I sometimes enjoy fantasizing about outlandish gadgets, such as the one you described. Ultimately it all comes down to feasibility and cost-efficiency. Luckily, in our cases, the price for LEDs and COBs are dropping, which allows us to spend more on fancy features. The features, imo, make the project of building light fixtures even more delightful.

When I start building my next design (could be months before I need to), I'll be able to incorporate some cool contraptions within the framework of the light fixture. These *Crowns* were for testing. I've only known about COBs for about ehh ~1 month and I'm anxious to catch up to StarDustSailor in respect to his crafting skills and knowledge of electrical circuitry.

:joint:
 
Last edited:

AquariusPanta

Well-Known Member
I've been facing some temperature issues due to the introduction of 2x 30W COBs. The average temperature, when lights turned on, is around 83 degrees fahrenheit at the canopy, with lows being ~81 and highs being ~85. This wouldn't be a problem if my ole' lady was vegetating but she's already well into motherdom and I would like to see the average drop to at least 81.

This is sort of a new obstacle for me, as I've never really owned a tent before, so providing cool temperatures is something I'm not entirely experienced on (yet).

Just for your information:

- one 1.7' x 3' x 5' tent
- one 170CFM 4" Inline Fan w/ small charcoal filter
- one 6" opening on opposite side of exhaust opening (near the top)

I've been sort of obsessing over different ways of keeping temperatures down, like opening the lower 4" openings, which sort of dropped temperatures but released odor (It smelled good coming home and walking in the front door and instantly getting a sour whiff. I wonder if my landlord would think the same.). After trying a few different things, I decided it was time to put my 6" Air King fan to good use. Before I started this project, I looked for 6" ducting but couldn't find any at the local hardware store, so I settled for what I already had. I had left over zip-ties, paper bags, and cardboard laying around so, again, I went with what I had around me. Using what I knew, and the tools at my disposal, I designed and crafted a little paper bag sock for my fan to efficiently blow through the 4" ducting and thus cooling my tent.

(The pictures take ~30 seconds to load, music helps)

DSC07338.JPG DSC07339.JPG DSC07342.JPG DSC07343.JPG DSC07344.JPG DSC07346.JPG DSC07347.JPG DSC07348.JPG DSC07349.JPG


Link to the fan http://www.walmart.com/ip/LASKO-PRODUCTS-INC.-Personal-Fan-W-Clip-6-White/15152093
I'm sure you can find similar fans for $5-10 cheaper at local or online stores. I don't think the fan really pulls 190 CFM but maybe 120. I've had it for over 3 years though, so who knows.
 
Last edited:

AquariusPanta

Well-Known Member

epicfail

Well-Known Member

AquariusPanta

Well-Known Member
the Arcadia desert CFL's and t5's have 20% more UVB and the same UVA as those

http://arcadia-reptile.com/fluorescent-lamps/t5-d3plus-desert/
http://arcadia-reptile.com/fluorescent-compact-lamps/

Remember to turn off the UV when you are tending to your garden as prolonged exposure to it can cause cancer.

http://www.cancer.org/cancer/cancercauses/radiationexposureandcancer/uvradiation/uv-radiation-does-uv-cause-cancer
20% more UVB you say? How do you figure?

Btw, I can only use 13W mini bulbs with this fixture of mine. They will each have little mechanical 'knobs' to turn on/off, which really makes it easy to turn em' off during playtime. I based my choice of brand with this:


Which wavelength within UVA (315-400nm) and UVB(280-315nm) do you think would best suit the increased production of THC/resin?
 
Top