DiY LED - Frankenstein's Crown

Would you consider trying a DiY, if you haven't already, after viewing this demonstration?


  • Total voters
    23

AquariusPanta

Well-Known Member
Welcome!

I am feeling slightly brain dead as I attempt to throw words together to create coherent sentences.

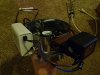
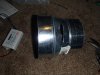
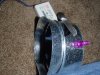
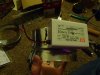
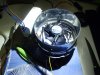
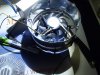
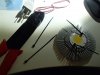
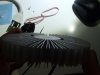
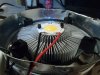
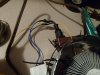
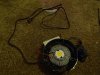
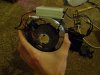
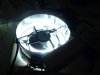
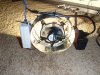
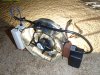
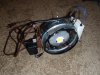
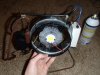
This is my very first DiY of a LED COB unit or whatever you would consider calling the combination of an LED COB with power supplies and cords. After all the long hours (some agonizing, many joyful) of analyzing, researching, and building, I finally have something to show for. Luckily I get to show you all my clunky gizmo!

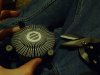
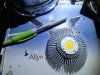
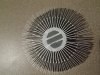
Tonight I will upload a few pictures of the first *Crown*; with it some descriptions, links, etc. I'll get around to the second sometime next week.

Finally, I would like to dedicate this thread to those before me that showcased their own gizmos, allowing me to muster up the manhood to even try such a feat: SomeGuy, SupraSPL, captainmorgan, and stardustsailor :clap:

Without them, and without this site, I'd be stuck buying BlackStars :spew:
Instead, I'm trying something new, learning a few tricks about electronics, and saving money (well maybe not saving just yet).
 

AquariusPanta

Well-Known Member
For both *Crowns*, I will be using Bridgelux's Vero 18 LED CoB ( I call it the V18 ).

http://www.digikey.com/product-detail/en/BXRC-56G4000-F-04/976-1198-ND/4747504

I chose it because it's popular and cheap.

When buying the drivers, I bought three different brand/model drivers; eventually deciding to use the MeanWell APC 35 105.

http://gr.mouser.com/ProductDetail/Mean-Well/APC-35-1050/?qs=21bV/TPs%2bw/czmDCSwIKOQ==

Again, I chose this model due to brand popularity, price, and most importantly the matching numbers that click with the V18.

For the heatsink/fan combo, I followed SomeGuy's playbook and bought a few Intel sockets.

http://www.ebay.com/itm/New-Original-Intel-Socket-775-CPU-Cooling-Fan-and-Heatsink-E97375-001-/230771615333?ssPageName=ADME:L:OU:US:1120

The power supply for the fan provided me with the greatest level of frustration and headache, as I went through a few select AC adaptors, from Ebay, that promised desired attributes but lacked the required power to start the fan. I'll mention the products that I tried that DIDN'T work for me.

http://www.ebay.com/itm/100-240V-AC-to-DC-Adapter-Converter-12V-1A-Power-Supply-f-CCTV-System-US-Plug-ES-/261617598782?pt=US_Server_Power_Supplies&hash=item3ce99fc13e

http://www.ebay.com/itm/12V-DC-500mA-Power-Supply-Adapter-Converter-Transformer-/231292911090?pt=Multipurpose_AC_to_DC_Adapters&hash=item35da21bdf2

It's up to you to find the working ones. I followed Supra's advice and went with OEMs.

As for everything else, such as soldering tools, multimeters, and etc, I either went through Ebay, Amazon, my local hardware store, or dug through my junk-filled closets.

If you have any questions about a particular thing, like choosing cords, just ask. Otherwise I'm just go through the motions.
 
Last edited:

AquariusPanta

Well-Known Member
I had originally designed an elegant schematic, on engineering paper ;-), that I wanted to make, offering the dimensions and structure of an ideal light unit. I quickly realized that I had not the time nor the resources to construct such a piece. Between school, family, and a plant, there was just no way that it was going to happen. I decided shortly afterwards that I'd save the idea for when I could dedicate myself to such a project and chose to go with the idea that later developed into *Frankenstein's Crown*.

Time was the major factor.

I had the tools, the parts, but not the time. Did I mention that this was my first DiY LED unit?

Space efficiency was something that I had to have, regardless of looks. I needed something no taller than four inches and nothing longer in diameter or width of 8 inches (given my layout).

I thought about using PVC piping but instead went with this aluminum ducting piece (I guess it's for ducting?). I knew I could manipulate aluminum much more so than with PVC. You can find such a piece at any hardware store for around ~$10.


PA140007.JPG
 

AquariusPanta

Well-Known Member
I used a pair of metal-cutting scissors (I don't know what their really called), severed the aluminum piece in half and chose an end to start with.

I figured I had to be able to use the structure as the housing for everything so I used a flamboyant push pin (I don't even remember where I picked these up at) to poke holes through the aluminum. The holes were small, useless for anything I was gonna do so I eventually pulled out a steak knife and began widening the holes. I had planned on using zip-ties to secure and bound any and everything that I could tie down.

PA140008.JPG PA140011.JPG
 

AquariusPanta

Well-Known Member
After securing the driver to the structure, I moved ahead to the heatsink/fan.

Using the same scissors I used to cut the aluminum, I picked off the parts of the fan that I didn't need or want.

Following, I placed the V18 on the heatsink to mark the spots where I planned to drill screws into, hoping to hold the CoB to the heatsink.

PA140012.JPG PA150017.JPG
 

indianajones

Well-Known Member
lol that thing is a cut palm waiting to happen, seal that sharp
edge with silicone! seal your solder points with silicone also,
it will last longer if it isn't exposed to oxygen, and if for some
reason something were to bridge the gap from the positive to
the negative side you won't burn your house down.
 

AquariusPanta

Well-Known Member
Really awesome, and inspiring!
Want to see it in action!

So - how efficient is this one COB @ 1050mA? So it's ~30V and 3000lumens, right?
Your in luck, as I did record some numbers.

With the driver running through the CoB and using a multimeter, the current or amperage showed up as 1037mA (98.8%), and the voltage simmered around 28.3V (85.8%) giving off approximately 29.35 watts of light and, guessing, ~3500 lumens. Heat hasn't been an issue, except for the driver. It's almost too hot to touch for a lengthy amount of time. I wouldn't be surprised if there was something out there to offset the heat but I'm new to the game.

The V18 I linked at the beginning was actually my original choice but soon afterwards decided to go with the 4000K (White Neutral):

http://www.digikey.com/product-detail/en/BXRC-40E4000-F-03/976-1155-ND/3913134

To my surprise, the Crown doesn't add much heat to the setup; maybe 1 or 2 degrees fahrenheit higher. The only problem I faced earlier on was that the fan directs itself at the canopy and sometimes gets hot, increasing the odds of upper leaves to curl inward (not a good thing). Twelve inches from the canopy as the minimum distance works well.
 

AquariusPanta

Well-Known Member
lol that thing is a cut palm waiting to happen, seal that sharp
edge with silicone! seal your solder points with silicone also,
it will last longer if it isn't exposed to oxygen, and if for some
reason something were to bridge the gap from the positive to
the negative side you won't burn your house down.
I noticed that SomeGuy used silicone in his DiY. I wouldn't mind using some myself but I have little to no experience when dealing with silicon paste. There are like twenty variations of the stuff at my local hardware store. I'd like to go back and fix some of the things you mentioned.

Would you mind sharing with me the best type of silicone in order to make the *Crown* safer and more durable?
 

indianajones

Well-Known Member
RTV silicone would be good for making the edge smooth, but don't use
it on electronics.

you could also make a small incision ever few inches and bend it over
to make a little "U" shape and use the trough to hold the silicone.

here's a pretty good explanation that i found online about different types
of silicone for sealing electronics.

The best generic term is "Silicone Rubber".
I'll refer to it as SR for brevity.

SR is a good to excellent encapsulant that has limitations (as does everything).

It is not essential to use an electronics grade SR - these are usually dearer and may have Mil Spec ratings which are not essential.
BUT see below for what IS essential.

For electronics and anything liable to be corroded you MUST use "neutral cure" SR.
You can buy acid cure SR which exudes acetic acid as it sets.
If it smells like vinegar then it's acid cure.

Do not use "acid cure" silicone rubber for electronics.
Neutral cure SRs will always say "neutral cure" or similar on the container. if they do not say this or similar they will be acid cure.

There are 2 main types of neutral cure SR (= NCSR) in common use. There are a number of other NCSRs but you will almost certainly not meet them.

Oxime cure is the cheaper and most common NCSR. It releases oximes and usually also methyl alcohol as it sets. Ventilation is needed and some people may get excema skin reactions. The oximes can corrode bare bright copper during curingh but this is usually not a major problem. Oxime cure NCSR does not bond to polycarbonate plastic.

Alkoxy NCSR is more costly and the better grades of NCSR are alkoxy. It releases methyl alcohol as it sts. This can be 5% - 10% by volume ! so ventilation is an extremely good idea. It is good to work with - just be sensible.

ALL SRs that you meet are moisture cured !!!!!!!!!!!!!!!!!!!!
Atmospheric water reacts with the SR to cause cross linking of the SR rubber. If the air is relatively dry it takes longer. If the air is completely dry then SR will; not set !!!. SR tubes are water proof and water vapor proof. Once you open them they are NOT water vapor proof - a tube of set of SR that is carefully sealed will set completely hard on months to a year. Storage in 100% dry air MAY work.

To set right through water vapor from the air must penetrate the SR. Pentration rates vary from about 1]mm/day to 3mm/day. If you make a very very thick blob of SR it can take many days to set in the middle. If you take two flay plates and overlap thenm and appkly SR to the overlap the air path to the overlap is d/2 where d is the smallest overlap dimension and the path is through set SR and is very thin. SO an overlap SR join may take many many many days to set. Major SR makers recommend not using vast overlap in joins.

The 600 pound gorillas of the SR market are Dow Corning, Shinetsu (Japanese) and maybe BASF (BASF are the 600 pound gorilla of ANYTHING chemical but nobody notices). There are many other brands and many are good but if it's made by DC or Shinetsu you know it's good. Not all brands are good. Some people put large amounts of filler in their SRs to the extent that it works poorly.

DC do make some cheap lower performance NCSRs but even these work well for most purposes. DC and other large makers may sell specific grades in selected markets which are not available in all countries. eg they sell "Dow Corning Neutral Plus" oxime cure NCSR in Asia.Unlike most DC SR's it has no product number and US sources do not know of its existence. It costs a few $US a tube in eg Hong Kong and works well enough.

Many people do not know the following. Others will refuse to believe it:
Note that SR's are NOT water vapor proof. Water vapor will permeate through them but liquid water will not. So a container "sealed" with SR will have an internal relative humidity comparable to that outside it! SR is typically about 10x more water permeable than the EVA sealant/adhesive used to bond silicon "solar cells" & glass PV panels together. So a Glass fronted PV panel and a "waterproof" backsheet is also not in fact sealed and inside humidity levels are ~+ outside ones. Keeping LIQUID water off your components is what is required to prevent major corrosion. Fortunately.

There are many many grades of NCSR - setting times vary from minutes to hours. Viscosity varies from very pourable to thixotropic.
 
Top