Westnewton
Active Member
Maybe they are Z2s. The tray of 20 that I received had a Z4 sticker on it so I assumed they were Z4 however I had ordered Z2 at the time.
Id have to assume Supra is right. My z4 is like the one on the left and z2 is like the one on the right looks like yours do with the wavy edge of the circle. Either way z2 is still pretty kick ass if thats what they are.Maybe they are Z2s. The tray of 20 that I received had a Z4 sticker on it so I assumed they were Z4 however I had ordered Z2 at the time.
I was not suggesting using just blue. my current light gives me 31% blue 31% green and 34% red I like my plants short and bushy with a lot of leaves and a strong stem when I take them into flowering.blue light also stimulates the plants immune system protecting them from disease and insect. the proper mix of white leds seems to be able to give what ever spectrum is desired and the whites are more efficient than most monochromatic leds a cheap 25000k cold white produces 110 lumens per watt at full power and 49% of its output is blue ( 54 lumens per what in blue light) the royal blue chinese leds only produce 40 lumen per watt. all leds suffer from droop so efficiency goes up at lower power levels. I do not know how much it increases with chinese diodes because I have not been able to find data sheets on themI experimented with blue led only in veg... it seemed to me that they were growing slower then the ones with white mixed with blue... also the blue leds made the leaves darker green and the thickness of the leaves was increased as well... so if would suggest only vegging mother plants with completely blue... i was able to keep a mom for six months under two feet with lots of lst though...
★★★kushed_out★★★

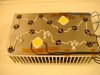
![20140424_154418[1].jpg](/data/attachments/2235/2235704-89e8f6a4313a3bd94f4966b1418f160a.jpg)
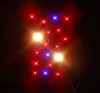
![20140424_154431[1].jpg](/data/attachments/2235/2235705-8a3e374401ffbf31abc0d38a0d7d38a2.jpg)
Thats awesome!Here are three side by side, a plants point of view
 ... )
... )
What size and where would I get one and how is it wired up?A capacitor to give them a jolt when they first come on?
So the same size would work fine 12v-2a-24w, how long did it take you to get one from Hong Kong ?Bummer! Ya the 24 hour idea is a good idea to get you through until you get a replacement. I like the capacitor idea but as simple as it is, above my knowledge.
Worst case scenario I can vouch for this PSU with (4) 140mm fans. It is adjustable from 8.4V-13V.
what diy is better overall in your opinion, the 3070s or the r-w-b? I am trying to decide if I want to add 3070s to the sides of my magnums with horts, do 16 3070s, do 4 r-w-b, or do a combo of the 3? money isnt an issue I just dunno what way to go and have a few weeks left to figure it out. whatcha think?Bummer! Ya the 24 hour idea is a good idea to get you through until you get a replacement. I like the capacitor idea but as simple as it is, above my knowledge.
Worst case scenario I can vouch for this PSU with (4) 140mm fans. It is adjustable from 8.4V-13V.