DIY E-Nail

biscuithead

New Member
Ok I have my plug set up like yours I think.. is the n from the plug only looped to the brass pin or where because I thought the n should split like the positive top terminal loops to the middle pos on the rocker. Thanks budbro
 

nme

Member
My coil just blew the fuck up. I used a K type TC coil with a ta4-snr using PID setting P=30 I=10.5 D=2.12

I set it at 100* and it overshot to 165*. The coil was warm to touch but definitely not that hot...so I turned it up to 600 and as soon as I hit the set button it overheated the coil and popped and scared the shit out of me!

Anyone know what I did wrong?
 

nme

Member
Time for an admittance of shame! I screwed up and ordered a nice fiberglass sheathed coil but didn't notice it was only 12V and not 120V...son of a bitch!
 

watdaheo808

Active Member
My coil just blew the fuck up. I used a K type TC coil with a ta4-snr using PID setting P=30 I=10.5 D=2.12

I set it at 100* and it overshot to 165*. The coil was warm to touch but definitely not that hot...so I turned it up to 600 and as soon as I hit the set button it overheated the coil and popped and scared the shit out of me!

Anyone know what I did wrong?
You might've purchased the wrong PID. From my understanding you need a TA4-SSR not the SNR.
 

JUANO

New Member
Does anyone have any insight on the wiring for a straight analog E-nail????? Basically it's a light dimmer and a 110v cord connected to the coil. Any help is appreciated
download.jpgdownload (1).jpg
 

watdaheo808

Active Member
Domeless.com has one that doesn't seem as generic and is way cheaper too. I should be getting mine in soon so I can't really say anything about the function. Original preorder price was $100 but its $150 now. Still a really good deal compared to all the other analogs out there going for $200-400..
 

tharealmclovin

Well-Known Member
Domeless.com has one that doesn't seem as generic and is way cheaper too. I should be getting mine in soon so I can't really say anything about the function. Original preorder price was $100 but its $150 now. Still a really good deal compared to all the other analogs out there going for $200-400..
based on the quality of their Ceramic nail, which I cracked the first day without ever getting it red hot, I would not expect too much from them. They used an inferior glazed ceramic that Hive rejected last year. When Hive was asked about them as competition, they said they were NOT worried because they knew it was junk compared to theirs.
 

watdaheo808

Active Member
Yeah I can't really comment on the ceramic nails but comparing the 2 units, domeless still looks like they put way more work into the e-nails.
DABTRONICS-AnalogSet-10mm-3__37808.1385138174.1280.1280.jpgDABTRONICS-AnalogSet-10mm-4__27242.1385138175.1280.1280.jpg vs Dabpad4color.jpg
 

Attachments

tharealmclovin

Well-Known Member

watdaheo808

Active Member
"(We think the optimum bowl temperature should between 300-400 F)" This is a quote from their site. Sounds like they are making a pizza not vaping concentrates. Most enails are being used at 650-900 degrees
He must've been high when he posted that or meant celcius or the best temperature for weed...I hope lol. Regardless he does say THE TEMP WILL GO BETWEEN 200F ~ 1200F which is what I'm looking for. I'm not fully backing this yet since I haven't been able to try it but for $150 (I paid $100 during pre-order), it's a great deal. If you look for another analog, they'll all most likely be $250-400 and made in cheap plastic cases. The only one that has a decent amount of work put into it is the smart dab. Hopefully it comes in within the next week so we can all see if its truly worth the money. Regarding the ceramic nail, did you crack it using a e-nail or torch? Also did you try to heat it as evenly as possible as he recommended? Just wondering so I know if I should even attempt to torch the nail.
 

tharealmclovin

Well-Known Member
He must've been high when he posted that or meant celcius or the best temperature for weed...I hope lol. Regardless he does say THE TEMP WILL GO BETWEEN 200F ~ 1200F which is what I'm looking for. I'm not fully backing this yet since I haven't been able to try it but for $150 (I paid $100 during pre-order), it's a great deal. If you look for another analog, they'll all most likely be $250-400 and made in cheap plastic cases. The only one that has a decent amount of work put into it is the smart dab. Hopefully it comes in within the next week so we can all see if its truly worth the money. Regarding the ceramic nail, did you crack it using a e-nail or torch? Also did you try to heat it as evenly as possible as he recommended? Just wondering so I know if I should even attempt to torch the nail.
I dont blame ya. I almost ordered one myself, but decided to make one instead. I enjpy projects
 

jdee

Active Member
I agree that 300f is way too low..Using a k type thermocouple wire sensor to calibrate the temps of the dish to optimum vaping temps I found that what should have been a good temp 580 on PID / ~385f on dish, was too low a temp for the dish. It would leave unvaped residue unlike the higher temps, required longer pulls and more of them to vape a dab. It vapes so slow that while it does taste good the vapor to air ratio caused by the slow vape dilutes it too much. at 680 my dish is 485 and vapes a dab in a reasonable amount of pulls without tasting burned and without being diluted by too much air due to vaping too slow. Also no visible 'wet' residue left behind. Also not that anyone asked but I leave my dab station running 24/7 and have had zero issues. The unit never heats up (except for the coil) and having plugged it into power meter, it uses a steady 30watts @ 0.5amps. With a rate of 8.85 cents/kWh this costs $1.90/month to run. I believe it's much cheaper than refillable torches.
 

budbro18

Well-Known Member
Heres my wiring diagram. Theres less wires because the power inlet/switch are all in one so i just had the lines in the picture coming straight off the switch.

Reds are hot, blues neutral/negative, green are ground, orange are SSR, purple are TC


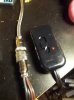
Heres the power inlet/switch wiring, already posted but i like having em in the same spot.
Reds hot, white negative/neutral, white with black line is ground (far right wire)


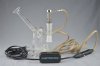
Ill probably be tearin open the box today and takin some pictures. Looks like a rats nest but should help a little more.

And to anyone who hasnt bought their project box get one about an inch longer than the one i listed. It all fits... but barely.
 

budbro18

Well-Known Member
I also like what domeless.com is doing. Theyve switched to non glazed a while ago and have the V2s for the coils. Not 100% sure my coils will fit but i hope. Gotta get a caliper to see my exact coil dimensions.

Im probably gonna get a V2 and possibly the infiniti copy as well if this quartz doesnt come through.
 

biscuithead

New Member
Yea my buddy is working on the quartz nails now so that should be soon but I would love to see some pictures because when I wired it how I thought ur diagram said and my pid or rocker didn't light up haha I'm over stressing the fuck out now I just think it's funny now how I can't get it right but thanks bud to I can't imagine I'm too far off but pictures would clairify everything for me but is the live terminal supposed to split and one side is the middle post and why in the pic is the other split side of L a skinny white cord . Thanks man
 

budbro18

Well-Known Member
the skinny white cord in the back isnt a cord its a piece of shrink wrap haha

Also i didnt split the wires off of my switch/output. I ran a single wire off of each of them and then wire nutted 2 or 3 wires on there.

So the wire for the live goes through the fuse and out the red one and straight into the switch. then that send it to the top wire that isnt brass/copper and a single wire comes out of there. Then i attach a wire nut and ad 2 wires off one.

For the neutral i did something a little different. i put single wires on both the N and the brass pin on the switch then connected those to 2 more wires with a wire nut and ran 1 to the pid and one to the coil.


I wired directly and didnt have to solder any parts. Looks nice and its short enough the coil doesnt make it too long when wrapped up. Gotta find a case for it to carry it around.
 

biscuithead

New Member
I just wired it exactly how it should be thanks a lot budbro but my pid only reads room temp even when I clicked the down arrow to 700 and held in the > for auto tune but I can't make it heat up.... I never switched the tc and ac on my xlr so there's no way I could have burned out the coil right I made sure only neg was ever hooked to the ac but hopefully I just need help setting the pid thanks
 

budbro18

Well-Known Member
Im not sure whats wrong the thermocouple is usually the thing that burns out. Are you sure you have your SSR hooked up right?? You need the hot to go into the 2 and out the 1 into the coil and to also have a negative hooked up to the coil as well as a ground. and the TC -/+.

Also it could be your SSR. Are you using the exact auber controller im using?? If not double check your numbers and placement. as long as the TC is hooked up right and you have power into your PID and its powering up youre half way there.

Hope this helped!
 

LiquidJunglist

Well-Known Member
So the only question I have is about the SSR. Are you putting a connecting wire from connection #2 to connection #1 on the SSR and where are you putting that ground in the SSR? I'm just a little confused about that. It would be amazing to see the inside of the box. I get everything else just not the SSR wiring. Thanks brov.
 
Top