DAS DIY COB Panel

DazedAndStoned

Well-Known Member
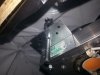
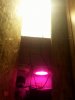
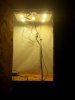
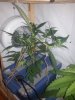
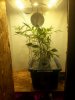
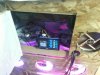
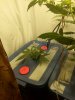
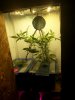
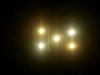
Hello guys . Been away from RIU for a while, but now I am back and ready to share my newly built COB Panel. I would like to thank Supra and RealStyles for the inspiration for this build.I am currently about 90% complete, just need to add a fan speed controller with temperature probes so I can tell the heatsink temps, and I will tidy up my electrical work a little bit as well.

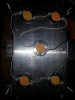
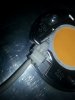
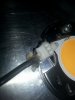
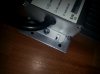
5x CXA3590 Chips- 2x 3000k, 1x 3500k, 2x 4000k
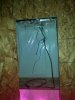
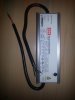
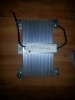
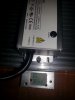
HLG-185H-C500A Driver- currently at 500mah, but will dial down to 250mah once I figure out how the potentiometer is supposed to get dialed down:bigjoint::wall:
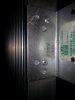
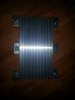
8.5" x 16" Aluminum Heat SInk
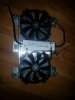
2x 200mm BitFinex PC Fans (148.72 CFM each)
And an assortment of 14ga wire, machine screws, self tapping screws and whatever else my stoned self can't think of at the moment
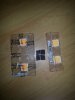
bongsmilie
IMG_20150828_102801.jpg IMG_20150828_184329.jpg IMG_20150902_195442.jpg IMG_20150902_212714.jpg IMG_20150902_220800.jpg IMG_20150902_220811.jpg IMG_20150902_220830.jpg IMG_20150903_003706.jpg IMG_20150903_035746.jpg IMG_20150903_163034.jpg
 
Last edited:

DazedAndStoned

Well-Known Member
looks great DAS, you have an A version driver. just pop that black cap on top of it, insert a small screw driver and twist to dim. You may want to have it plugged into a Kill-a-Watt to dim to your desired watt draw. or a multimeter works too.
Thanks. I finally got the word from Reals that it takes a Phillips #0, been scratching my head all day, searched my work station like 9837629 times thinking I had lost something haha. Only thing I lost was my head! haha

Thanks again lolbongsmilie
 

DazedAndStoned

Well-Known Member
This auto is currently going under the new light to see how well it does under a 12/12 schedule, I'll also throw some Cinderella99 and Texada Northern Lights under it as well. This is my biggest auto thus far, pretty impressed for only about 14 days since preflowers showed.

Red Poison Auto
IMG_20150901_165937.jpg
 

DazedAndStoned

Well-Known Member
It was all I could find that had a solid core. I build houses so I stole ten feet from the electrician lol. Was looking for 18 but it'll do. Wires cold as ice. Heatsink gets pretty hot after a 8 hour test last night without ventilation pulling heat out of the top half of my cab


Having a problem with my driver though. Pretty sure my dimmer is stripped because I can't turn it either way.

I'm going to take some needle nose pliers to it tomorrow if I can find a pair small enough. Any other ideas would be greatly appreciated lol. I wont need to mess with the dimmer much, once I set it I'll forget it
 

DazedAndStoned

Well-Known Member
Yea, maybe I did dim it, I can't really tell lol, I'll take a multimeter to it later to find out for sure.

I'm 2 hours into my stress test, and the heatsink is COLD to the touch. Room temp for sure. I added a 6" intake to the cab, and ran my 6" duct, and I'm about 2° above ambient room temp. Unreal. This is the best move I made dumping my HPS for the DIY panel.

Here's my RPA under the new panel
IMG_20150905_060919.jpg
 

SSJGemini

Well-Known Member
Nice work but all those dangling wires make me cringe:???:

I'm making the jump to LEDs too. My small cab was getting to hot with cfls so I'm hoping for a significant temperature drop with my new light.
 

Growmau5

Well-Known Member
Hey DAS, not hattin, but I am a little concerned about the connections of the larger than specified gauge wire going into the IDEAL cob holder. Looking back at one of your pictures. ( 1st pic post #2) it looks like the bare wire is with in a mm of being exposed and touching the metal of the cob holder. This happens from time to time, may want to try to insert it further or add a dab of silicon or hot glue, for safety.
respect.
 

CanadianONE

Well-Known Member
Hey DAS, not hattin, but I am a little concerned about the connections of the larger than specified gauge wire going into the IDEAL cob holder. Looking back at one of your pictures. ( 1st pic post #2) it looks like the bare wire is with in a mm of being exposed and touching the metal of the cob holder. This happens from time to time, may want to try to insert it further or add a dab of silicon or hot glue, for safety.
respect.
Good catch on the bare wire (Safety First Ladies & Gents) Also maybe a good idea to have a less severe bend in the wire as well.
 

DazedAndStoned

Well-Known Member
Already about 3 steps ahead of you guys lol. Like I said in the OP I was about 90% done and still need to tidy up my electrical, that was what I was referring to. Glad you guys are looking out for my safety though :) all is good.

I added hot glue to all the wires going into the COB holders to prevent them from coming out, and to insulate the ⅛" of bare wire sticking out the end. I cut a lot of them as well so they are not as bendy as before. I left my wires long so I could do just this once I was happy with the performance of the light, in case I needed to make any adjustments or anything like that. All is good over here. I'll take some pics of my electrical work in a couple.

My stress test is now over after 12 hours , heatsink is room temp, slightly colder than what my gaming PC runs at, so my rough estimate is right around 35-45°C. I'll find out for sure once I add my temperature probes.
 

DazedAndStoned

Well-Known Member
So as I said earlier, I had shortened a lot of the wires, and added some hot glue to hold them in place and to insulate them to prevent any short circuiting.

Now I am just on the hunt for something to hold my wires up out of place, fan speed controller with probes and another air pump for my DWC babies.

About 95% complete at this point. Just gonna give the panel a cleaning with a qtip cause I got some thermal paste in odd places


Busy weekend over here so I'm hoping between my paintball tourney, my flight lessons, and hockey that I can finish this panel up by Monday. If not, then sometime during the week for sure. Gotta change reses on 8 plants right now then clean 12 markers for my teammates to use in the morning! Busy busy busy....

IMG_20150905_172537.jpg

Before glue
IMG_20150905_172553.jpg


After glue
IMG_20150905_180447.jpg
 

CanadianONE

Well-Known Member
So as I said earlier, I had shortened a lot of the wires, and added some hot glue to hold them in place and to insulate them to prevent any short circuiting.

Now I am just on the hunt for something to hold my wires up out of place, fan speed controller with probes and another air pump for my DWC babies.

About 95% complete at this point. Just gonna give the panel a cleaning with a qtip cause I got some thermal paste in odd places


Busy weekend over here so I'm hoping between my paintball tourney, my flight lessons, and hockey that I can finish this panel up by Monday. If not, then sometime during the week for sure. Gotta change reses on 8 plants right now then clean 12 markers for my teammates to use in the morning! Busy busy busy....

View attachment 3493832

Before glue
View attachment 3493834


After glue
View attachment 3493835
Fan speed controller with probes?
 

CanadianONE

Well-Known Member
Yup, here is the one I use in my Veg Cab. Its got 5 probes that I strategically placed around the Cab and you can set each fan RPM separate or have it attempt to maintain your set temp at the probes.

They seem to be accurate to within a degree so its an affordable solution for us micro growers :)

View attachment 3493872
ahhh temp sensors very nice. Can you give me the model number off that unit so I can have a look at the specs.
 
Top