Hello
")
I'm growmau5. I contacted Mark over at
www.cutter.com.au a few weeks ago to ask if he could package together some high quality components and offer us a 1-click solution to ordering the parts necessary to assembly the single most popular configuration for most growers here: Four of Cree's flagship 3590s @ 1400ma.
As a paid supporter and sponsor of RIU, Mark was happy to help us out. He mentioned that he had been thinking about doing this for some time and that he would fast track the only missing component from his site: the Heatsinks.
A lot of us have been using extruded bar heatsinks with great success for sometime now. And I am sure many of you will continue to enjoy the process of measuring, marking, drilling and tapping these type of heatsinks for your custom COB setup.
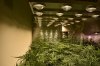
View attachment 3630067
In my estimation, the heatsink machining and preparation process is the most intimidating part of a DIY COB build for most beginners, accounting for 60-70% of the time it takes to complete a build. To streamline and make this process easier for all of us, the guys at Cutter really went out above and beyond to source a
Passive Anodized Pin heatsink for us :with a thermal resistance of 1.07 C/w. The increased heat emissivity of this design allows for smaller, lighter, more efficient thermal management at a comparable price.
OH, and did I mention they come pre-drilled and tapped for popular COB models including the Cree CXB3590!
If you are interested in learning more about this kit, follow this link directly to the kit page:
http://www.cutter.com.au/proddetail.php?prod=cut2900
Here is what is included:
4 pcs Cree CXB3590, top bins only
4 pcs Ideal 50-2303CR CXB Holder
4 pcs Ideal 50-2300AN Adapter for the Ledil ANGELINA
4 pcs Ledil Angelina 90 Degree reflector
4 pcs Graphite Thermal pad(TIM) 1 side adhesive for simple assembly on the COB
1 pc LGSU-1400D, Dimmable driver allows the COBS to be run at just under 50 watts, the sweet spot of wall plate efficiency
1 pc 0-10V dimmer compatiable with the LGSU Driver
4 Passive Pin fin Coolers suitable for the 50 watt drive( based on eff% calculations), predrilled and tapped for the Ideal Holder and adapter( you will only need a screw driver not a drill press)
16 pcs M3 6mm screws for the Holders
16 pcs M3.5 12mm Screws for mounting to side rails
The kit is called the
MAU5 : IV so that it is easy to find & so that newer hobbiests know they are ordering the same components I showcase on my
YouTube Channel. I will also be offering installation support and instructional videos on wiring, assembly, & configurations.
Additionally, these heatsinks and Cutter Kits will be the foundation of a new series of videos that I am producing called: the
Community OpenSource DIY LED grow light
the goals of the series are :
-to cooperatively design and build a completely modular, adjustable, infinitely configurable system with standard components .
-affordability, global accessibility, high performance
-applicable to anyone from the closet grower to the warehouse grower.
-ease of assembly and use.
To complete the project I will be creating all of my files in a collaborative affordable software called: Autodesk Fusion 360 (free 30 day trial, $40/mo license). Publishing will go directly to my profile over at
GRAB CAD, a free website were anyone can download files and send them to a local shop for fabrication.
I will also be assisting our community by reaching out to fabricators that will cut out parts and ship anywhere in the world. Places like Big Blue Saw can take one of these files , produce the part and ship to your doorstep for less than you might think. (more on that later).
In the meantime, I will be designing and fabricating prototypes that will hold the heatsink, allow for modularity, and allow flexibility for mounting other components like reds and UVs.
One note to USA buyers, the bold typeface prices on Cutter.com are in Australian dollars, US dollar conversions are listed below that.
The RIU discount code: CUTANDROLL will work for this kit!!!
Pre-orders are going on now (mid-march) for April 2016 availability.
Cheers
View attachment 3630098
View attachment 3630099