COB spectral research microcab

Positivity

Well-Known Member
Actually it's my save money and just buy minimal leds spectum test area.

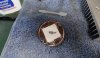
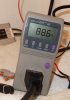
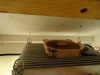
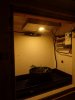
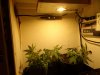
First up is a Cree CXA 3590 in 2700k
Manufacturer Part No:
CXA3590-0000-000R00AD27F

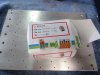
Powered by a 1.05a 96w Inventronics dimmable driver.
http://www.inventronics-co.com/upload/EUC-096SxxxDT(ST)_2013030703241121811.PDF


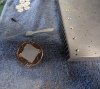
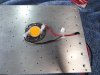
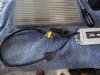
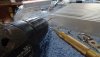
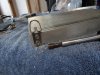
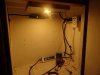
Decided to just keep it simple. Everything screws or pushes in. The ideal cob holders actually line up pretty good with the predrilled heatsink I had laying around. Put a 3 prong plug straight on the driver. Used wago connectors to connect everything on the dc side.

Still need to tidy it up and add a fan and another oddball potentiometer, 250k this time. Otherwise incredibly easy to make about a 88w light with a few watts to spare for a small star or two.

image.jpg
 

PetFlora

Well-Known Member
Great

So many microcabs don't know what light to use

Did you cut a hole/s in the top above the heat sink?


Im guessing sans lens
 

Positivity

Well-Known Member
Great

So many microcabs don't know what light to use

Did you cut a hole/s in the top above the heat sink?


Im guessing sans lens
No lens on this light pet. Might melt a hole in the floor..haha

No holes above heatsink yet. Actually thinking about cutting a hole in the ceiling and setting the heatsink over it. That would maximize my use of the small area.

Subbed ,Pos !
Great thread!
Thanks sds. Just a fun side project! Nothing fancy this time around but maybe try a few interesting leds/combos in the future.

3590 in 2700k at roughly 350ma for the first run. Maybe compare it to a 5000k with a red or two on the next.
 

SupraSPL

Well-Known Member
Nice setup POS! Did you tune the driver to exactly 1.05A or it is set on max? So 2.4sq ft. and approx 80W of dissipation puts you at 33.33W/ft² and about 34.3% efficiency or 110lm/W. Dimmed to 350mA it should be about 24W dissipation and 43.3% efficiency or 139lm/W. Not to shabby for one LED! If you could get 3 zips from that cab it could pay someones rent or a small mortgage LOL.
 

Positivity

Well-Known Member
Nice setup POS! Did you tune the driver to exactly 1.05A or it is set on max? So 2.4sq ft. and approx 80W of dissipation puts you at 33.33W/ft² and about 34.3% efficiency or 110lm/W. Dimmed to 350mA it should be about 24W dissipation and 43.3% efficiency or 139lm/W. Not to shabby for one LED!
These inventronics drivers are sealed and potted. So they aren't adjustable from my understanding. Every time I plug them in I get the expected watts so no problems there yet. It's full current, 1.05a without the dimmer connected.

In the first picture the lights only putting out 7w..lol. I connected a 10k pot to see what would happen. Only 7w happened...lol.

I'm going to start looking into meanwells if I build more lights. But I still have parts I need to assemble...lol.

Thanks for the numbers, greatly appreciated!

Don't want to run too many more watts with my expensive electricity. Probably run it around 40w or so
 

Positivity

Well-Known Member
Alright! I love this mini cab!

Resistor pot works great, 250k was the right one for this particular driver. Thanks to sds and everyone else who helped clear up choosing correct resistors.

So dialed in at 40w. That should be enough for this tiny area. Just need to find a psu for my fan and then I have a little girl ready to go.

2700k 3590. Will it impress me?

image.jpg
 

Positivity

Well-Known Member
I almost did a blumat, coco coir, veg n bloom thingy. But I have my veg chamber below with electronics so no standing water allowed.

Not sure what to do with this plant. Never flowered one like this before. Bent her sideways and will veg just a few days I suppose. She's in a good amount of recycled soil complete with worms and a mini airpot :razz: That should keep her happy and low maintenance.

Not going for a yield record. Although a scrog would be veddy veddy interesting. Little more interested in just seeing how the buds develop and running through some of my f2 seed collection

:joint:

image.jpg image.jpg
 

Tazbud

Well-Known Member
I like it very much. I'm using blumats above veg but the reservoir will be remote (and coming in from a different side to lights..) really can't grow without blumats anymore the things are revolutionary, one small safe air pump covers all the water/power needs.

Whats that thing on the wall, an apple product? : )

Go well, I like your spectral research!
 

Positivity

Well-Known Member
I like it very much. I'm using blumats above veg but the reservoir will be remote (and coming in from a different side to lights..) really can't grow without blumats anymore the things are revolutionary, one small safe air pump covers all the water/power needs.

Whats that thing on the wall, an apple product? : )

Go well, I like your spectral research!

Blumats are great. I used to aerate my res initially but not anymore. Just a dead res with r/o and ca/mg keeps everything purring.

The apple looking product is the remote dimmer, lol. Crucial for dialing in desired power level.

So not much to see here yet. Just a small bubba and a peyote purple at day 1 flower. Initial observation on 2700k is a bit slower growth vs 3k. Extra blue speeds things a small bit more. Still..very healthy. Almost want to say it's easier to grow healthy plants under red heavy spectrums. Just seems all their inherent needs are better met. Flowers are where I'm interested though..

image.jpg
 

Staxxx

Active Member
They look great, this should be fun to watch. I have a similar pre-drilled heatsink from RapidLED. I wanted to build a 3070, but I really want to avoid drilling/tapping. Does the ideal holder screw right in to the existing holes on the heatsink? What kind of screws did you use to mount the cob? Seems like the screw holes on the heatsink are smaller than the m3 size recommended for the holder. Thanks in advance.
 

Bueno Time

Well-Known Member
Does anyone else use a small nail as a makeshift center-punch before drilling into aluminum?
That might work.

I used a nail punch that I had already in one of the tool boxes. It was old and well used so I took an angle grinder to it to flatten the tip again. On my first module, I found that with 1-2 nice wacks the drill bit still wanted to wander a little. I didnt wail on it like crazy but I started doing 4 real firm blows and no more bit wander.

Getting a nice depth on the center punch seemed to keep the bit from wandering, try it and see I think it could work with a nail as the punch.
 
Top