Cann
Well-Known Member
So, normally I am found lurking in the Organics section, but I feel this should be shared with the community as a whole. Ive been ruminating on this for a while and finally figured I would put it on paper (or in this case screen). So here goes:
We have all heard of the DIY method of CO2 production fill a gallon milk jug with saturated sugar water at room temp, add yeast, and poke a few holes in the cap. Wait 12 or so hours and you have a steady amount of CO2 being released over the course of the ferment (generally 2-4 days depending on temp). The benefits of this method are that it is cheap, relatively immediate, and effective! The downside is you have to replace the jug every few days, and you end up going through a lot of sugar water and pouring a lot of sugar water alcohol down the drain. As a homebrewer it is hard to brew an alcohol with the intention of pouring it out, so I began reconsidering what types of CO2 concoctions I could create...
The most important factor in the brew, if we are considering it from the plants point of view, is the ability to generate a constant level of CO2, ideally enough to sustain 1500ppm (perfect plant conditions). No CO2 homebrew will let off perfectly constant amounts of CO2 over the course of its life, but some will do better than others. If youre looking a perfectly steady 1500ppm at all times, invest in a tank and regulator or else you will be disappointed. If youre okay with a bit of fluctuation, this method is for you.
First, lets take a look at what types of numbers an average sugar-water homebrew would create in its lifetime in terms of ppm. To calculate ppm, one needs to first understand moles.
Props for born2killspam for typing all this up way back in 09 - a much better job explaining that I would've done -
This is an excerpt from the thread https://www.rollitup.org/do-yourself/162265-co2-via-yeast-right-way.html
A mole is like a dozen, except its waay bigger, and isn't an arbitrary number 1mole (602000000000000000000000 of anything) of protons weighs 1g.. This means that the mass of a mole of atoms weighs its atomic number in grams..
CO2 has a molar mass of 44g, glucose [C6H12O6] has a molar mass of 180g. From the eq'ns we see that the ratios of CO2 to glucose are 2:1 and 6:1 respectively, so by mass it works out that the CO2 yield under anaerobic conditions is about 50% initial sugar mass, and about 150% initial sugar mass in reproductive mode..
Another thing about moles is that we can use them to estimate CO2 ppm..
A mole of a gas like CO2 will occupy 22.4L (~0.8cuft) at standard temperature/pressure. 1mole of CO2 in 22.4L at STP would be 1000000ppm.. Our ideal target is about 1500ppm, which 667x diluted.. So 44g of CO2 produces about 15000L (530cuft) of ideal plant air, but stationary the CO2 will pool at the bottom.. Knowing how many cfm your grow room cycles, and being able to estimate the CO2 production rate its possible to scale towards a roughly correct stable concentration..
So if we apply this knowledge to our 2.6gal brew, we find:
Over its active period the batch will evolve about 2lbs (~20moles) of CO2, which would mix up to 300000L (~11000cuft) of ideal 1500ppm plant air..
From here its about considering your grow-room volume, exhaust rate, and exhaust position.. Exhaust on cieling is FAR superior to a low exhaust for CO2 containment..
It should be pretty evident though that this won't add up to much in a 2000cuft room with 560cfm exhaust, but for a contained stealth grow it could help a lot.. Personally I'm under the anecdotal belief that the ethylene evolved helps my buds ripen a bit quicker.."
So lets apply this to my flower room. I have a 450cuft tent, so this amount of CO2 would fill my room roughly 24.5 times over the course of the ferment (11000cuft/450cuft=24.5). Divide this 24.5 by the 5 days of fermentation, and you average 5 rooms full of perfect 1500ppm air per day. Not bad for some sugar water
The problem is, you only get this kind of CO2 production when you have a starting liquid with a very high specific gravity (measure of sugar content in liquid) and ferment it quickly at high temperatures. Almost all styles of beer are meant to start with a medium specific gravity, and ferment at low temperatures for a long period of time (minimum 10 days usually 14 or more). Because of this, beer is almost immediately ruled out as far as a practical synergistic counterpart. This does not mean that a batch of beer in the corner of your flower room under a blanket (to keep it dark) wont help out with CO2 levels but it won't help a whole lot and after 7 days it will no longer be adding any noticeable CO2. At this point you could potentially swap it out with a fresh brew and allow it to sit for another 7 days in your living room, but the CO2 it imparted over its lifetime has nowhere near the impact of a high gravity liquid (aka the recipe above with 4lbs sugar in 10L water). If you want to brew a double IPA with an abv (alcohol by volume) of 10% or above you can produce a good amount of CO2, but grow room temperatures will create a funky tasting double IPA....unless you have your room dialed perfectly and can turn the temps down to 70 day/64 night or something like that - you're going to end up with some gnarly beer.
Fortunately, there are other tasty alternatives to beer that have a very high starting gravity (OG or original gravity as it is known in the homebrew world). My ferment of choice for the last year has been Hard Apple Cider. And by hard, I mean hard this stuff comes out between 12% and 15% abv... I chose apple juice as my starting point simply because I love apples, but you can probably use most fruit juices pomegranate, cherry, cranberry, grape, etc. or any combination of the above. I have not experimented with much beyond apple, but as long as the juice is within a pH range that yeast will survive, and has no preservatives (this is crucial), all should be well. Not sure about citrus juices as the pH would be crazy...
Anyway, on to the recipe:
This is for a 5 gallon batch. I use a 6 gallon food grade plastic bucket I own for the sole purpose of brewing, but a 5 gal home depot bucket will work (doesnt impart a noticeable taste, BPA is a whole other topic so dont get me started ), if a 5 gal bucket is all you got just scale down the recipe a tiny bit so you only end up with 4.5 gal (or just fill the bucket as high as you are comfortable and put the rest in a milk jug). This will avoid spills, etc - and sometimes the brew foams up a bit if the temps are high enough.
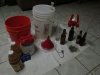
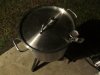
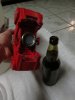
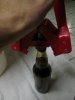
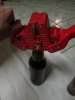
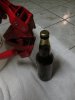
Here's a picture of most of my setup. I only had 2 bottles of apple juice, so I will be making a water brew for the sake of pictures. Also, I am out of Pasteur Champagne yeast currently, but Cuvee yeast (little blue packet also made by Red Star) is a perfectly acceptable replacement. The plastic tube in the picture is a hydrometer - a tool used for measuring specific gravity. If you own a hydrometer you will be able to measure the abv of your cider, and you can also use it to check how far a ferment is from being finished. A hydrometer is not necessary at all, but they are only about $20 at a homebrew store if you are curious. Along these same lines is the little metal deal in the middle of the picture, it only costs $6 and it screws on to a hose faucet in order to clean bottles with a jet of water. You can use a bottle brush alone (pictured sitting in the bottle on the right), but the jet will make your cleaning job faster and easier. Also pictured is the bottle capper (red), bottle caps, vinyl tubing, funnel, buckets (5 and 6 gal), and a swing top bottle. Not pictured is the massive stock pot, steel spoon, and thermometer.
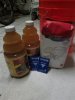
5 gallons apple juice - (usually 10 bottles), I always buy organic of course, and if you choose to do the same the yeast will thank you (as will your body), since there are many more nutrients in organic fruit versus synthetic. Also, organic apple juice almost never has preservatives, and I cannot emphasize enough that the juice needs to be preservative free if you want your yeast to survive. We want nothing to be preserved CO2 is produced when things are constantly changing!!!
10 lbs cane sugar again organic is best, but often I find myself skimping here because of price C&H is just so much damn cheaper than organic unbleached sugar!!!
1 or 2 packets of Red Star brand Pasteur Champagne Yeast This is the most important ingredient in the list if you are going to be drinking this cider at the end which I hope most of you will be if you are spending $50 bucks on apple juice There are all sorts of different yeasts out there. In an emergency you can use always bakers yeast and still get a ferment that will produce CO2, or better yet you could simply let mother nature do the work and leave your cider outside during the day making sure to remove the lid and cover the top with cheesecloth or a shirt to keep out dust. This will allow the millions of wild yeasts floating about in the air to colonize your cider (see Sandor Katzs book Wild Fermentation for more amazing read). These various yeasts will all produce CO2, but they will do so at different rates, and create a finished product that is likely not very high alcohol %, and not very tasty (although wild yeasts can surprise you). All yeasts have different properties some reproduce faster than others and therefore will create faster ferments. Other strains are unable to reproduce over temperatures of 65 degrees Fahrenheit these are poor choices in the grow room for obvious reasons. Some strains are unable to tolerate alcohol by volume over 8% - again these would not work for the purposes we need. If you allow your cider to be colonized by wild yeast, there is a good chance your yeast will not be suitable for such a high abv cider, and they will die in their waste (alcohol). This is not a pretty death, not to mention the fact that your cider will not taste the best (too sweet), and all that sweetness is potential CO2 that was never released - just another smack in the face with each sip
  . You dont want to end up drinking a weirdly sweet and sour cider that reminds you with every taste how you wasted $$$ and missed out on extra CO2
so go pick up some Red Star Pasteur Champagne yeast!! This strain has been bred to withstand abv up to 16%, and it also is extremely fast (not to mention tasty) three properties that combine perfectly with our CO2 production and cider drinking needs. If you can't find Pasteur Champagne Yeast, Red Star makes another yeast called Cuvee that will work just as well - it comes in a blue packet not yellow like the Pasteur.
. You dont want to end up drinking a weirdly sweet and sour cider that reminds you with every taste how you wasted $$$ and missed out on extra CO2
so go pick up some Red Star Pasteur Champagne yeast!! This strain has been bred to withstand abv up to 16%, and it also is extremely fast (not to mention tasty) three properties that combine perfectly with our CO2 production and cider drinking needs. If you can't find Pasteur Champagne Yeast, Red Star makes another yeast called Cuvee that will work just as well - it comes in a blue packet not yellow like the Pasteur.
This is it. It is that simple. You can add spices if you desire sometimes in the winter Ill throw in cinnamon, cloves, etc. for a spiced cider, but in general I just keep it pure. Literally the same ingredients as a ghetto sugar-water brew just replace the water with organic apple juice, increase the amount of sugar, and add the right kind of yeast. You'll be surprised with the results.
Although the ingredients are very similar; it is the process that differs:
Here is what I do:
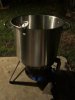
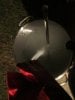
Pour 3-4 gallons of the juice into a big stockpot and bring it to a simmer. TURN OFF THE HEAT. Add your sugar slowly, stirring the entire time and making sure it doesnt burn to the bottom (scorched sugar will immediately ruin the flavors). If the sugar wont fully dissolve continue to add juice until it goes into solution. Once the sugar has dissolved, it is all about bringing the liquid to below 90 degrees as quickly as possible. If your stockpot is big enough, add the rest of the juice, this will bring the temperature down a little bit, but usually not much (cold or frozen juice will make a bigger difference if you have time to prepare). If you are in a rush you can make an ice water bath in your tub and submerge the hot stockpot this will cool the liquid below 90 in a few hours. Otherwise simply leave it overnight in a cool area outside is perfect if you put the lid on and then cover it with a blanket or something you are just trying to prevent other yeasts/bacteria from colonizing the cider before you add the Pasteur yeast (this step is not critical, as the amount of yeast you introduce will likely outcompete any other wild yeast). If you are a homebrewer and have a wort chiller then you are golden and it only takes about 30 minutes to cool
Here is a little photo montage - first pic is the kettle on my outdoor cooker, second pic is adding sugar, third pic is how I leave it overnight to cool. Not much else to photograph...
Once the liquid is below 90 degrees you can safely add your yeast without killing it. A note on this if your liquid is too cold when you add the yeast it will drastically affect their performance. Therefore, it is important to add the yeast as soon after the liquid drops below 90 as possible, and it is paramount to catch it before it gets below 65 degrees. If it gets that cold you may want to try heating it back up a tiny bit to give the yeast some energy from the get go. A 65 degree brew might take 24 hours or more to start fermenting wheras a 90 degree brew can pick up in a matter of 2 or 3 hours. This all has to do with bringing the yeast out of their dried dormant state as fast as possible. If your brew is too cold, you can activate the yeast first by adding them to a bowl full of hot water and a few tablespoons of sugar. Make sure the water is about 90 degrees, then add the sugar, yeast, aerate well, and wait until it starts to foam up. Once you can see the yeast are active (usually 5-10 minutes) you can add the mixture to the cider. This will give them a head start - it is still not as ideal as adding them when the cider is 90 degrees, but its better than a straight cold start. The brew temperature will reach equilibrium within grow room rather quickly but nevertheless starting temperature is critical!
When the time is right, add your yeast and give the cider the stirring of a lifetime. You want to introduce as much oxygen as possible into the water, since the yeast need this to live! If you have an extra 5 gal bucket around I would recommend violently pouring the mixture back and fourth between buckets a few times to make sure its nicely aerated. Otherwise a quick violent stirring back and forth with a giant spoon or bamboo stake for a few minutes will do the trick. Either way, once you have aerated it properly add your yeast and give it a final stirring for distribution. Now comes the choice of whether or not to add a lid. Many homebrewers would tell you that a lid is necessary or else your cider will develop mold but I would beg to differ. I have done this method countless times with simply cheesecloth or a clean tshirt over the bucket, and never once had an issue with mold. The Pasteur yeast is so dominant in the cider that it outcompetes any mold or bad bacterium that attempts to establish itself, and since it ferments so fast to such a high abv it rapidly becomes inhospitable to most molds (ever seen mold grow on anything 14% abv? Probably not ) Therefore, I say do what you please when it comes to lids but personally I have a lid with an airlock attached (a one way valve that lets CO2 out but nothing in) that I employ to avoid random particles in my cider such as hairs, lint, etc from the tshirt. Also, I can use my airlock to monitor CO2 release since it bubbles every time the CO2 escapes. I can literally listen to the rate at which CO2 is being released, and youd be surprised how much this can vary over the 7-day fermentation period. It is much harder to visually estimate the rate of CO2 release, so that aspect alone to me is worth the $5 for a lid, cork, and airlock from a homebrew store.
Once you have decided whether or not to add a lid it is time to move the cider to its final resting point in the grow room. The hotter the area of the grow room, the faster CO2 will be released and vice versa. As with most alcohols, the faster the ferment, the worse the alcohol is going to taste. This is an unfortunate truth when trying to combine these hobbies, but it is what it is. The cider will still be good fermented at 90 degrees, but at 60 degrees it will be delicious. At 90 degrees it may finish fermenting in 5 days, at 60 degrees it may take a month. I find 80 to be a happy medium, usually resulting in 7 or 8 day ferments and pretty damn tasty cider. Too much longer and I get annoyed by the lack of CO2 (might as well just have it in my living room) and too much shorter I find that the cider is a bit funky tasting (then again I am a snob). It will sure taste better than your sugar-water brew
Another factor in brew location is airflow where is the CO2 going to go once it comes out of the bucket? Remember that CO2 is denser than air and therefore will tend to settle on the bottom unless provoked otherwise exhaust outtakes on the ceiling are advised, as are oscillating fans on the floor to promote the movement of CO2 around the room (constantly stirring up the CO2 particles which then settle down over your ladies). A single exhaust fan on the floor will suck up such a large percentage of your CO2 that it is almost not worth the effort in the first place consider this before starting your endeavor.
Once you have moved the cider to the perfect spot it is CRUCIAL that you cover it with a blanket or something else light proof to keep it in total darkness. Light will negatively effect the taste of the cider, so this is something that must always be worked around in a grow room where there is an excessive amount of light. I find that a soild quilt will do a great job keeping things dark just make sure you arent using thin sheets! When in doubt, sit on the ground with your cider under the blanket with the lights on and see how dark it is! If you can see things within a minute or less of your eyes adjusting it is probably not dark enough and you might want to get a thicker blanket. If you dont want to mess with a blanket in your grow room (I dont blame you) you can always go without and see how it tastes youll probably think it still tastes good, again Im just picky here and going for optimum flavor (after all isnt that what we seek in all of our hobbies?).
At this point you can forget about your cider for a while, or if youre like me youll be in there every day checking on its progress. DO NOT STIR IT like you would a sugar-water brew. The re-introduction of oxygen into the cider will mess up the flavors, although it does stimulate faster fermentation if thats what you really want (again not necessarily the point of this thread...). If you are keen you can take the temperature of your brew once every few days to monitor its progress. An electric blanket or seedling mat can keep the temps stable if you need. An aquarium thermometer is the best; just make sure you clean it before using!!! If you are using an airlock you will be able to see when fermentation has stopped (no more bubbling), otherwise youll just have to watch the surface of the cider and look for tiny bubbles coming up.
When you are certain the cider is done fermenting, take it out of the grow room (and swap it out with another if you so desire). I would recommend waiting an extra day or two just to be certain the fermentation is done before bottling otherwise you could end up with some exploding bottles in your fridge I can tell you from personal experience this is not very enjoyable to deal with, and can be potentially very dangerous (ever had a bottle explode in your hand?). If you are not planning on bottling your cider, then you can just start drinking. The downside to this is that it will be uncarbonated and taste a lot like wine. It will still be delicious, but I prefer the carbonated version myself tastes like apple champagne, epic if you put it on ice on a hot summer day dangerous Anyway, if youre planning on drinking it uncarbonated you can just pop it in the fridge - but good luck fitting 5 gallons of liquid into your fridge
I suggest refilling the old apple juice bottles if you are comfortable with alcohol in plastic, I personally use glass but Im a purist. If you are going to bottle your batch you are in for a bit of a project, and a little bit of cash but well worth it IMO. The extra cash is not necessary (you can reuse old plastic bottles in a bind) but it will make the final product much better. You will find the best literature on bottling on a homebrew forum, so I will just summarize here (yes this long block of text is a summary, welcome to homebrewing ") ). Basically, you will clean a bunch of bottles with a bottlebrush ($3), sanitize them if you want (not necessary at all, but only about $5), fill them all via funnel ($1) or siphon ($5), and then cap them (100 caps cost $2, capping machine is $10). In order to achieve carbonation, you will add what is called priming sugar to the cider right before bottling. This small amount of sugar will be converted into CO2 by the remaining yeast in the bottle, therefore creating pressure inside the bottle, which will seek equilibrium by dissolving into the cider (carbonation). This is the reason I say to allow for an extra day or two before bottling, because if there is a bit of sugar left in the cider before you add the priming sugar there will be too much sugar, therefore the yeast will produce too much CO2 in the bottles leading to exploding bottle bombs. For a good amount of carbonation I usually add ¾ of a cup of cane sugar per 5 gal batch. I dissolve this sugar first in about 2 cups of boiling water, and then add the boiling sugar water to the cider. At this point you will want to stir the sugar into the cider to distribute it evenly, trying to avoid introducing oxygen into the mix as much as possible. This means gentle, powerful stirs but at this point you encounter a problem. If you havent noticed already, there is a layer of yeast and sediment at the bottom of the bucket that is anywhere from 1/8 nch to ½ inch thick. If you stir the sugar into this mix you will also invariably stir up the yeast and sediment as well something you probably dont want to taste in the finished cider. In order to avoid this, you can do what homebrewers call racking, or scientists call decanting. Basically, you slowly transfer the cider into another container, making sure not to get any of the yeasty sediment layer in the mix. The easiest way to do this is with a piece of food grade vinyl tubing just put your cider on top of a table, put a vessel on the floor, and start up a siphon. This is the way that homebrewers do it, because it allows for a smooth transfer and minimal oxygenation. If you have to pour it manually (decanting) try to avoid splashing as much as possible, pour it as if you were pouring a cup from a keg (aim for the sides of the container). Remember that oxygenation will produce off-flavors in a finished cider. If you dont have another vessel, simply say fuck it and mix the priming sugar in with the yeast and sediment youre cider will be a bit more au natural, but still taste good im sure. With the priming sugar mixed evenly you are ready to bottle. If you are using glass bottles, you MUST HAVE POP TOP BOTTLES. You cannot recap twist offs!!! Also, amber bottles are ideal, green is decent, clear glass sucks. This is because as you know from earlier on, light degrades the flavor of alcohol, so amber bottles offer more protection to your cider than other colors of glass (violet glass is actually best look up MIRON glass company - you may have heard of Herb Preserve which is the same jar with a shitty sticker over it for $20 more marketed to the cannabis community
) Once you have your bottles use the same siphon as before to fill bottles up to the middle of the neck (same level as you buy beers) or if you have a funnel use that (prepare for sore forearms and delicate pouring). Then, take your caps (preheated in hot NOT BOILING water) and apply them using your capper. This is one of the only stages you cant skimp on if you are on a budget and still trying to bottle unfortunately there arent many ways to put caps on a bottle without a capper...The only way around it is if you have swing top bottles (such as Grolsch) but most people dont have 50 swing top bottles lying around
If you are comfortable with plastic you can use plastic soda bottles (or even the apple juice bottles) but I wouldnt recommend it. Plastic also doesn't hold carbonation nearly as well as glass with proper caps. You will end up with about 52 12oz bottles per 5 gallons give or take a few bottles. If you cant find glass bottles, I find I can always scrounge at least 50 if I spend some time digging through recycling for a bit it never takes longer than an hour or so - just make sure you clean them well!!!
). Basically, you will clean a bunch of bottles with a bottlebrush ($3), sanitize them if you want (not necessary at all, but only about $5), fill them all via funnel ($1) or siphon ($5), and then cap them (100 caps cost $2, capping machine is $10). In order to achieve carbonation, you will add what is called priming sugar to the cider right before bottling. This small amount of sugar will be converted into CO2 by the remaining yeast in the bottle, therefore creating pressure inside the bottle, which will seek equilibrium by dissolving into the cider (carbonation). This is the reason I say to allow for an extra day or two before bottling, because if there is a bit of sugar left in the cider before you add the priming sugar there will be too much sugar, therefore the yeast will produce too much CO2 in the bottles leading to exploding bottle bombs. For a good amount of carbonation I usually add ¾ of a cup of cane sugar per 5 gal batch. I dissolve this sugar first in about 2 cups of boiling water, and then add the boiling sugar water to the cider. At this point you will want to stir the sugar into the cider to distribute it evenly, trying to avoid introducing oxygen into the mix as much as possible. This means gentle, powerful stirs but at this point you encounter a problem. If you havent noticed already, there is a layer of yeast and sediment at the bottom of the bucket that is anywhere from 1/8 nch to ½ inch thick. If you stir the sugar into this mix you will also invariably stir up the yeast and sediment as well something you probably dont want to taste in the finished cider. In order to avoid this, you can do what homebrewers call racking, or scientists call decanting. Basically, you slowly transfer the cider into another container, making sure not to get any of the yeasty sediment layer in the mix. The easiest way to do this is with a piece of food grade vinyl tubing just put your cider on top of a table, put a vessel on the floor, and start up a siphon. This is the way that homebrewers do it, because it allows for a smooth transfer and minimal oxygenation. If you have to pour it manually (decanting) try to avoid splashing as much as possible, pour it as if you were pouring a cup from a keg (aim for the sides of the container). Remember that oxygenation will produce off-flavors in a finished cider. If you dont have another vessel, simply say fuck it and mix the priming sugar in with the yeast and sediment youre cider will be a bit more au natural, but still taste good im sure. With the priming sugar mixed evenly you are ready to bottle. If you are using glass bottles, you MUST HAVE POP TOP BOTTLES. You cannot recap twist offs!!! Also, amber bottles are ideal, green is decent, clear glass sucks. This is because as you know from earlier on, light degrades the flavor of alcohol, so amber bottles offer more protection to your cider than other colors of glass (violet glass is actually best look up MIRON glass company - you may have heard of Herb Preserve which is the same jar with a shitty sticker over it for $20 more marketed to the cannabis community
) Once you have your bottles use the same siphon as before to fill bottles up to the middle of the neck (same level as you buy beers) or if you have a funnel use that (prepare for sore forearms and delicate pouring). Then, take your caps (preheated in hot NOT BOILING water) and apply them using your capper. This is one of the only stages you cant skimp on if you are on a budget and still trying to bottle unfortunately there arent many ways to put caps on a bottle without a capper...The only way around it is if you have swing top bottles (such as Grolsch) but most people dont have 50 swing top bottles lying around
If you are comfortable with plastic you can use plastic soda bottles (or even the apple juice bottles) but I wouldnt recommend it. Plastic also doesn't hold carbonation nearly as well as glass with proper caps. You will end up with about 52 12oz bottles per 5 gallons give or take a few bottles. If you cant find glass bottles, I find I can always scrounge at least 50 if I spend some time digging through recycling for a bit it never takes longer than an hour or so - just make sure you clean them well!!!


 bottling sequence. sorry about the lack of pictures for all the other steps - this is definitely a 2 man job if you are trying to take pictures at the same time, maybe even 3..
At this point I label my caps with the batch name and date, put them in milk crates, and store them in the dark for 14 days to age, clarify, and carbonate. This waiting period is the hardest time, but similar to achieving a good cure there is nothing better than cracking a cider after 14 long days and having it be perfect and delicious. And during those 14 days you can always make two more batches to keep you occupied
So lets take a look at the CO2 output from one of these batches.
For each 5 gallon batch, the 10lbs of sugar converts to roughly 5lbs of CO2. 5lbs CO2 is roughly 50 moles, which makes 27,500cuft of perfect 1500ppm air. Over the course of a 7-day ferment (assuming 80 degree temps) this will fill my room 61 times (27500/450) with perfect CO2, almost 9 rooms full a day. This means I can vent my room once every two hours and still keep my ppm over 1000 on average. Vent it once every three hours and I could potentially have too much CO2 in my room a problem I never thought I would encounter with homebrewed CO2 This would only be an issue during days 2 and 3 of fermentation when things are raging at full force, because a disproportionate amount of CO2 is released the first few days compared to the last few. This means more realistically I should be venting my room once every two hours for the first couple days, and then once every three or four hours for the few days. Without a ppm meter it is hard for me to judge, but based on my calculations I am hovering about 1000 almost all the time (with rotating brews).
After the initial cost of the brewing equipment ($30 or so) you can have a room full of CO2 and 52 bottles of 15% abv cider every week for as little as $50
In my book, thats damn hard to beat. It's hard to find shitty beer for $1 a bottle, so delicious organic cider for $1 a bottle, plus free CO2...you do the math
Looking at these numbers it is easy to see why I am so excited about this method It works! And just wait until you taste that first batch of cider youll be surprised something so simple can be so delicious. Itll make you rethink commercial alcohols immediately (remember your first hit of some organic homegrown?). If this thread sparks a few people into the venture of homebrewing/distilling I will be happy with the results. Brewing is just as addictive as growing I am even finding myself getting addicted to the other brewing aspects of growing - compost teas!! But that is for another thread .
I hope this makes sense to everyone sorry it is so verbose. Like I said, I have been ruminating on this for a while so I wanted to make sure I outlined the process in full. Hopefully this sparks some creativity in yall to get brewin! If not for the sake of your ladies, for the sake of yourself!
We have all heard of the DIY method of CO2 production fill a gallon milk jug with saturated sugar water at room temp, add yeast, and poke a few holes in the cap. Wait 12 or so hours and you have a steady amount of CO2 being released over the course of the ferment (generally 2-4 days depending on temp). The benefits of this method are that it is cheap, relatively immediate, and effective! The downside is you have to replace the jug every few days, and you end up going through a lot of sugar water and pouring a lot of sugar water alcohol down the drain. As a homebrewer it is hard to brew an alcohol with the intention of pouring it out, so I began reconsidering what types of CO2 concoctions I could create...
The most important factor in the brew, if we are considering it from the plants point of view, is the ability to generate a constant level of CO2, ideally enough to sustain 1500ppm (perfect plant conditions). No CO2 homebrew will let off perfectly constant amounts of CO2 over the course of its life, but some will do better than others. If youre looking a perfectly steady 1500ppm at all times, invest in a tank and regulator or else you will be disappointed. If youre okay with a bit of fluctuation, this method is for you.
First, lets take a look at what types of numbers an average sugar-water homebrew would create in its lifetime in terms of ppm. To calculate ppm, one needs to first understand moles.
Props for born2killspam for typing all this up way back in 09 - a much better job explaining that I would've done -
This is an excerpt from the thread https://www.rollitup.org/do-yourself/162265-co2-via-yeast-right-way.html
A mole is like a dozen, except its waay bigger, and isn't an arbitrary number 1mole (602000000000000000000000 of anything) of protons weighs 1g.. This means that the mass of a mole of atoms weighs its atomic number in grams..
CO2 has a molar mass of 44g, glucose [C6H12O6] has a molar mass of 180g. From the eq'ns we see that the ratios of CO2 to glucose are 2:1 and 6:1 respectively, so by mass it works out that the CO2 yield under anaerobic conditions is about 50% initial sugar mass, and about 150% initial sugar mass in reproductive mode..
Another thing about moles is that we can use them to estimate CO2 ppm..
A mole of a gas like CO2 will occupy 22.4L (~0.8cuft) at standard temperature/pressure. 1mole of CO2 in 22.4L at STP would be 1000000ppm.. Our ideal target is about 1500ppm, which 667x diluted.. So 44g of CO2 produces about 15000L (530cuft) of ideal plant air, but stationary the CO2 will pool at the bottom.. Knowing how many cfm your grow room cycles, and being able to estimate the CO2 production rate its possible to scale towards a roughly correct stable concentration..
So if we apply this knowledge to our 2.6gal brew, we find:
Over its active period the batch will evolve about 2lbs (~20moles) of CO2, which would mix up to 300000L (~11000cuft) of ideal 1500ppm plant air..
From here its about considering your grow-room volume, exhaust rate, and exhaust position.. Exhaust on cieling is FAR superior to a low exhaust for CO2 containment..
It should be pretty evident though that this won't add up to much in a 2000cuft room with 560cfm exhaust, but for a contained stealth grow it could help a lot.. Personally I'm under the anecdotal belief that the ethylene evolved helps my buds ripen a bit quicker.."
So lets apply this to my flower room. I have a 450cuft tent, so this amount of CO2 would fill my room roughly 24.5 times over the course of the ferment (11000cuft/450cuft=24.5). Divide this 24.5 by the 5 days of fermentation, and you average 5 rooms full of perfect 1500ppm air per day. Not bad for some sugar water
The problem is, you only get this kind of CO2 production when you have a starting liquid with a very high specific gravity (measure of sugar content in liquid) and ferment it quickly at high temperatures. Almost all styles of beer are meant to start with a medium specific gravity, and ferment at low temperatures for a long period of time (minimum 10 days usually 14 or more). Because of this, beer is almost immediately ruled out as far as a practical synergistic counterpart. This does not mean that a batch of beer in the corner of your flower room under a blanket (to keep it dark) wont help out with CO2 levels but it won't help a whole lot and after 7 days it will no longer be adding any noticeable CO2. At this point you could potentially swap it out with a fresh brew and allow it to sit for another 7 days in your living room, but the CO2 it imparted over its lifetime has nowhere near the impact of a high gravity liquid (aka the recipe above with 4lbs sugar in 10L water). If you want to brew a double IPA with an abv (alcohol by volume) of 10% or above you can produce a good amount of CO2, but grow room temperatures will create a funky tasting double IPA....unless you have your room dialed perfectly and can turn the temps down to 70 day/64 night or something like that - you're going to end up with some gnarly beer.
Fortunately, there are other tasty alternatives to beer that have a very high starting gravity (OG or original gravity as it is known in the homebrew world). My ferment of choice for the last year has been Hard Apple Cider. And by hard, I mean hard this stuff comes out between 12% and 15% abv...
I chose apple juice as my starting point simply because I love apples, but you can probably use most fruit juices pomegranate, cherry, cranberry, grape, etc. or any combination of the above. I have not experimented with much beyond apple, but as long as the juice is within a pH range that yeast will survive, and has no preservatives (this is crucial), all should be well. Not sure about citrus juices as the pH would be crazy...Anyway, on to the recipe:
This is for a 5 gallon batch. I use a 6 gallon food grade plastic bucket I own for the sole purpose of brewing, but a 5 gal home depot bucket will work (doesnt impart a noticeable taste, BPA is a whole other topic so dont get me started ), if a 5 gal bucket is all you got just scale down the recipe a tiny bit so you only end up with 4.5 gal (or just fill the bucket as high as you are comfortable and put the rest in a milk jug). This will avoid spills, etc - and sometimes the brew foams up a bit if the temps are high enough.
Here's a picture of most of my setup. I only had 2 bottles of apple juice, so I will be making a water brew for the sake of pictures. Also, I am out of Pasteur Champagne yeast currently, but Cuvee yeast (little blue packet also made by Red Star) is a perfectly acceptable replacement. The plastic tube in the picture is a hydrometer - a tool used for measuring specific gravity. If you own a hydrometer you will be able to measure the abv of your cider, and you can also use it to check how far a ferment is from being finished. A hydrometer is not necessary at all, but they are only about $20 at a homebrew store if you are curious. Along these same lines is the little metal deal in the middle of the picture, it only costs $6 and it screws on to a hose faucet in order to clean bottles with a jet of water. You can use a bottle brush alone (pictured sitting in the bottle on the right), but the jet will make your cleaning job faster and easier. Also pictured is the bottle capper (red), bottle caps, vinyl tubing, funnel, buckets (5 and 6 gal), and a swing top bottle. Not pictured is the massive stock pot, steel spoon, and thermometer.
5 gallons apple juice - (usually 10 bottles), I always buy organic of course, and if you choose to do the same the yeast will thank you (as will your body), since there are many more nutrients in organic fruit versus synthetic. Also, organic apple juice almost never has preservatives, and I cannot emphasize enough that the juice needs to be preservative free if you want your yeast to survive. We want nothing to be preserved CO2 is produced when things are constantly changing!!!
10 lbs cane sugar again organic is best, but often I find myself skimping here because of price C&H is just so much damn cheaper than organic unbleached sugar!!!
1 or 2 packets of Red Star brand Pasteur Champagne Yeast This is the most important ingredient in the list if you are going to be drinking this cider at the end which I hope most of you will be if you are spending $50 bucks on apple juice
. You dont want to end up drinking a weirdly sweet and sour cider that reminds you with every taste how you wasted $$$ and missed out on extra CO2
so go pick up some Red Star Pasteur Champagne yeast!! This strain has been bred to withstand abv up to 16%, and it also is extremely fast (not to mention tasty) three properties that combine perfectly with our CO2 production and cider drinking needs. If you can't find Pasteur Champagne Yeast, Red Star makes another yeast called Cuvee that will work just as well - it comes in a blue packet not yellow like the Pasteur. This is it. It is that simple. You can add spices if you desire sometimes in the winter Ill throw in cinnamon, cloves, etc. for a spiced cider, but in general I just keep it pure. Literally the same ingredients as a ghetto sugar-water brew just replace the water with organic apple juice, increase the amount of sugar, and add the right kind of yeast. You'll be surprised with the results.
Although the ingredients are very similar; it is the process that differs:
Here is what I do:
Pour 3-4 gallons of the juice into a big stockpot and bring it to a simmer. TURN OFF THE HEAT. Add your sugar slowly, stirring the entire time and making sure it doesnt burn to the bottom (scorched sugar will immediately ruin the flavors). If the sugar wont fully dissolve continue to add juice until it goes into solution. Once the sugar has dissolved, it is all about bringing the liquid to below 90 degrees as quickly as possible. If your stockpot is big enough, add the rest of the juice, this will bring the temperature down a little bit, but usually not much (cold or frozen juice will make a bigger difference if you have time to prepare). If you are in a rush you can make an ice water bath in your tub and submerge the hot stockpot this will cool the liquid below 90 in a few hours. Otherwise simply leave it overnight in a cool area outside is perfect if you put the lid on and then cover it with a blanket or something you are just trying to prevent other yeasts/bacteria from colonizing the cider before you add the Pasteur yeast (this step is not critical, as the amount of yeast you introduce will likely outcompete any other wild yeast). If you are a homebrewer and have a wort chiller then you are golden and it only takes about 30 minutes to cool
Here is a little photo montage - first pic is the kettle on my outdoor cooker, second pic is adding sugar, third pic is how I leave it overnight to cool. Not much else to photograph...
Once the liquid is below 90 degrees you can safely add your yeast without killing it. A note on this if your liquid is too cold when you add the yeast it will drastically affect their performance. Therefore, it is important to add the yeast as soon after the liquid drops below 90 as possible, and it is paramount to catch it before it gets below 65 degrees. If it gets that cold you may want to try heating it back up a tiny bit to give the yeast some energy from the get go. A 65 degree brew might take 24 hours or more to start fermenting wheras a 90 degree brew can pick up in a matter of 2 or 3 hours. This all has to do with bringing the yeast out of their dried dormant state as fast as possible. If your brew is too cold, you can activate the yeast first by adding them to a bowl full of hot water and a few tablespoons of sugar. Make sure the water is about 90 degrees, then add the sugar, yeast, aerate well, and wait until it starts to foam up. Once you can see the yeast are active (usually 5-10 minutes) you can add the mixture to the cider. This will give them a head start - it is still not as ideal as adding them when the cider is 90 degrees, but its better than a straight cold start. The brew temperature will reach equilibrium within grow room rather quickly but nevertheless starting temperature is critical!
When the time is right, add your yeast and give the cider the stirring of a lifetime. You want to introduce as much oxygen as possible into the water, since the yeast need this to live! If you have an extra 5 gal bucket around I would recommend violently pouring the mixture back and fourth between buckets a few times to make sure its nicely aerated. Otherwise a quick violent stirring back and forth with a giant spoon or bamboo stake for a few minutes will do the trick. Either way, once you have aerated it properly add your yeast and give it a final stirring for distribution. Now comes the choice of whether or not to add a lid. Many homebrewers would tell you that a lid is necessary or else your cider will develop mold but I would beg to differ. I have done this method countless times with simply cheesecloth or a clean tshirt over the bucket, and never once had an issue with mold. The Pasteur yeast is so dominant in the cider that it outcompetes any mold or bad bacterium that attempts to establish itself, and since it ferments so fast to such a high abv it rapidly becomes inhospitable to most molds (ever seen mold grow on anything 14% abv? Probably not ) Therefore, I say do what you please when it comes to lids but personally I have a lid with an airlock attached (a one way valve that lets CO2 out but nothing in) that I employ to avoid random particles in my cider such as hairs, lint, etc from the tshirt. Also, I can use my airlock to monitor CO2 release since it bubbles every time the CO2 escapes. I can literally listen to the rate at which CO2 is being released, and youd be surprised how much this can vary over the 7-day fermentation period. It is much harder to visually estimate the rate of CO2 release, so that aspect alone to me is worth the $5 for a lid, cork, and airlock from a homebrew store.
Once you have decided whether or not to add a lid it is time to move the cider to its final resting point in the grow room. The hotter the area of the grow room, the faster CO2 will be released and vice versa. As with most alcohols, the faster the ferment, the worse the alcohol is going to taste. This is an unfortunate truth when trying to combine these hobbies, but it is what it is. The cider will still be good fermented at 90 degrees, but at 60 degrees it will be delicious. At 90 degrees it may finish fermenting in 5 days, at 60 degrees it may take a month. I find 80 to be a happy medium, usually resulting in 7 or 8 day ferments and pretty damn tasty cider. Too much longer and I get annoyed by the lack of CO2 (might as well just have it in my living room) and too much shorter I find that the cider is a bit funky tasting (then again I am a snob). It will sure taste better than your sugar-water brew
Another factor in brew location is airflow where is the CO2 going to go once it comes out of the bucket? Remember that CO2 is denser than air and therefore will tend to settle on the bottom unless provoked otherwise exhaust outtakes on the ceiling are advised, as are oscillating fans on the floor to promote the movement of CO2 around the room (constantly stirring up the CO2 particles which then settle down over your ladies). A single exhaust fan on the floor will suck up such a large percentage of your CO2 that it is almost not worth the effort in the first place consider this before starting your endeavor.
Once you have moved the cider to the perfect spot it is CRUCIAL that you cover it with a blanket or something else light proof to keep it in total darkness. Light will negatively effect the taste of the cider, so this is something that must always be worked around in a grow room where there is an excessive amount of light. I find that a soild quilt will do a great job keeping things dark just make sure you arent using thin sheets! When in doubt, sit on the ground with your cider under the blanket with the lights on and see how dark it is! If you can see things within a minute or less of your eyes adjusting it is probably not dark enough and you might want to get a thicker blanket. If you dont want to mess with a blanket in your grow room (I dont blame you) you can always go without and see how it tastes youll probably think it still tastes good, again Im just picky here and going for optimum flavor (after all isnt that what we seek in all of our hobbies?).
At this point you can forget about your cider for a while, or if youre like me youll be in there every day checking on its progress. DO NOT STIR IT like you would a sugar-water brew. The re-introduction of oxygen into the cider will mess up the flavors, although it does stimulate faster fermentation if thats what you really want (again not necessarily the point of this thread...). If you are keen you can take the temperature of your brew once every few days to monitor its progress. An electric blanket or seedling mat can keep the temps stable if you need. An aquarium thermometer is the best; just make sure you clean it before using!!! If you are using an airlock you will be able to see when fermentation has stopped (no more bubbling), otherwise youll just have to watch the surface of the cider and look for tiny bubbles coming up.
When you are certain the cider is done fermenting, take it out of the grow room (and swap it out with another if you so desire). I would recommend waiting an extra day or two just to be certain the fermentation is done before bottling otherwise you could end up with some exploding bottles in your fridge I can tell you from personal experience this is not very enjoyable to deal with, and can be potentially very dangerous (ever had a bottle explode in your hand?). If you are not planning on bottling your cider, then you can just start drinking. The downside to this is that it will be uncarbonated and taste a lot like wine. It will still be delicious, but I prefer the carbonated version myself tastes like apple champagne, epic if you put it on ice on a hot summer day dangerous
Anyway, if youre planning on drinking it uncarbonated you can just pop it in the fridge - but good luck fitting 5 gallons of liquid into your fridge
I suggest refilling the old apple juice bottles if you are comfortable with alcohol in plastic, I personally use glass but Im a purist. If you are going to bottle your batch you are in for a bit of a project, and a little bit of cash but well worth it IMO. The extra cash is not necessary (you can reuse old plastic bottles in a bind) but it will make the final product much better. You will find the best literature on bottling on a homebrew forum, so I will just summarize here (yes this long block of text is a summary, welcome to homebrewing bottling sequence. sorry about the lack of pictures for all the other steps - this is definitely a 2 man job if you are trying to take pictures at the same time, maybe even 3..At this point I label my caps with the batch name and date, put them in milk crates, and store them in the dark for 14 days to age, clarify, and carbonate. This waiting period is the hardest time, but similar to achieving a good cure there is nothing better than cracking a cider after 14 long days and having it be perfect and delicious. And during those 14 days you can always make two more batches to keep you occupied
So lets take a look at the CO2 output from one of these batches.
For each 5 gallon batch, the 10lbs of sugar converts to roughly 5lbs of CO2. 5lbs CO2 is roughly 50 moles, which makes 27,500cuft of perfect 1500ppm air. Over the course of a 7-day ferment (assuming 80 degree temps) this will fill my room 61 times (27500/450) with perfect CO2, almost 9 rooms full a day. This means I can vent my room once every two hours and still keep my ppm over 1000 on average. Vent it once every three hours and I could potentially have too much CO2 in my room a problem I never thought I would encounter with homebrewed CO2 This would only be an issue during days 2 and 3 of fermentation when things are raging at full force, because a disproportionate amount of CO2 is released the first few days compared to the last few. This means more realistically I should be venting my room once every two hours for the first couple days, and then once every three or four hours for the few days. Without a ppm meter it is hard for me to judge, but based on my calculations I am hovering about 1000 almost all the time (with rotating brews).
After the initial cost of the brewing equipment ($30 or so) you can have a room full of CO2 and 52 bottles of 15% abv cider every week for as little as $50
In my book, thats damn hard to beat. It's hard to find shitty beer for $1 a bottle, so delicious organic cider for $1 a bottle, plus free CO2...you do the math
Looking at these numbers it is easy to see why I am so excited about this method It works! And just wait until you taste that first batch of cider youll be surprised something so simple can be so delicious. Itll make you rethink commercial alcohols immediately (remember your first hit of some organic homegrown?). If this thread sparks a few people into the venture of homebrewing/distilling I will be happy with the results. Brewing is just as addictive as growing I am even finding myself getting addicted to the other brewing aspects of growing - compost teas!! But that is for another thread .
I hope this makes sense to everyone sorry it is so verbose. Like I said, I have been ruminating on this for a while so I wanted to make sure I outlined the process in full. Hopefully this sparks some creativity in yall to get brewin! If not for the sake of your ladies, for the sake of yourself!
 So I'll step up to plate and speak for all, "You hit this one clearly out of the park! We thank you! kiss-ass