Careerforacityboy's Stealth Cabinet Build

Careerforacityboy

Well-Known Member
This is the very beginning of the making this grow cabinet. Unfortunately, I won't be able to actually grow in it til November due to unforeseen circumstances(the woman I live with a.k.a. the girlfriend.) In the mean time I've decided to get everything in place...slowly... so when the time comes, I will be ready and won't blow too much money at one time.

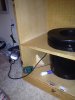
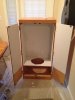
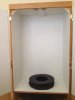
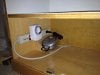
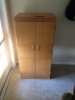
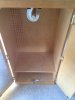
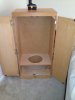
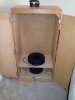
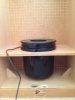
Found this cabinet on Craig's list for $30, the shelf was securely in there and would have compromised the side walls had I taken it out...so I put a hole through it to fit my bucket. I think this may lower the temp. in the reservoir, being that the light isn't beaming on it, but that is merely speculation. The dimensions are 24"x15"x48" so I will have to get creative with training, but should be able to pull a respectable yield. This is also going to be my first hydroponic grow so I don't wanna count my chickens before they hatch.

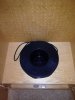
Going to go with a 300w Led, think I would be able to get good results, but I am open to any other ideas. I am going to update this thread each time a new addition is made to the cabinet, watch the thread if your interested.
Any questions, comments, concerns, suggestions are welcomed and encouraged!!!
 

Attachments

sub-zero234

Member
thank you so much ...I may be calling on you for advice when the time comes...appreciate the fact you are being so friendly thank you...sub-zero
 

reku

Active Member
Cab looks good, except the holes in the back are planning on making it "light tight"? BTW I think you have plenty of space for one plant.
 

Careerforacityboy

Well-Known Member
Niice cab...
Those tiny holes in back can cause some light stress?
Cab looks good, except the holes in the back are planning on making it "light tight"? BTW I think you have plenty of space for one plant.
Thanks for the interest in the build, and yes, I am going to put some white poster board against the back and was going to cover the inside in a sheet of Mylar...found a small sheet of Mylar on ebay for $3.99 w/ free shipping, which is good for me because I won't be needing an entire roll.
Link: Mylar Polyester Film, 84" x 52", 2 mil in thickness, at 95%+ reflectivity.
Once that arrives and is installed I will do an update.
 

Careerforacityboy

Well-Known Member
Also, the proceeds from the Mylar sheet goes to help fund South Florida Cancer Association (SFLCA), an organization that helps promote breast cancer awareness and treatment. So the money goes to a good cause.
 

Abiqua

Well-Known Member
Don't do it....mylar that is, white sheetboard is probably better.

You can only get 95% reflection from Perfectly smooth mylar, which really can only be done with a glue and weighted roller to smooth out the mylar under pressure while being glued. Lots of work for $3.99 :)

It may yield up to 20% less or more than 95%, just tacked up.

:peace:
 

Careerforacityboy

Well-Known Member
Don't do it....mylar that is, white sheetboard is probably better.

You can only get 95% reflection from Perfectly smooth mylar, which really can only be done with a glue and weighted roller to smooth out the mylar under pressure while being glued. Lots of work for $3.99 :)

It may yield up to 20% less or more than 95%, just tacked up.

:peace:
Well I was thinking of smoothing it out with a squeegee i got, but if you think I'd be better off just putting up white sheetboard and maybe painting the interior white, then i'll go that route.
Also...seen your cabs and i'm starting to think a 300w led might be a bit overkill, started looking into 135w led lights. What do you think, when it comes to lighting this cab?
 

Abiqua

Well-Known Member
^....and they use a different kind of mylar in those tents too, thicker usually, the stuff for $3.99 might even be worse.

Mylar is just something I can't recommend and its usually people starting out fresh, that are using it....I did it too, but then I moved on. :peace:

Great vid!
 

Abiqua

Well-Known Member
Well I was thinking of smoothing it out with a squeegee i got, but if you think I'd be better off just putting up white sheetboard and maybe painting the interior white, then i'll go that route.
Also...seen your cabs and i'm starting to think a 300w led might be a bit overkill, started looking into 135w led lights. What do you think, when it comes to lighting this cab?
That 300w, which I assume is off Ebay or something, @$100 aren't bad. Not terribly efficient 25-30%, HPS 33%, top of the line Cree cobs [40-50%].

And only draws about 180 actual watts, probably 170w at the lights, sans driver and fan losses. I would recommend about 40-50w's per sq ft of that less efficient led. The 135w is included here, but is a actually a 75w draw. They list the ufo's
@180, 135, 90w,
90w 75w and 50w draws are the actual #.

You have 3 sqft. so the 300w isn't overkill by any means, but don't pay more than $100 and the spectrums are janky, along with heat and just overall reliability of the mystery parts put into those things.

The ufo's are going for $75 or less [180w], shipping included, but again wonky spectrums at times. Not terrible, not ideal.
---------------------------------------------------

DIY Cree CXA 3070 fixture, this is where I am headed. And you can run as little as 25w's per sq. ft with the efficiency of these Led's.

You could run two CXA's [37v @1.4 amps = 52watts] for 104 watts @ 16000 lumens. Not bad around 140 lumens per watt. The Cheaper fixtures might be around 60-70 lumen's per watt, rare to see them even over 100 lumens/watt.You would equal the overall output of a "300w" fixture and use less power to boot. Win.

3000k is a do it all spectrum, some add some blue in veg and some add some deep red in flower. You could do this with Cree bulbs from Home Depot [2700k, 5000k]

The CXA fixture would cost you about $125 sans a soldering iron to put together.

Parts List is

[2] Cree Cxa 3070 Z2 Bin [$38]
12" of 5.89" Heatsink @ Heatsink USA [$1.47/inch]
[1] 5" DC fan and power supply
[2] Meanwell LPC 60-1400 [$19 apiece]

:peace:
 
Last edited:

paul1978

Well-Known Member
Actually found an interesting video on the matter...
Not sure if you noticed but in tent A they have had a heat deflector under the bulb and in tent B they did not... not very scientific research if the conditions were not the same. Deflector certainly helps with heat but light output below lamp will be slightly reduced - hence the results.

Sent from my Nexus 7 using Rollitup mobile app
 

Careerforacityboy

Well-Known Member
Here's some detail of how I ran the air line...wanted to make it a real clean setup.
Gave it a quick test to make sure the line was not being pinched and it's looking good!
Of coarse I will have a surge protector in there and run the wire through the back.
 

Attachments

Careerforacityboy

Well-Known Member
And god said let there be white...

In addition to the paint job, drilled a two 2" holes covering with wire grommets (for aesthetics): 1 for the light/fan cord from the top and one for the surge protector to the socket on the bottom.
 

Attachments

Abiqua

Well-Known Member
And god said let there be white...

In addition to the paint job, drilled a two 2" holes covering with wire grommets (for aesthetics): 1 for the light/fan cord from the top and one for the surge protector to the socket on the bottom.
Mucho blanco!

Same thing I did, slap some white over it, little bit of prep in the start, but afterwards its all ezy breezy.

DWC right?

Never followed a type of grow like this, should be interesting....:peace:
 
Top