Budget Two-Level Stealth Cab

IHalveKnownAim

Active Member
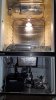
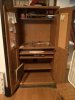
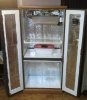
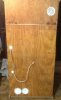
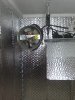
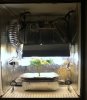
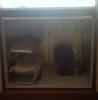
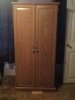
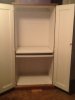
I have a Sauder computer work station that I'm converting into a two-level cab. I replaced the flimsy cardboard back with plywood and painted the inside flat white. The temperature in its designated location is pretty cold in the winter and pretty hot in the summer. My budget is very limited so right now I'm leaning towards a hydro grow using CFLs. The reason for the two levels is to have the lower section set aside for vegging and cuttings and the upper section for flowering. An Aerogarden and a seed starter tray should fit down there nicely. Another reason for the two sections is because I'd like to be able to easily convert to an aquapoinc set up sometime down the road.

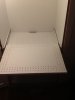
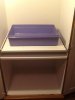
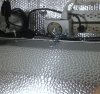
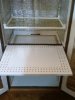
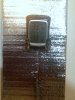
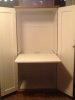
Since I'm working with 25 cubic feet, I plan on a passive ventilation system with an intake in the lower right made from a filtered residential heat register. I left two shelves in place.. (the top one slides out and the lower one does not) ..Using a section of pegboard as a template, I'll perforate the top shelf with a drill. To perforate the lower shelf.. (and to prevent light bleeding through) ..I'll stagger the placement of the holes by pulling the top shelf out a half inch. I'll then use the top shelf as a template for the lower shelf. Between the two shelves will be two one way furnace filters. The space that is the outer edge of the two shelves will be filled with a length of 2 1/4" x 2 1/4" Frost King A/C weather seal. One concern of mine is how big/small of a fan am I going to need to draw air through this cab.. (suggestions welcome) ..I had a similar cabinet set up back in the late 90s and I used a 9 inch fan mounted on top of the box. Based on my experience then, a 9 inch fan is a bit much.

As I mentioned before, I'm doing this on a very limited budget. I already have a handful of the proper CFLs for vegging. I'm currently leaning in the direction of a 250 watt 2700k CFL for the top section. Particularly this one. Or, I could always go with a 2 foot 4 bulb T5 with supplemental CFLs to help out.

So that's it for now. I'm looking for input on fan size and and lighting set ups. Any and all suggestions are greatly appreciated.

Attached are a few photos of the cab. Dimensions of the upper portion are 2' 4" wide x 2' 9" high x 1' 10" deep. The lower is 2' 4" wide x 1' 11" high x 1' 10" deep.

Thanks!

(Edit: I also intend on a ScrOG in the top section)
 

Attachments

fishdeth

Well-Known Member
Looks like you are gonna have about the same amount of space I have in my fridge.
I'll be watchin this.
20150913_171754.jpg
 

IHalveKnownAim

Active Member
Yeah, I've been watching your latest post.. (as well as having viewed your earlier runs with the fridge) ..My hat goes off to you. Thanks for the inspiration!

I've had a change of plans regarding my flow-thru shelving and decided to only perforate part of each shelf. I'm thinking that a 4" in-line fan should have no problem pulling air through the shelves and two standard sized home heat registers as my inlets. Still up in the air in regards to 12/12 lighting but still leaning towards the 250w CFL linked above.

Attached is what my unit looked like before and the other two are of the perforated shelves.
 

Attachments

IHalveKnownAim

Active Member
The box is finally light-tight with weather stripping and it now sits on casters. The 2700k 250 watt cfl has been ordered as has my four inch fan which should be here in a few days. Instead of using heat registers as my intake, I opted to go with 2 four inch soffit vents. I'm using another soffit vent at my exhaust. I decided to hang the ScrOG screen using hooks and chains in order to save a little shelf space. Currently waiting on my friend with the four inch hold saw to call so I can cut my vents.
 

IHalveKnownAim

Active Member
Compared to fishdeth and Tim Fox, I'm a total slacker when it comes to photo documentation but it's coming along nicely. The 4" fan has been installed as well as power strips and timers for each level. I wound up going back and doubling the size of the flow through holes on each shelf because I was a little worried that my 90 cfm fan wasn't enough to draw air through the first holes that I'd drilled through the shelves. Each shelf had to be repainted because drilling through the particle wood shelving made a mess comparable to my first drilling session. I ran out of flat white latex paint and wound up painting the shelves with an oil high gloss white. The fact that it's not a flat white shouldn't be an issue since my DWC tub will be covering most of the top shelf and the underside (bottom shelf) is only the ceiling of the bottom / veg. chamber. The walls and doors have been lined with windshield sunshade. My 250w cfl should be here Tuesday. Hopefully the lingering fumes from the oil paint will be gone by then. I'll post a few photos tomorrow when I have more time. I converted a 3 gallon sterelite tub to hold two 5" net pots but I'm considering making another with one 5" net pot. Both my shopping list and my to-do list are getting smaller. I'm hoping to have it all running my Wednesday of next week.
 

IHalveKnownAim

Active Member
I got a surprise visit from FedEx today in the form of my 250w cfl. After eyeballing its placement, it soon became apparent that I'd need to modify the hood in order to maximize space in the cab. So, I scrapped the triangular mounts that came with the hood and drilled a few holes in the sturdiest part of the hood's spine in order to accommodate the rope ratchets. It also became apparent that the lightweight hood barely supports the weight of the mammoth sized bulb. So, I drilled two more holes through the center of the hood and snugged up the bulb to the using a length of lightweight chain, a good sized bolt and a wing nut. I also picked up a 2.5 gallon Rubbermaid food storage bin that will hold one five inch net pot. I'll finish that up tomorrow and I'll take some pics as well. Right now, I'm too beat to do anything but sleep. I don't know how you guys manage to stop and take photos along the way. Oh well.
 

IHalveKnownAim

Active Member
They're not the best photos in the world but you'll get the general idea. I still have a bunch of work to do on the reservoir but it's pictured just to give an idea of what I'm working with. The black strip between the upper and lower shelf is a length of Frost King AC weather stripping. In the photo with the top shelf slid outward, you can see the furnace filter that I added in order to help block some of the light from bleeding into each chamber. There's also a photo of the chain that I used to keep the bulb from sagging in the fixture. I don't have any plan for a charcoal filter and I might not go that route since I have an industrial sized ionizer that I can set up in the lower chamber.a.jpg b.jpg c.jpg d.jpg e.jpg f.jpg g.jpg a.jpg b.jpg c.jpg d.jpg e.jpg f.jpg g.jpg a.jpg b.jpg c.jpg d.jpg e.jpg f.jpg g.jpg
 

IHalveKnownAim

Active Member
Thanks! It's coming along nicely. It's finally up and running. Currently housing the tomato plant that's been in my aerogarden for the past month. I figure it's best to do a 'dry run' while I do some tweaking. I wound up installing a dryer vent to my outlet fan and the other end is secured under the hood of the light. Temps were a little bit high and that problem's been solved. I'm a little concerned about the 90 cfm outlet fan being a little too weak to draw air up through the perforated shelves. So, I'm looking into replacing the furnace filter with a 5 volt AC powered lap top cooling pad.
 

IHalveKnownAim

Active Member
The tomato plant took a major turn for the worst yesterday. Several days ago, I had concluded that its growth had been stunted and its leaves seemed to be a little burned. Assuming that it was due to nutrient lockout, I decided to flush it with distilled water for a few days. The big mistake came from my half thought out attempt at supplying the plant with nutrients via foliar feeding. The mental note that will never leave me is.. "NEVER apply undiluted nutrients directly to a plants leaves!!" ..Oh well, the plant was a brandywine heirloom which folks claim to be one of the tougher plants to grow even in an outdoor environment. That being the case, I'll give it another go with some Siberian tomatoes which mature very quickly and can tolerate lower temperatures. At least this gives me a chance to learn from my silly mistakes while I continue to make further adjustments to the cabinet. Speaking of which, the addition of the laptop cooling pad/fan between the shelves made a huge difference not just in ventilation but also providing a good source to block light from bleeding through to each chamber. I'm also able to do a little tweaking on my reservoir as well as DIY'ing a better mount for the UFO LED.
 
Top