Undercover Cop
Active Member
 Greetings potential soilless grower
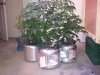
Ive had a few people ask me about my set up, and after seeing several pretty elaborate Bubbleponic/DWC set ups, I figured I'd show just how easy it can be if you're only growing a handful of plants. Many people are intimidated by growing hydro, and while it may be a little more labor intensive than just plopping a seed in soil and watching it sloooowlly grow, hydro and bubbleponics can grow your first crop in under 4 months, then another harvest every 2 months if you go the perpetual route. Hydro will give you complete control over almost every aspect of the plants life, from light, air and now water... you can adjust everything to exactly what your plants want.
Soil growing relies on alot of variables, like soil moisture content, nutrient levels, soil ph, organics/microbial life required to convert your fertilizers into nutrients usable by the plant, etc etc etc. Ive grown in soil using everything from orange juice cartons and milk jugs to a giant closet filling bonsai bush in a 12gal storage tote. Soil growers indoors are constantly battling insects/pests (fucking fungus gnats! soil grow in your bedroom closet and tell me you dont mind fungus gnats floating around) I once microwaved 5 gallons worth of bagged soil, one casserole dish at a time for 10 minutes each, over the course of about 6+ hours, all in the hopes of killing any larvae or pests in the soil. Needless to say my entire apartment complex stunk of steamed shit for 2 days, and of course I still got bugs (fucking soil even sprouted a mushroom!) Thats when I went to hydro. This was 10 years ago, before I even had the internet. So I pretty much figured out ways to do it though trial and error. I made aeroponic units with sprinkler heads under net pots. I made a waterfall/NFT table out of totes that slide under a bed. I was never satisfied and kept making more complex then simpler units, all from scratch. I would make my own net pots by carefully cutting 2ltr soda bottles or gallon milk jugs. I made my own nutrient solution using Miracle Grow and epsom/superthrive/h2o2 etc to make my own nutrient solution (I also learned that you cant put juice into your nutrients to make your plants taste better lol). This was because I was broke and barely scraping by with rent, so most of my supplies had to be scavenged and re-purposed, and I honestly didnt even know where there was an indoor gardening store anywhere around. Now that Im growing again I have the money to buy professional units, but I remember how much fun it was to get stoned and go to home depot and just walk the aisles, appearing to most people to be wandering lost, but Im really thinking furiously and getting ideas how to make or improve my own units. I love DIY!
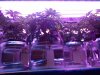
So the purpose of this thead is to show my way to make a simple bubble jug/bucket that would suit a smaller grow (1-6) without having to run recirculating water pumps and reserviors etc. Self contained jugs that will not only help you fine tune the nutrients fed to each plant but will also help to restrict any infections/diseases from spreading to other plants.

Ill start with the basics for this method. I dont want to go through the entire grow process like lights, strains, nutes (I will describe what I feed with, but everyone who grows hydro has their own preference in nutes). But Ill try to focus on just what you'd need to start growing w bubbleponics.
**note, this method is not compatible with the Scrog method due to the necessity to occasionally (every 10-14days) flush/refill the jugs individually since there is no central reservior with this method.
**note, this method is suited better for smaller grows, under 6 plants is preferred. Only because it can get a little labor intensive when you're in flowering and the plants are drinking a gallon or more each day, refilling the jugs can take some time. But if you're ambitious and have the time to do it, theres no reason it wouldnt work.
THE ESSENTIALS
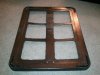
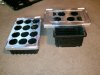
First you will need a Dremel tool, sorry I know they can be expensive and not everyone has one, but you need to be able to cut a hole in the top of the water jug or bucket lid. An option is to purchase the bucket lid net pots that fit right into a standard bucket (but that is defeating the purpose of DIY isn't it?)
You will need an air pump. no preference. If you plan on 4 plants, then a 4 outlet pump would be perfect. My local shop sells 2 outlet pumps for $14 and a 4 outlet for $29ish.
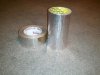
Of course you'll need tubing in sufficient quantitiy, locally its $20 for 100ft.
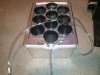
Air rocks, 6"+ are preferred. The small cylindrical rocks that are the size of a D cell battery arent that great because they're harder to keep centered (if your rock is only bubbling on one side of the jug, then your roots will grow out of the net pot towards it and the rootsystem will be lopsided abit. If you want to splurge on the expensive micropore air rocks, then you are a baller and I am envious of your riches. the cheap ones are fine, $1.50-$3ea and up. One for each jug you plan for, then you can replace them every grow -some boil them and re-use them several times.
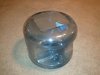
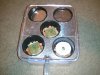
You'll need the proper number of netpots, one for each jug (although this method would work the same if you wanted to make one big bubble tub for a few plants). If buying them is not an option, you can take 2ltr soda bottles and cut a bunch of slits in the bottom two inches to allow the roots to grow
through, then set the jugs on something in the bucket to keep them elevated up a few inches inside the bucket (you dont want the net pot sitting on the bottom, it has to have a gap between the bottom of your container and the air rock under it)
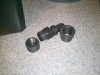
One 3/4" or 1" drainage connection per jug, used to replenish the fluid levels. These are sold at most Hydro or home imporvement stores, I get connections used in DWC or other hydro systems to connect drainage lines to reserviors. Be creative in your design, Ive used simple rubber stoppers, and even a flap of tape to cover over the hole in the past. The point is to have a hole in the top of the jug or bucket lid so you can add water through a funnel without having to lift the netpot.
A funnel, for refilling. I got one at Walmart for $1.50
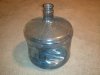
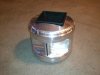
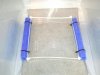
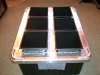
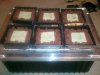
And lastly you will need the bucket/jug/tub of your choice. For my method, I prefer 3.5 gal water jugs because they have a handle which is used for the sight tube (to visually see the fluid level inside)...although I would probably like 5 gallon jugs just as much because I wouldnt have to refill the fluids so often. After you have been growing with this method (individual bucket/jugs) you will get used to feeling the weight of a feshly topped off bucket vs one that is running low and you will quickly learn to tell the level by lifting the jug alone. *depending on the bucket/jug you choose, you may need some paint or foil tape to surround the jug to block any light from leaking through.* If you choose the orange Home Depot 5gal homer bucket or other opaque material you will have to lightseal the outside or you will have light shine through, even just a little can cause algae. If you can see the light from a flashlight through the material then the light from your HID will leak through. Black plastic 3 or 5gal buckets are good, I use clear 3.5gal jugs so I have to wrap mine in aluminum foil tape (3M scotch foil tape is best because it has no backing to peel off, but its hard as hell to find locally so I order it from amazon)
OPTIONALS
Random tools, DIY is awesome but usually disappoints if you do it without the proper tools. If you have NO tools, you should probably get some. Basic tools will do, wire snips, drill etc. *Think about the plan you come up with and think about what you will need to do it, then make sure you have everything needed when starting your project or youll end up half-assing it and may have to fix it later.*
2 zip ties per bucket, used to hold the air rock in a centered position under your netpot.
I learned that it is helpful to have a disconnect point somewhere in my air lines so I can un-plug a particular jug so I can remove it to dunk-flush my pot, or clean out the jug, closely examine the plant or whatever. One advantage of this system is that you can actually move the plants around to take better advantage of light or to foliar feed outside of your shiny mylar tent etc. For this disconnect I use an elbow. 10cents at the hydro or pet store. just a simple plastic air line elbow placed in your air line (I put mine right at the bucket itself) allows you to unplug your jug at that elbow so you're not tethered to the pump anymore.
PH test kit (vial with re-agent drops was like $8 then GenHhdro PH up and down are abt $12 ea. I put this under optional, because when I grew years ago I never once checked the ph and never had issues, when I re-started recently I got the tester and PH up and down, checked my fluids religiously and freaked out whenever it fluctuated... when really, there's a natural cycle of water being used and the ph rising, then you re-fill and it lowers. I add a little PH down to a water feeding about halfway between jug flushes which helps keep it at a good level until I change all the water a couple days later. Otherwise I alternate water/nutes with every feeding. I would recommend a ph test kit, just to have incase an issue comes up, but really I dont check mine anymore, and never did before
Ok so finally, rip that bong
 ready...
 You have now already chosen your Jug/bucket based on your preference. I like the 3.5gal water jugs because they have a built in sight tube and when full arent too heavy to move around. However at times I wish I had 5gal jugs so I didnt have to refill every day or two. With smaller gardens its not that big of an issue, but with more plants it can get time consuming. Just remember that with this method you will have to be around to re-fill fluids every other day or even every day when in full bloom, so dont plan to leave them on their own for a week. *Im a fan of spending as much time as possible in my room so it's not a big deal for me to spend the time with them, just something to consider*
I start with 3.5gal water jugs because I can get an endless supply from my work, and the water in them is pure and after nutes are added, is stable at about 5.5ph. Whatever you want to do for water is upto you. I used to use San Diego city water from the tap with no rest, and never had an issue.
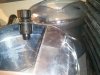
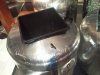
Take the netpot you've chosen (I use 6") and use it as a guide to outline the dimensions of the top of the netpot onto the top of your jug (from now on Ill assume you're using a water jug like mine. If not, use your brain and picture what this would be like if you use a bucket or tote etc, be creative and make your own
** when cutting a shape out of plastic with a dremel, cut the hole in a clockwise direction. The plastic will melt towards the inside and all the melted goop will cool and solidify on the center of the cutout which you can then throw away. Cut counterclockwise and the plastic will melt and pile up on your jug and is a bitch to scrape/clean off **
/// USE SAFETY GLASSES WHEN CUTTING PLASTIC, IT MELTS AND WILL FLING INTO YOUR EYES ! ! ! ///
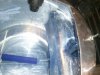
Make sure to cut the hole smaller than the actual dimensions of your net pot or container (If it has a lip to hold it suspended above the air rock inside, if the container of choice has no lip you will need to have something solid and clean with no pores like plastic/glass for your container to sit on elevated over the air rock) Its better to cut the hole too small then go back and fix it, then ruin a jug with a hole that is too big.
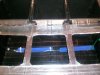
Now you need to make the container light proof, I use foil tape. You could use black or silver metallic spray paint, but I like the reflective finish of the foil tape, and its pretty durable. Wrap every inch of the outside surface of your jug so you have no holes for light to shine through into your nutrient soution. It will take a long time to wrap your jug using foil tape, spray paint would be easier but would also take several coats, with a few hours to dry between so really it's quicker to foil tape them, just more labor involved. However you choose to light seal your jug, it will help keep your nutrients clean and algae free, giving you a huge healthy root system. I use a tube from a bic ink pen to flatten down the tape once I have it laid in place, smooth out any bubbles and press the foil into all the contours of the jug. Foil tape is excellent because you can form it to different shapes and it will hold, but it doesnt stretch so make sure to lay it down in any crevices or it will tear/crack when you press on it with nothing behind it. Its so strong, a few layers on anything and you can form a shape or reinforce something, even mend a broken stem w it! I love foil tape! (and 3m #77 Spray Glue!) I will then spray spar urethane on the bottom of my jugs to help to permanently seal down the tape on the bottom, but its not necessary. If you tear a piece of foil on the bottom you can just patch it with the tape.
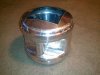
If you choose to spray paint and are using the clear water jug like mine, you will want to put a thin piece of painters tape on the handle area before painting, then when dry you can peel the tape off to reveal a clear patch which will let you view the fluid level inside the jug. If using foil tape, once its completely wrapped (around the handle and everything), take a razor and cut a thin rectangular strip of the foil off of the handle, vertically so you can view the fluid level. This makes your Sight Tube
Now you will need to drill holes for your air line and your re-fill cap. When you buy your air line, if it is from a bulk roll, make sure to check the outside diameter (O.D.) from the label. Drill a hole in the top above the handle, the same size as your air line.
You will also drill a hole for screwing/connecting/attaching whatever type connection you purchased. The connection I use holds my funnel perfectly, so I dont have to worry about spilling while refilling. I like to keep my grow nice and clean, especially since I have a carpet floor under everything.
When you attach the air line, I feed enough line to reach from the inside top of the jug to where the rock will sit in the middle/bottom, usually about 8-9". Feed the line through the hole in the top, running it down the handle to help hold it stable.
Before connecting the air rock, attach 2 zip ties to the very end of it, in opposite directions, so the extra plastic that usually gets cut off is pointing in opposite directions... this acts like a stabilizer and keeps the rock centered under the net pot. If the rock sits for a long time on one side of the net pot, the roots will tend to grow to that one side and will not grow as efficiently. You want the bubbles floating right up into the bottom of your net pot so the air can permeate your medium more effectively. Attatch the air line elbow or other quick connect to the Outside of the jug so you can access it. I simply cut my air line about 1/4" from the jug, then insert the elbow and reconnect the cut line to the elbow. The elbow expands the tubing and make it wider than the diameter of the hole, so it wont slide down into your jug and is held firmly in place. Now I can separate my jug and remove it for maintenance, cleaning, foliar feeding, trimming, staring at her buds etc.


When you first fill your jug, measure as you add water and mark where the one and two gallon ponits are for reference.
Using this method, I find that in veg I am refilling every 3-4 days while the plants are smaller, and once the roots have grown out of your medium and into the nutrients your growth rate will increase and your water uptake will increase also, right now Im refilling every other day. In late flowering, you may need a gallon a day to keep up, and you need to keep them roots wet or they'll start to die. Its not good to let the water level get down too far either, As your plants grow they use different rates of nutes vs water. So if your plants use more water than nutes, your nute solution will become concentrated and the salts will deposit on the surfaces inside your jug and eventually the salt buildup could block uptake by your plants, leading to deficiencies. (When I transition to flower, I remove the netpot from the bucket and dunk the whole thing up to the stem a few times in fresh clean water to flush away excess salts, just be careful with the roots) The fluids concentrating in your jug can also affect ph. Thats why its nice to have a larger jug so you get a bit more buffer, but again its a trade off of efficiency vs practicality. If you can walk around your plants and reach them easily, a larger jug would be better. A small closet grow, which this is ideal for, would require you to shuffle the jugs around abit for maintenance, so smaller is more beneficial. I alternate Nutes one feeding, then PH'd water the next (during flowering I spike the straight water with a little MOAB-Mother Of All Blooms powder) I use GH flora series nutes w/ B1, SuperThrive, and H202. You can use whatever hydro nutrients that you like, I dont bother with organics since H202 kills bacterias, organics require microbes to break down the organic compounds like bat poo and seaweed to turn it into nutrients the plants can use like Nitrogen and Potassium etc. As long as you use quality nutes w food grade ingredients I dont worry about chemicals in my MJ, because thats what they require, mmmm good clean chemicals lol. But use whatever you like, this is what I use and it works for me!
You can take the principles described here and apply it to many other designs, for seedlings I use smaller netpots/rockwool and can have several smaller plants in one black plastic tote until they are too big and need more room, until eventually they are big enough for their own jug. You can design something to hold several large plants also, only I prefer individual jugs for larger plants so they get the individual attention they like.
This would work in scrog, you just wouldnt be able to separate the plants from each other in the single tub under a screen, and this would require a drain fitting in the larger reservior to facilitate flushings and reservir maintenance.
Feel free to contribute alternte designs and ideas, just keep them self contained. Lots of soil growers are apprehensive about going hydro because they rent and dont want to risk a visit from the landlord after a waterleak. No active plumbing or separate reserviors.
 Thanks and happy growing!
 Thanks for sharing!