MadMel
Well-Known Member
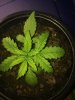
I started just a single seed 1 week ago, using the cling film method in a "Cow Pot" ( pot formed from compressed, and composted cow manure @ the same size as a small plastic pot/ solo cup) and reusing soil from my outdoor container grow earlier this year.
After the seed sprouted, I put it under a CFL light (largest size batteries plus had at the time in the "cool" spectrum) for 2 days of uninterrupted light, then a night of "rest" and back under the light to repeat the above cycle. I want to get as much growth as possible in the "veg" stage.
I am using Greenleaf Nutrients Mega Crop fertilizer, (a shout out to @GreenleafNutrients) and have already used some, at full strength for the veg period, fully intending to put MC to the test from the beginning.
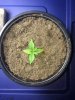
You may be as surprised as I was that after using the MC only as the source of water (gotta push it, without killing it lol), that the sprout is thriving. See for yourself with this picture I took this morning.....
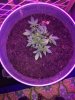
After the seed sprouted, I put it under a CFL light (largest size batteries plus had at the time in the "cool" spectrum) for 2 days of uninterrupted light, then a night of "rest" and back under the light to repeat the above cycle. I want to get as much growth as possible in the "veg" stage.
I am using Greenleaf Nutrients Mega Crop fertilizer, (a shout out to @GreenleafNutrients) and have already used some, at full strength for the veg period, fully intending to put MC to the test from the beginning.
You may be as surprised as I was that after using the MC only as the source of water (gotta push it, without killing it lol), that the sprout is thriving. See for yourself with this picture I took this morning.....
Attachments
-
 1,006.7 KB Views: 36
 -
 630.9 KB Views: 30
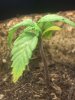

 Grizzly Adams dude is rocking the house with MC.