1 x Super Lemon Haze {CFL}{Soil}{Indoor}{5gal}

Chipp

Well-Known Member
Alright, so after months of reading this forum, I'm finally ready to begin my first grow ever. Let me get out as many details as I can right now in an easy-to-reference manner.

Name: Hazel (what I'll call her throughout :) )
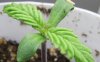
Strain: Green House's Super Lemon Haze (Feminized)
# of Plants: One
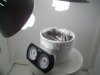
Pots: 1 inch rockwool -> 2 litre -> 5 gallon
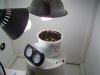
Lights: As many as possible! So far 7x42w (6500K x2 & 2700K x5)
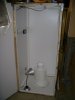
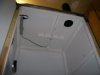
Grow Box: Details below. 2.5x2.5x5.5 feet.
Box Reflectivity: White paint.
Intake: 1x80mm CPU fan
Exhaust: 1x120mm CPU fan
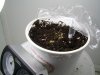
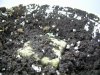
Soil: Lambert's All Purpose Potting Mix
Nutrients: [Veg - BC Grow] [Flowering - None purchased yet] [Others - Supernatural's Gro-Terra, Bloom Terra, and Super Boost]
pH Tester: Crappy starter test kit with drops :(


Now that I've got some base information out, I'll lay out some grow details:

Plant Size: Hopefully coming quite close to filling my box. I'd like a nice big girl...
Yield: As long as I can grow a healthy big plant from start to finish, anything over 3-4oz would just be the icing on the cake.
Growing Techniques: Topping (via Uncle Ben's method for 4 colas)
CO2: I'll be doing a poor-man's CO2 cup/jug just for shits, cause why not? I'll be tossing some yeast/sugar/water together too see how it works.
Light positioning: Very random. With a weird makeshift mashup of multiple lamps / reflector clamps / cords, I'm going to trying to have LOTS of light coming from all angles. Hopefully it works!
Veg Time: I want to veg as long as it takes to get my plant nice and big without growing too large for my grow room. I have no idea how long this will be, but I'd guess 6-8 weeks? Not sure :S


Grow Box Construction:
To construct my 2.5x2.5x5.5 feet box, I got a bunch of 2x2's and that cabinet-style backing wood. I built the frame, added the cabinet wood (white side inwards), then caulked many light leaks. I put a power bar inside the box, and ran the wire out the top. The inside is painted white, and I put extra nails and looped screws for dangling lights from eventually. Using a lot of duct tape and black corrugated tubing, I added an intake and exhaust fan in opposite positions on the box (using computer case fans too, wired up to the same AC adapter with sufficient output). The door I made using a shitload of duct tape as a hinge, but I might need to buy a metal hinge for load-support later.

...


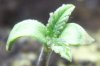
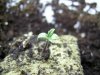
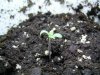
I think that about covers it. I'm posting this thread now to get my details out, and also to toss up some pics of the grow room. I'll be germinating in about 1 week (more or less), and I wanted to start this thread off right (and non-rushed).

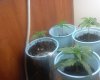
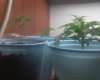
I've attached two pictures of the grow box. You should be able to see 1 of the lamps, the exhaust (top) and intake (bottom side) fans, and also the two pots I plan on using (the 5 gallon and the smaller one).

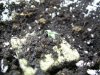
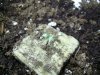
Here is my first question about my grow. I got this free sample from a very friendly hydro store owner, and I can't tell if they are samples or just small packs of nutrients to use on their own. It was this: http://www.sulphurplasma.com/terraponic/3-pack-terra.htm

I'm not sure if those are supplements (such as cha-ching/ open sesame /etc that go along with fox farms), or what?


Anyways. I'll be keeping this thread updated and detailed every step of the way come germination. Expect to see many updates and more information than necessary, hah...

Thanks to this forum for giving me a goldmine of information that I've poured over for months.

-Chipp

*As for that rule of not posting in other people's journals, I'd feel quite honoured if anyone posted here! Please, post away with comments / suggestions / criticism / etc. I look forward to seeing what others think of my poor-man's 1st time CFL grow.
 

Attachments

Chromulan

Well-Known Member
cool man. this looks pretty similar to what i just built last weekend. i'm excited to see yours in action.
So does the exhaust you have maintain pretty good temps? cuz thats the only thing i have left to do on mine. also, what stores would be good to find those at?
 

AeroKing

Well-Known Member
I'd consider using bigger pots for flowering. You can grow quite a monster in that space. I ordered some SLH. I'm interested to see how this goes for you!
 

Chipp

Well-Known Member
Grow Update:
I just set my seed to germinate (using the method on green house's webpage). So, it's only a matter of time until it cracks (I hope!)

Responses:

cool man. this looks pretty similar to what i just built last weekend. i'm excited to see yours in action.
So does the exhaust you have maintain pretty good temps? cuz thats the only thing i have left to do on mine. also, what stores would be good to find those at?
Yeah, I'm really excited to see it in action. I've done so much reading, and I'm going to try really hard to do it all right the first time (may not happen, though). My exhaust is a 120mm fan rated for about 70CFM, and my intake fan is 80mm, but I figure it's okay to be a bit smaller than the exhaust. My basement is kinda cold right now due to the weather, but when I flipped on 4 CFLs and my interior fan (a cheap 12 inch tower fan that oscillates), after about 3 hours, the temps stabilized at around 24 degrees C / 55% humidity. As the season moves into summer, we'll see how well the 1 exhaust works. I'm pretty sure it should be okay, but I might put a second exhaust in the opposite talk corner.

Good stores for what? My exhaust/intake consists of:

1. Case fan ( local computer shop, just ask for the cheapest ones they have, but make sure to read for the CFM's on them)
2. AC/DC Adapter (I went to a surplus store and got a 12V/500mA for 4 dollars. check adapaters around your house first!)
3. Corrogated black tubing (Home depot - 10 feet for 6 dollars, but there is probably a more cost effective way if you put more effort into it)
4. Duct Tape & Caulking to get the seal.

I used the same adapter for both the fans (their total amperage was 420mA vs the 500mA my adapter was rated for)

I hope the helps!

I'd consider using bigger pots for flowering. You can grow quite a monster in that space. I ordered some SLH. I'm interested to see how this goes for you!
Bigger pots, yeah? I think I'm going to stick with my 5gal. The way my timing constraints are, I'll have about 8 weeks to veg, give or take a week (most likely "take" a week). That, combined with me already having drilled the holes in the 5gal (and cleaning it, since it was full of old latex paint before), makes me decide to just stil with the 5gal though. Perhaps next grow I'll up the pot size (hey, you didn't think I'd construct this box for just 1 grow, did you?)

Thanks for the interest. Like I said, I'm going to try to keep this thread packed with info, for my organizational benefits and everyone elses!


Cross your fingers for my single seed to crack....
 

Chipp

Well-Known Member
Update:
Still going by Green House Seed Co.'s method, today I took the seed from the cup of water and placed it between two plates and damp paper towel. The seed had already cracked, and was displaying an ever so small root tip. Take a look!

Sorry about the picture quality. My digital camera can't take close up shots (and I can't take pictures)...

Update #2:
Alright, I've officially planted her! The root tip grew out of the shell approximately 1/2 cm in just the short time I left it between the two paper towels. I used a pre-soaked rockwool cube planted within a medium-small pot filled with damp soil. Yeah, I know my pot right now is kind of overkill for just the one seed to sprout, but I know there was a reason I did it (something about something, I forget now). I hope it still goes well though. I've wrapped the top with plastic wrap to keep some humidity in there, and put a piece of rolled up paper there to keep the plastic wrap away from the soil.

The temperature should stabilize somewhere around 25degC (77F) and humidity inside is obviously like 100% cause of the wrap.

I've posted 1 pic to show you what it's like. Those are 2x 42w 6500K CFLs, and they are kinda far away cause I don't think I'm supposed to blast that thing with light just yet. I'll move them closer and closer during the first 3-5 days after sprout, until they are like 1 inch away pretty much.
 

Attachments

Chipp

Well-Known Member
Update - Day 1:
We're on Day 1 now! Hazel has shown her cotyledons today, and an ever so small inkling of her first true set of leaves.

I've got some plastic wrap still sitting over top, but I think I'm going to remove it later on this evening (approximately 5-10 hours from this pictures here). The relative humidity in the room (not under the wrap) is about 60-70% right now, but when I add more lights, the RH drops a bit.

Anyways, things are trucking along, and I'm pretty happy so far. Hopefully she keeps growing.
 

Attachments

Chipp

Well-Known Member
Day 2:

I think things are going okay - I think. The two fan leaves are growing nice and slow, and the steam leaned into my light, so I rotated my pot 180 degrees or so, hoping it will bend a bit back.

Temperature and humidity are pretty constant: 70 degrees F and 70% humidity.

When should I start bringing the lights down nice and close to this guy? I feel like the soil is drying out kinda fast. I actually gave it a bit of pH-ed water today, but not much (1/4 cup maybe, just around the rockwool and a tiny bit on the rockwool). Then again, when I first planted her, I never actually wet the soil enough so it dripped out the bottom. I web the soil pretty well, but not a complete drench.

Anyways, day 2 went okay I think. Hoorah! Hopefully the fan leaves start to grow a little faster tomorrow - they are friggin small right now.
 

Attachments

Chipp

Well-Known Member
i got 1 super lemon haze growing to.I would keep in touch with this grow and psot some of my pics when it grows some.
Awesome man, thanks! Do you have a journal of your own for that SLH, or will you just toss a few pics in my thread here from time to time for comparison? Good luck with the SLH!

Also, just curious, how old is your SLH?
 
My slh came out the soil feb 23 and been veggin since.Im gonna start a journal once i put my white widow to flower so i can focus on my young one and switch from these t5s to a 250 mh.heres a couple pics of my slh.my slh is the one with the longest leafs the rest are kushberry and i have 2 arjan ultra#2 i didnt get in the pic.They all look small to me imo its the t5s so im putting a 250 in here as soon as i get an exhaust fan.Im using a 2x2x6 closet that i can veg and flower in if i want 2.But i use my homebox with a 400 hps to flower.
 

Attachments

Chipp

Well-Known Member
Responses:

wyteberrywidow said:
My slh came out the soil feb 23 and been veggin since.Im gonna start a journal once i put my white widow to flower so i can focus on my young one and switch from these t5s to a 250 mh.heres a couple pics of my slh.my slh is the one with the longest leafs the rest are kushberry and i have 2 arjan ultra#2 i didnt get in the pic.They all look small to me imo its the t5s so im putting a 250 in here as soon as i get an exhaust fan.Im using a 2x2x6 closet that i can veg and flower in if i want 2.But i use my homebox with a 400 hps to flower.
That looks awesome - nice and healthy. Thanks for those pics! I'll have something to look back on in a few weeks once I've veged for that long.

Day 3:

My little seedling hasn't done much of anything today... or so I thought! The fan leaves got ever so larger, but it's very minimal, maybe 1 mm. So, that's a bit of a bummer.

Here comes my newbie mistake, though! The seedling was only about 1 inch tall, and the fan leaves are still pretty small, so I assumed there wouldn't be much root growth. WRONG! I lifted the rockwool cube out of my soil to set it in some water, for a last watering before leaving it be, but I saw a root! There was a small, 90% opaque root that protruded about 3/4 inch from the bottom of the rockwool. I set the cube back down gently, and got scared, haha...

So, I'll ask a question here, and I hope somebody answers it: Does this amount of root grow mean that I should water more? Is my tap root really stretching to find that water? Or is that amount of root growth normal? Take a look at my seedling, and should my root be long enough to protrude 3/4 inch out of the bottom of the rockwool?

Thanks guys.

Update: Before going to bed tonight, I added 1 oz of ph-ed water to the rockwool, applied gently from the top. I hope this was what Hazel was looking for :)
 

Attachments

Chipp

Well-Known Member
wyteberrywidow said:
yeah thats normal for the root to come out the bottom of the rockwool
Thanks for the reassurance, man. Although, things seem to be worsening - check it out.

Day 4:

I guess things have to get worse before they get better, huh... After getting home from work today, I see that one of the cotyledon's on Hazel is turning a yellowy-brown colour. It's the smaller of the two cotyledons (yes, they are quite different sizes too, haha... Check out the pics).

Possible things that could have made it happen:

1. The temperature may have dipped a bit last night, but by no more than like low 60's.
2. If you read my Day 3 post, you'll see what I did by pulling out the rockwool when the root was already out of the bottom.
3. I still have no idea how much to water this girl. I gave her 1oz of water, gently on the rockwool last night. Before that, it was only light spraying and occasional dripping water around. The soil around it is still fairly moist though.


Anyways, at this point, I'm more just hoping that she pulls through and starts to demonstrate growth. We'll see what tomorrow brings :S
 

Attachments

Chipp

Well-Known Member
Day X:

Hazel is dead. I fucked up. Not sure how or why, but it had slow growth, then a yellowing baby leaf, then the plant bent over, ultimately just lying back on the rockwool (fell over completely), with everything deformed.

I'm gonna germ and sprout once more and update this journal maybe only once in the first week.

I'll change a few things this time:

1. I'm not using rockwool, but that shouldn't make a big difference.
2. I'm only going to use 1 CFL for the first week, it being a 42 W 6500K light.
3.I'm going to rasie that CFL about 10 inches from the top of the soil for now. I hope is far enough away to not dry anything else.
4. I'm going to give the soil a thorough wetting before putting the seed in. This will be my only watering for 3-5 days after sprouting I think.
5. I'm going to monitor the pH better. Before, I adjusted my water's pH, but I didn't 48 hours later, and using the same water, the pH was A LOT higher (7.6 +). I guess even more chlorine / etc must have evaporated off.


Anyways. Feel free to post comments here about what I should do different this time - I'd love it.

If I don't get any responses, expect this thread to resume in no more than 1 week.

-Chipp
 
r u sure the light too far? It probably was strecthing 4 light.My baby is looking good.I just transplanted her into a 3 gallon bag.
 

Chipp

Well-Known Member
r u sure the light too far? It probably was strecthing 4 light.My baby is looking good.I just transplanted her into a 3 gallon bag.
Hey, I'm fairly sure I just didn't water properly, and my water had a messed up pH. I've got some seeds germing now, and I will do it right this time... Hahah it's a piss off, but I guess I learned my lesson.

About the light... Right now it's like 8 inches away, but within like 2 days of it being sprouted, I'll bring it in to like 2 inches, presuming my fan keeps the temps stable in that area
 

Chipp

Well-Known Member
Let the thread resume!

Using two new seeds (both SLH), I'm on:

(New) Day 2:

I planted two new seeds, and on Day 2, they are both going well (I think)!

I didn't use rockwool this time, and I monitored my pH better when I gave it the initial watering...

Temp is stable at 70 deg F, there is a gentle fan blowing just to move air (not blowing at the plants, just nearby), and the RH is about 70% right now.


Attached: two pics for two plants.
Until tomorrow!
 

Attachments

AeroKing

Well-Known Member
Sorry for your loss. When I read that you had problems watering in RW, I thought to myself - "Shit, they're going in dirt anyway and that's really hard to fuck up!", but I see you'd figured that out already! Keep it up. I can't wait to see these flower.
 

Chipp

Well-Known Member
Day 3:

Alright, so after seeing the tap root come out of the one in the larger, more shallow pot, I transplanted it to the big 5 gallon. It looks like overkill, but I guess it had to be done. The plants are getting bigger and better, but I'll be relieved once 24 hours passes and the transplanted girl is showing signs of strength.

I don't really have any good pics for today - they came out blurry. Stay tuned for tomorrow, and let's hope the transplanted girl pulls through!
 

Chipp

Well-Known Member
Day 4:

I think the transplant was a success with Hazel. She demonstrated some growth since the transplant, so that's what I'm gauging it off.

The other plant (Eve - yes I ripped the name off some other guy's grow journal - credit to him, haha), seems to need a transplant too. I can't see her root coming out the bottom, but her growth has slowed a bit, and her leaves are EVER so droopy... Check out some pics.
 

Attachments

Top