slow_grow
Well-Known Member
Hey guys, I wanted to post a review of my experience with Timber Grow Lights (and Dan). When originally deciding on lights I started my journey with information gleaned primarily from amazon reviews. Frankly this was before I found RIU. I ended up with a few popular budget LED panels. I'll leave out brands because that isn't important in this context. It wasn't long before I learned the error of my ways. In short I was expecting far too much from my budget panels, was nowhere near as efficient as I thought I was, and I had next to no warranty. I firmly believe there is a place for the LED panels that I had but they weren't right for me.
I learned that if I downsized my space I could have far superior lighting for the same price with a 5 year warranty and humans I could call.
After asking a bunch of questions and reading a ton more, I ended up calling Dan at Timber. I told him about my goals and he suggested the 300W CREE CXB3590 kit. I told him I'd get back to him and did some more research in case he was just trying to sell me something. I kept reading that he and his kits were solid so I called him back and placed my order.
They test each kit for 24 hours prior to shipping. That said, I had the kit in my hands the following week.
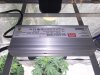
Packaging: As discreet as it can get, zero information on the box aside from the shipping label. Each heatsink and light assembly was individually bubble wrapped and packed into small boxes (see photo of floor layout). Driver and wiring was neatly organized and individually wrapped as well.
Wiring: I was really worried about screwing something up but each wire is color coded to match the colored connectors in a series which is then color coded to the leads from the power supply (see photo of color coded wire terminals). I've built more than a few computers spanning micro to full ATX and here I was intimidated by this... I felt a fool within 30 seconds of opening the box. I could honestly have my 2 year old son wire this after about 30 minutes of simply demonstrating that wire color matches terminal color.
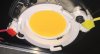
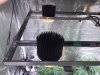
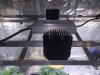
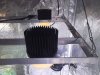
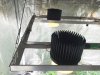
Pre-Assembly: I mention having built computers in the past and one thing I was a stickler about is always using high quality thermal paste. I could overclock a 3.2 GHz CPU to 4.5 easily with a good heatsink and clutch is the quality of the thermal paste. There are other DIY kits that use graphite pads. I could rant on that for an hour though perhaps a graphite pad is good enough for heat transfer in an LED application. The Timber website mentioned using Arctic 5 thermal paste. This stuff is 99.9% silver and shouldn't be overlooked. It runs $8 for a mere 3.5 grams. The heatsinks that come with the kit are fantastic but I attribute a lot of the reason why I can hold my hand on them inevitably after an 18 hour cycle at 100% without it feeling hot to the lack of skimping on the details. Well done Timber.
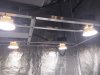
Framing: Although Timber offers a frame I opted to build my own. I used 1/8" aluminum angle. I cut with my mitre saw using an 80 tooth blade. Everything for the frame was picked up at lowes. I taped out the exact interior space of my tent on my kitchen floor to use as a coverage guide. I called Dan about 3 times, read about 100 posts, and finally decided on spacing. As mentioned by others, it is really just a matter of shifting into ninja erector set mode. It took me about 4 hours but I was taking my time. I'm forgetful yet for some reason I despise writing measurements down. This leads me to taking twice as long as anyone else.
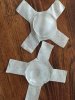
Reflectors & Diffusers: Very cool that these are included in every kit. I once again read a lot and called Dan on my configuration and ended up running the reflectors with no diffusers. They both pop on and off with ease. Damn I love how flexible this DIY approach is.
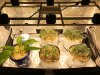
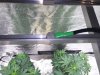
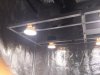
Performance: They run very very cool. I assumed that I'd need a cooling solution and even ordered THIS temperature controller to kick on a clip on fan over the heatsinks if temps around the canopy exceeded 85°. With my LED panels, I was hitting low 90's (granted it is very hot right now). With these I haven't exceeded 82°. My plants seemed to have responded very well to them. This is my first grow, I'm at day 26 or 27. You may notice in the pictures that I have 5 happy plants. This is too many plants for this space. This was from my original configuration. Next round I'm going with a 2 plant (either 5G or 10G soil) SCROG. They've been running now for over a week on a 18/4 schedule with zero issues.
Areas where improvement would help:
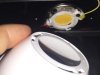
1. There are 4 holes drilled and tapped into the heatsink for flexible mounting options. There are two black headed screws included for each heatsink. This leaves you with two holes with nothing in them. Maybe it is OCD but having two exposed holes bothers me and I would have gladly paid a few extra bucks for extra black screws to fill them. To me it looks like I screwed something up.
2. The warranty information can be found online however it would be nice to print up a summary with links and telephone numbers to include in the packaging. That said Dan honestly strikes me as the kind of person that would act as a conduit for any issue spanning the Cree lights or Meanwell driver.
3. Mention in the instructions that each color coded terminal has two inputs. It wasn't crystal to me if those were just extras in case of an error or if they both needed to be leveraged somehow.
Overall: The flexibility, scalability, warranty, and efficiency of this kit along with the absolute joy it was to work with Dan makes it very easy for me to recommend to anyone. I'd be lying if I said there wasn't also a cool factor in the fact that it is DIY (even though they do 99% of the work haha).
One final thing. As a newbie, this post "IF you are new to LED and want help choosing what to buy, POST HERE!" was overwhelming. I'm sure it was well intended but jesh there is a lot of bickering in there. You guys that know a lot only serve to confuse us newer folks if you deviate from advice into complex technical arguments and oftentimes all out cock measuring contests. At least, that was the case for me. YMMV.
Ok onto the pics!
I learned that if I downsized my space I could have far superior lighting for the same price with a 5 year warranty and humans I could call.
After asking a bunch of questions and reading a ton more, I ended up calling Dan at Timber. I told him about my goals and he suggested the 300W CREE CXB3590 kit. I told him I'd get back to him and did some more research in case he was just trying to sell me something. I kept reading that he and his kits were solid so I called him back and placed my order.
They test each kit for 24 hours prior to shipping. That said, I had the kit in my hands the following week.
Packaging: As discreet as it can get, zero information on the box aside from the shipping label. Each heatsink and light assembly was individually bubble wrapped and packed into small boxes (see photo of floor layout). Driver and wiring was neatly organized and individually wrapped as well.
Wiring: I was really worried about screwing something up but each wire is color coded to match the colored connectors in a series which is then color coded to the leads from the power supply (see photo of color coded wire terminals). I've built more than a few computers spanning micro to full ATX and here I was intimidated by this... I felt a fool within 30 seconds of opening the box. I could honestly have my 2 year old son wire this after about 30 minutes of simply demonstrating that wire color matches terminal color.
Pre-Assembly: I mention having built computers in the past and one thing I was a stickler about is always using high quality thermal paste. I could overclock a 3.2 GHz CPU to 4.5 easily with a good heatsink and clutch is the quality of the thermal paste. There are other DIY kits that use graphite pads. I could rant on that for an hour though perhaps a graphite pad is good enough for heat transfer in an LED application. The Timber website mentioned using Arctic 5 thermal paste. This stuff is 99.9% silver and shouldn't be overlooked. It runs $8 for a mere 3.5 grams. The heatsinks that come with the kit are fantastic but I attribute a lot of the reason why I can hold my hand on them inevitably after an 18 hour cycle at 100% without it feeling hot to the lack of skimping on the details. Well done Timber.
Framing: Although Timber offers a frame I opted to build my own. I used 1/8" aluminum angle. I cut with my mitre saw using an 80 tooth blade. Everything for the frame was picked up at lowes. I taped out the exact interior space of my tent on my kitchen floor to use as a coverage guide. I called Dan about 3 times, read about 100 posts, and finally decided on spacing. As mentioned by others, it is really just a matter of shifting into ninja erector set mode. It took me about 4 hours but I was taking my time. I'm forgetful yet for some reason I despise writing measurements down. This leads me to taking twice as long as anyone else.
Reflectors & Diffusers: Very cool that these are included in every kit. I once again read a lot and called Dan on my configuration and ended up running the reflectors with no diffusers. They both pop on and off with ease. Damn I love how flexible this DIY approach is.
Performance: They run very very cool. I assumed that I'd need a cooling solution and even ordered THIS temperature controller to kick on a clip on fan over the heatsinks if temps around the canopy exceeded 85°. With my LED panels, I was hitting low 90's (granted it is very hot right now). With these I haven't exceeded 82°. My plants seemed to have responded very well to them. This is my first grow, I'm at day 26 or 27. You may notice in the pictures that I have 5 happy plants. This is too many plants for this space. This was from my original configuration. Next round I'm going with a 2 plant (either 5G or 10G soil) SCROG. They've been running now for over a week on a 18/4 schedule with zero issues.
Areas where improvement would help:
1. There are 4 holes drilled and tapped into the heatsink for flexible mounting options. There are two black headed screws included for each heatsink. This leaves you with two holes with nothing in them. Maybe it is OCD but having two exposed holes bothers me and I would have gladly paid a few extra bucks for extra black screws to fill them. To me it looks like I screwed something up.
2. The warranty information can be found online however it would be nice to print up a summary with links and telephone numbers to include in the packaging. That said Dan honestly strikes me as the kind of person that would act as a conduit for any issue spanning the Cree lights or Meanwell driver.
3. Mention in the instructions that each color coded terminal has two inputs. It wasn't crystal to me if those were just extras in case of an error or if they both needed to be leveraged somehow.
Overall: The flexibility, scalability, warranty, and efficiency of this kit along with the absolute joy it was to work with Dan makes it very easy for me to recommend to anyone. I'd be lying if I said there wasn't also a cool factor in the fact that it is DIY (even though they do 99% of the work haha).
One final thing. As a newbie, this post "IF you are new to LED and want help choosing what to buy, POST HERE!" was overwhelming. I'm sure it was well intended but jesh there is a lot of bickering in there. You guys that know a lot only serve to confuse us newer folks if you deviate from advice into complex technical arguments and oftentimes all out cock measuring contests. At least, that was the case for me. YMMV.
Ok onto the pics!
Attachments
-
 660.1 KB Views: 295
 -
 512.4 KB Views: 292
 -
 108.9 KB Views: 273
 -
 240.1 KB Views: 275
 -
 741 KB Views: 308
 -
 730 KB Views: 292
 -
 535.4 KB Views: 286
 -
 622.4 KB Views: 273
 -
 601.1 KB Views: 302
 -
 604.1 KB Views: 303

 VG
VG