Alaric
Well-Known Member
Back in the mid 90s I thought had gained enough knowledge through reading everything I could find and lurking
on weed base. I also had a little experience with a 6x8x8 closet then a walk up attic (what a glutton for
punishment). So, I quit my day job career of 23 yrs. Nothing much to talk about in the first
two locations------so this adventure begins with the 3rd of 6 locations.
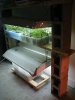
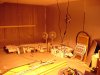
Huge basement (~40'x40'x8') of a split-level house that I rented. View attachment 3471670
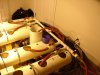
First tube design modeled after the GH aeroflow----except I was trying for a low profile design.
Plan was to run constant circulation-----didn't use sprayers----just 1/8" holes in the spray (pee) line---never had any problems with clogs. Here I was topping off manually.
I used compression couplers 3/4" (I think) for the drains. Made little supports using 2x4s and clamp to secure the tubes.
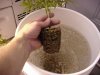
No medium used-----cut the bottoms off of those plastic then used floral foam sculpted with a steak knife.
Anyone see the problems.
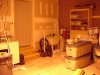
If anyone thought that little pump would heat the nutes----you're right---thank goodness I hadn't added any plants yet. Another thing I didn't like about that first design----the tubes were fixed at a specific distance apart.
I wanted more flexibility spreading the tubes if need arises. Still playing around with tube configurations using that wrong pump----new one ordered.
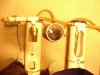
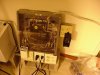
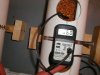
Got my new pumps Iwaki brand----comes with a cooling fan built (about $130 from memory).
Very happy with these----about ready for plants.
View attachment 3471705View attachment 3471670View attachment 3471681View attachment 3471705
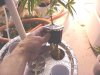
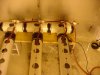
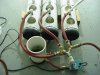
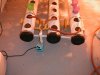
The red top valve is turned on to drain while the ones going to the spray lines are turned off.
Drilled and tapped holes for a 3/4" female slip fitting (the one my left foot is under).
Plant to use 3/4" pvc pipe for a trellis.
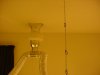
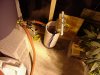
What I was testing out here----if I could maintain a nute level in the tubes by setting the level in that vertical tube----yes it worked but I was still topping off manually----which I didn't like.
One more thing I wanted to know before plants go in---
What's adequate dissolved oxygen level. So I called up GH and to my surprise talked to one of their engineers. He couldn't tell me.
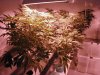
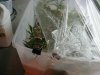
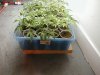
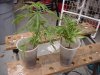
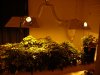
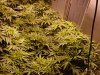
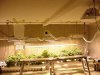
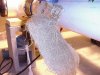
Vegging here under two 400s----about ready for prime time. Vegged 4-6 weeks after rooted.
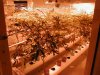
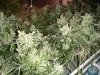
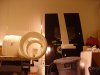
Moved into the flower room, about 15 plants in each section (two 4'x10' canopy sections, each section equipped with three 1ks, air cooled and on a mover.
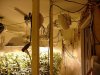
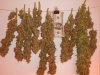
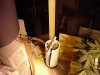
Almost ready for chop.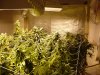
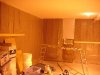
In this shot I used tomato netting streached between 2x4 and each corner of the tubes
The silver stuff is a reflective fabric I used around the canopy edges (taken down for pics ).
Used bungee cords to stretch the netting between the 2x4s that could be slid up and down.
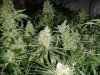
Very close now.
on weed base. I also had a little experience with a 6x8x8 closet then a walk up attic (what a glutton for
punishment). So, I quit my day job career of 23 yrs. Nothing much to talk about in the first
two locations------so this adventure begins with the 3rd of 6 locations.
Huge basement (~40'x40'x8') of a split-level house that I rented. View attachment 3471670
First tube design modeled after the GH aeroflow----except I was trying for a low profile design.
Plan was to run constant circulation-----didn't use sprayers----just 1/8" holes in the spray (pee) line---never had any problems with clogs. Here I was topping off manually.
I used compression couplers 3/4" (I think) for the drains. Made little supports using 2x4s and clamp to secure the tubes.
No medium used-----cut the bottoms off of those plastic then used floral foam sculpted with a steak knife.
Anyone see the problems.
If anyone thought that little pump would heat the nutes----you're right---thank goodness I hadn't added any plants yet. Another thing I didn't like about that first design----the tubes were fixed at a specific distance apart.
I wanted more flexibility spreading the tubes if need arises. Still playing around with tube configurations using that wrong pump----new one ordered.
Got my new pumps Iwaki brand----comes with a cooling fan built (about $130 from memory).
Very happy with these----about ready for plants.
View attachment 3471705View attachment 3471670View attachment 3471681View attachment 3471705
The red top valve is turned on to drain while the ones going to the spray lines are turned off.
Drilled and tapped holes for a 3/4" female slip fitting (the one my left foot is under).
Plant to use 3/4" pvc pipe for a trellis.
What I was testing out here----if I could maintain a nute level in the tubes by setting the level in that vertical tube----yes it worked but I was still topping off manually----which I didn't like.
One more thing I wanted to know before plants go in---
What's adequate dissolved oxygen level. So I called up GH and to my surprise talked to one of their engineers. He couldn't tell me.
Vegging here under two 400s----about ready for prime time. Vegged 4-6 weeks after rooted.
Moved into the flower room, about 15 plants in each section (two 4'x10' canopy sections, each section equipped with three 1ks, air cooled and on a mover.
Almost ready for chop.
In this shot I used tomato netting streached between 2x4 and each corner of the tubes
The silver stuff is a reflective fabric I used around the canopy edges (taken down for pics ).
Used bungee cords to stretch the netting between the 2x4s that could be slid up and down.
Very close now.
Attachments
-
 60.2 KB Views: 16
Last edited: