DankSwag's Green Machine 2014

DANKSWAG

Well-Known Member
Howdy Ho...

It's Mr. Dabby


Times have changed, yes times have changed. I finally broke down spent money on my own gear and now I've never met dab I didn't want to do!
Dabba Dabba Do! I am now a.k.a Mr. Dabby well self titled in hopes of finding the best dabs to do.

So why this post in organics? Well just as times well changed in how we consume cannabis so will my medical grow and I intend to record the ride on DankSwag's Green Machine 2014.

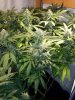
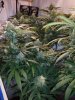
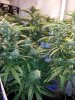
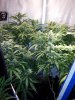
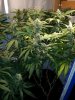
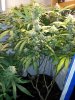
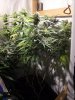
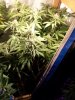
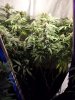
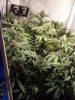
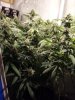
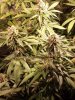
My space and my strains have been limited but things are changing. Currently you have seen my medical op in PHOGS a 2x3 DYI tent using a passive watering system, LEDs and organic soil and nutrients.

I will be expanding to actually be able grow the limit the medical law allows.

I will be introducing new strains, building out a new complete grow space. I am hoping to dedicate a 5 x 10 space for flowering alone if note more.
This alone will increase almost 3x my current square footage. I will be increasing the power and size of LED panels and building a passive water reservoirs that will be plug and grow when adding cloth pots to the system. It will also be updated with float that will gravity feed the reservoir to replace water the plants drink will in the system.

I also hope to gain another 5x10 space to build out a proper veg room with plenty of room for clones.

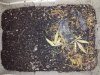
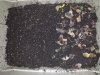
As I am doing all this I hope to post how I have built my vermi compostor, soil generator and brewing system.

In other words I am hoping this season as time allows I can build out this new complete grow room indoors hoping to break new ground on producing high quality organic cannabis so I can sing the following to Eddy Rabbit "driving my life away":

"Ooh I dab at least once day, looking for a better grade, of B H O, oooh I dab at least once day, to fade away, the blues"

DankSwag

DankSwag
Stay Dialed In my Friends more to come...
 

DANKSWAG

Well-Known Member
These are current pics from my PHOGS Gen4 of perpetual grow in this 2x3 DIY tent. I have 4 Blue Cheese lovely ladies here that are 5.5 weeks into flower. They are main lined trained and about 2.5 feet tall with the top 8 to 10 inches of foliage left after lollipoping at beginning of flower.

20140111_182207.jpg20140111_182200.jpg20140111_182152.jpg20140111_182126.jpg20140111_182058.jpg20140111_182052.jpgf

DankSwag
 

Dr.J20

Well-Known Member
That PHOGS setup is nice; a little more simplified than the earthbox/earthtainer design; great results, i may have to try one of my gals in a setup like that
nice work bro!
be easy
Dr.J :leaf:
 

foreverflyhi

Well-Known Member
I almost stoped smoking herb and now i dab like a zombie. All good tho, 1-3 dabs a day well do me good. Also speaking of dabs, i have been experimenting with all sorts of ways making the stuff. And let me tell yea, my no till left overs/ shake/ little nugs is by far superior to any other dabs wax shatter etc. add winterizing to the mix and ive created the smoothest dabs ever! Next batch ill try and document, will be using no-till yoda og with black water og and p91 winterized shatter! Mmmm i can taste it now. I go dab now
 

Dr.J20

Well-Known Member
I almost stoped smoking herb and now i dab like a zombie. All good tho, 1-3 dabs a day well do me good. Also speaking of dabs, i have been experimenting with all sorts of ways making the stuff. And let me tell yea, my no till left overs/ shake/ little nugs is by far superior to any other dabs wax shatter etc. add winterizing to the mix and ive created the smoothest dabs ever! Next batch ill try and document, will be using no-till yoda og with black water og and p91 winterized shatter! Mmmm i can taste it now. I go dab now
this sounds promising...shoot me link to your thread when you start it if you don't mind, i'd like to see how you do! (and the smoothest dabs ever sounds pretty good too, i'd like to know how to do that!)
be easy, sorry for off-topicness---we love you too Dank!
:leaf: :joint: :leaf:
 

DANKSWAG

Well-Known Member

  • Looking great man!​


Thanks!


  • That PHOGS setup is nice; a little more simplified than the earthbox/earthtainer design; great results, i may have to try one of my gals in a setup like that
    nice work bro!
    be easy
    Dr.J


Thanks! Just wait till you see how I amp this up. I had a good conversation with Ed Rosenthal on the subject at Hempfest last summer. I originally read his work on passive hydroponics in one of his books. One nugget I gleamed is about how cannabis plants roots are structured, that is the upper third primarily are proficient at taking up nutrients in soil web, but the lower 2/3 of the roots are primarily designed for the uptake of water. Knowing this I wanted to build a system that would provide be simpatico with what the roots want. For we all know the better the roots the better the fruit.That is more roots more fruit. However for indoor grows more roots means larger containers of soil to provide room for. More soil, more $$.

Solution, PHOGS. I simply just took the principles of passive hydroponics with my new knowledge of the root system and integrated my own materials for wicking and created a reservoir designed to provide aerated water via the hygro-mite silca rocks that trap air when in water.

The obvious benefits of passive hyrdo were to be expected with water wicking into soil, plant self watering, more time doing what I want to do.
The best pleasant surprise about passive hydro as I have experienced it in PHOGS is the stability of the grow. I know there is info about stressing plants to increase yield but lack of H20 IMHO is not best method for I have heard of some wanting a little droopiness from dehydration before watering. I just think not having H20 which is vital for all the biological processes in the plant alone slows down growth. I perfer other methods such as bending branches, removing foliage to "stress" plant. Besides those who are building soil webs in ROLS or LOS know lack of moisture in the soil slows down microbiology there too.

But to be sure I was able to hot load soil beyond a typical SS recipe in my cloth pots without issue and the plant that had the hot load did better then then rest of them with no nutrient issues. I contribute that to allowing the roots to grow through the bottom of the hot soil into the cool reservoir from which it could drink H20 without the uptake of unneeded nutrients that are dissolved in the water in the soil. I need to do a side by side for true comparison. But I've seen plants that are put into too hot of soil I know what that does and it did not happen to my mine in PHOGS. So it seems to provide a buffer against possible soil issues, having a reservoir with nothing but H20 aerated sans chlorine that they can draw from directly.

Stay tuned to see how I build out the new one and automate more by integrating a float value to gravity feed it, will probably need a control box for the valve, not sure yet will see. Also I will post better pictures next round on current setup of reservoir and placement of pots in the system.

DankSwag
 

DANKSWAG

Well-Known Member
I almost stoped smoking herb and now i dab like a zombie. All good tho, 1-3 dabs a day well do me good. Also speaking of dabs, i have been experimenting with all sorts of ways making the stuff. And let me tell yea, my no till left overs/ shake/ little nugs is by far superior to any other dabs wax shatter etc. add winterizing to the mix and ive created the smoothest dabs ever! Next batch ill try and document, will be using no-till yoda og with black water og and p91 winterized shatter! Mmmm i can taste it now. I go dab now
Oh I can't wait and please do once you perfected share directly on this post with me, I am excited now.
And feel free to post end results of each batch you run, not sure what is better.

Dabs have presented a delima for me when it comes to viewing, it is like the T & A ? tits or ass?

Which do you prefer Bud Porn or Dab Porn?

Both but I prefer to inhaling dabs then buds, but there are no dabs without them, so GO BUDS!

DankSwag
 

DANKSWAG

Well-Known Member
That PHOGS setup is nice; a little more simplified than the earthbox/earthtainer design; great results, i may have to try one of my gals in a setup like that
nice work bro!
be easy
Dr.J :leaf:
Hey Dr. J

Take a look .....

These 1 gal cloth pots filled with organic soil blend are nested inside a second cloth pot that is seated in the reservoir and filled with silica rock just slightly higher then the rocks outside the cloth pot in the reservoir. This allowed me to level surface of cloth containers to match each other in the container so when filling with water I know by visually looking as soon as water reaches just above surface of outer rocks that it will be just under the surface of the rocks that my plants cloth pots are seated on.

The rocks wick water up as well to the surface however if you will note it at this point once roots grow down through cloth pots into reservoir the water wicking into the soil is primarily now for the soil's benefit the plant has access to all the water it needs.

View attachment 2963316View attachment 2963317View attachment 2963321View attachment 2963322

DankSwag
 

Attachments

Dr.J20

Well-Known Member
Hey Dr. J

Take a look .....

These 1 gal cloth pots filled with organic soil blend are nested inside a second cloth pot that is seated in the reservoir and filled with silica rock just slightly higher then the rocks outside the cloth pot in the reservoir. This allowed me to level surface of cloth containers to match each other in the container so when filled with water I know but visually looking as soon as water reaches just above surface of outer rocks that it will be just under the surface of the rocks that my plants cloth pots are seated on.

The rocks wick water up as well to the surface however if you will note it at this point once roots grow down through cloth pots into reservoir the water wicking into the soil is primarily now for the soil's benefit the plant has access to all the water it needs.

View attachment 2963316View attachment 2963317View attachment 2963321View attachment 2963322

DankSwag
this sounds intuitively right on, good thinking using rocks this way but i'm trying to figure out just what kind of rock you're using. Also, pics didn't attach or wokr for me :/ is it a problem on my end ?

definitely gonna be following your work here my friend,
be easy,
dr.J
:leaf: :joint: :leaf:
 

DANKSWAG

Well-Known Member
this sounds intuitively right on, good thinking using rocks this way but i'm trying to figure out just what kind of rock you're using. Also, pics didn't attach or wokr for me :/ is it a problem on my end ?

definitely gonna be following your work here my friend,
be easy,
dr.J
:leaf: :joint: :leaf:
Not sure what happened on the thread with the pics.

Hyro-mite is not being produced anymore that I know of. I am looking into an alternate medium such as Growstone.
There is another one I am testing side by side with hyro-mite, but I made need to add silica now cause if I go with Growstone which is recycled glass not sure how much available silica in that product.

Glad to have you on-board, let me know how your implementation goes...

Oh I hear a Dab calling me be back soon...

DankSwag
 

DANKSWAG

Well-Known Member
Okay back from great dab toke and have some updates on my Vermi Compostor bins.

I started with one and managed to keep these fellows happy as they maintained their residence at the DankSwag Garbage Bin Inn.

Here are some photos.

Bin A my first bin decomposing food scraps mostly banana peel, leaf litter and coffee grounds initially in picture at left 1-7-14, a week later picture on right I had to add more food mostly avocado, leaf litter and coffee grounds.


20140107_190140.jpg20140115_154257.jpg
There are two pounds of red wrigglers producing dank vermi post can't wait to incorporate into my grow.

Bin B is my second bin it currently resides on top of bin A. This is mostly again banana peel, leaf litter, coffee grounds and plums. The bacteria and fungi growth is awesome in this container I added some fish compost into the bedding with straw. Should of broke down the straw more.
The pic on left is begging of building bin B. I finished it with some standard light weight potting soil 1-9-14. Picture on right taken today shows the nice decomposition of the food stock added. I have been sifting bin A and hand picking the worms to begin their work in this bin.

20140109_212411.jpg20140115_154242.jpg


DankSwag
 

Dr.J20

Well-Known Member
^^^definitely starting a bin myself...better to do two smaller stacked or one longer one? or, contrariwise, is stacking primarily to produce more vermi-post per sq.ft?
be easy
:leaf:
 

UnderMeSensi

Active Member
Hey DankSwag love the setup. Are those a hybrid I just noticed they seem tall but buds look indica like. And the compost is great.mine is alot of avacado & bananna peels , coffee filters , leaf scrap, egg shells and pepper and onion scraps and old garden soil and coco course. Where did u purchase those red
worms. I bet my.compost would break down much faster with them. Roll on !
 

DANKSWAG

Well-Known Member
^^^definitely starting a bin myself...better to do two smaller stacked or one longer one? or, contrariwise, is stacking primarily to produce more vermi-post per sq.ft?
be easy
:leaf:
You want surface area over depth and you want multiple bins. I was hoping to build a DIY stacking bins to allow worms to crawl up into new food bin. Also cause worms multiply and if you have good environment you will need to expand to keep a good flow of vermi post coming. I am finding the two pounds of worms I have eat quite well and want to make sure I have a new bed (bin) to transfer them too. The bin is divided in half though the entire bin is where the initial bedding goes down only half is where food is allowed to break down. It gets real soggy on that side with the decomposing going down and the worms feeding so they like to have a separate area for whatever else they do when they don't eat. Oh yeah multiply and I ain't talking about a math class.
:-P

Basic needs for a worm bin.
1. Bedding
2. Food stock
3. Aeration
4. Moisture
5. Temp

DankSwag
 

DANKSWAG

Well-Known Member
Hey DankSwag love the setup. Are those a hybrid I just noticed they seem tall but buds look indica like. And the compost is great.mine is alot of avacado & bananna peels , coffee filters , leaf scrap, egg shells and pepper and onion scraps and old garden soil and coco course. Where did u purchase those red
worms. I bet my.compost would break down much faster with them. Roll on !
Hey there UnderMeSensi, Under Me Sensi, sounds like that would be a great place to be... :-P besides Me Blue Cheese (<-- two different links there) a hybrid which is what you are seeing in my medical grow currently.

Also have plans to put a G13xAk47 into PHOGS to see how this hybird does as well.

Thanks for da love, it has been a great journey so far and can only get better. I've got some ideas after speaking with Ed at Hempfest so I can't wait to implement and test.
The worms simply Amazon Uncle Jims don't pay to rush, because it is live product they do anywise.
Not only break down faster but worm compost has been show to be higher in available nutrients then anything else. It is BLACK GOLD, a gold I can make from home. SHIT YEAH! Pardon the pun

DawnkSwag
 

DANKSWAG

Well-Known Member
Hi UMS,

I have an idea... though just curious what you think 2x3 area with plants 2 and a half feet tall with only 8 to 10 inch tops will produce?

DankSwag
 
Top