using a hps/mh security light

DoobsDay

Well-Known Member
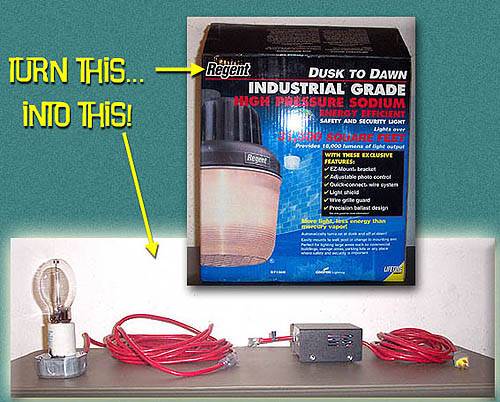
Ive been getting pms from people asking how they can use security lights for cultivation, so instead of responding individually I will make a thread about it for everyone to see. These lights can be used exactly like the way overpriced ones you find at hydro stores. I see a lot of people posting on how these lights are super dangerous and will burn your house down, don’t listen to them, its probly a salesman trying to scare you into buying one of the way overpriced “official” growlights. That being said these lights work the same as any other hps/mh light and equally carry the same hazards.

To convert the light so it will work inside your going to need:

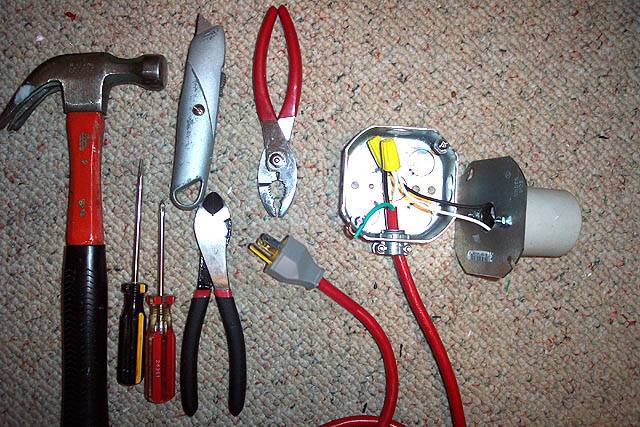
1. heavy duty extension cord of appropriate length
2. one heavy duty grounded male plug end (will come with cord)
3. some wire clippers would be nice but u can use whatever will cut the cord
4. some electrical tape

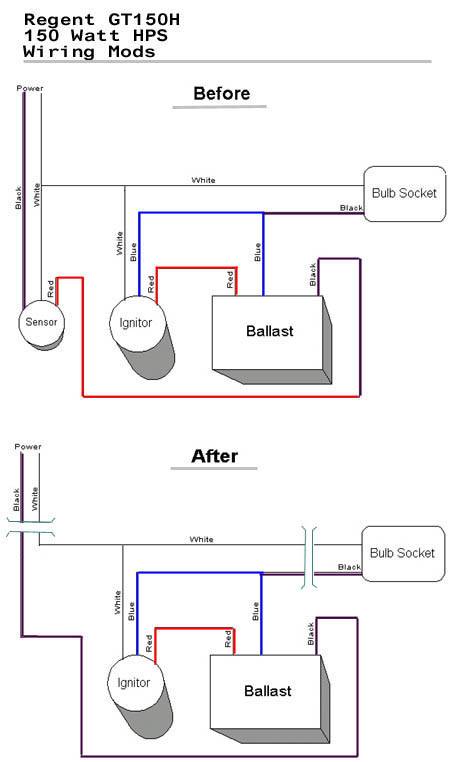
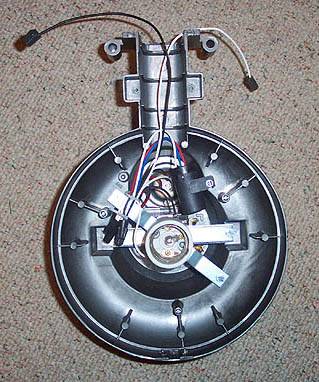
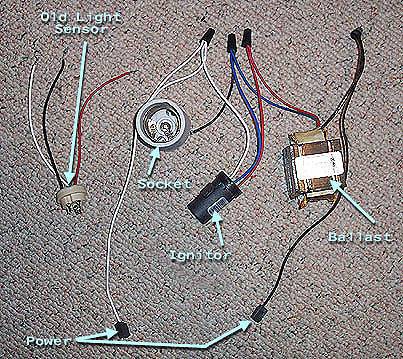
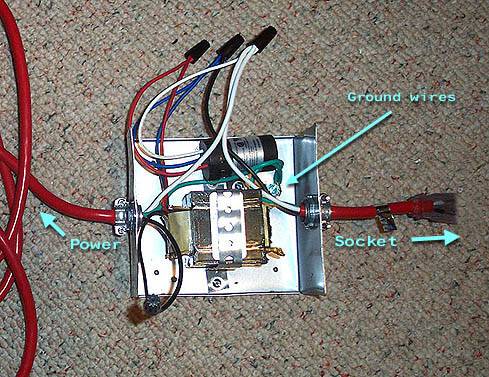
Your local lowes hardware store or home depot all carry these lights 50w-150w (ballast, starter, and light all in same casing). Now lets say you’ve just bought your light took it out of the box and you see instead of having a plug it has 3 cords (white, black, and green). Take heavy duty extension cord (you only need the male end) and cut it to a suitable length for you, youll notice it has the same white, black, and green (ground) cords. Simply match the cords up from your male end of the extension cord and your security light (white with white, black with black, green with green) and wire them together. Wrap electrical tape around the connections so u don’t get shocked if you accidently touch it while its on.

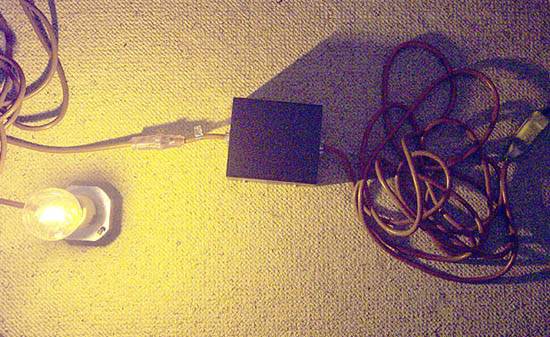
Now just plug it into the wall and see the light!


DoobsDay

Well-Known Member
(note you dont have to do this)

now there are some disadvantages to having the starter, ballast and light all in the same place, one it will produce alot of heat, this means the light cant be quite as close to the tops of your plants. fear not there are ways around this, you can modify your security light into a remote ballast so the light and ballast can be seperate reducing the heat and getting more out of your light, heres how:


How do I convert a home security light into a remote ballast grow light?

Contributed by: Spliffco, Inc.

For some reason growlight manufacturers are completely ignoring the small, personal grower. A quick look around Overgrow and you can see some very respectable bud being grown under 150's, and even 70 watt HPS lights. But the smallest ready made remote ballast growlight you can buy is a 250 watter, and they usually cost well over $150 (US).

So, as usual in the medicinal herb growing world, you need to take matters into your own hands.

Here’s how to turn a 150 watt HPS security light available at most Home improvment stores, into a nice remote-ballast grow light.


Materials & Tools:

MATERIALS
Regent GT150H, (About $79)
Heavy Duty extension cord of suitable length
One heavy duty grounded electrical plug end (male)
Electrical box
Electrical box plate
Romex cable connectors (3)
Wire nuts
Bolts, nuts washers
Strip of metal to secure ballast
Project case from Radio Shack ($6.99) #270-253A

TOOLS
5/16 nut driver (for removing parts from the casing -- regular pliers will work)
Philips head screwdriver
Regular screwdriver
Hammer
Power drill and assorted bits
Metal file
Wire cutters
Utility knife or wire stripper
Diagonal Pliers
Pliers

Wiring Diagram
Be careful...


Remove guts

Remove the guts from the casing - bulb socket, ignitor, light sensor socket, ballast. The ballast was glued to the casing. I heated the casing for a couple of minutes on an oven burner (high), and when it was getting too hot to hold, I put it on the floor and wedged a hammer between the ballast and casing and popped it out gently.


REMOVE LIGHT SENSOR

These security lights are designed to automatically turn on when it gets dark, so there is a built in light sensor that needs to be removed.

Remove all wire nuts.

Disconnect the white wire that comes out of the sensor (currently connected to all 3 other white wires).

Disconnect the black wire that comes out of the sensor (currently connected to the black “power in” wire).

The red wire coming out of the sensor is currently connected to the black wire coming out of the ballast. Remove the red wire, and then connect the black wire coming out of the ballast to the black “power in” wire.

Reattach wire nuts (there were 5 originally, now you only need 4).

Refer to the wiring diagram!


WIRE THE SOCKET

The socket on this particular light had some metal wiring connectors that stuck up and made it impossible to attach to the electrical plate without some modification (sorry no photo). Just pull the black and white wires off of the connectors, and cut the connectors down flush with socket base with diagonal pliers. Now loosen the connectors (screws inside the socket), slip the wires under them and tighten them back down. Please use some plastic electrical tape on the end of the socket to prevent any chance of the metal from the connectors making contact with the electrical box cover plate.

Secure the cord in the electrical box with a romex cable connector and wire it to the socket: black to black, white to white, secure with wire nuts. Some electrical boxes have a green screw inside to fasten ground wires, use that if yours has one, otherwise fasten the green ground wire to the box using one of the cover plate screws when you tighten the cover plate.


WIRE THE REMOTE BALLAST

Hopefully you can see the wiring clearly in the photo, but if not, refer to the wiring diagram for details.

You’re going to have to cut some holes in the Radio Shack project box for the power cords and some bolts to hold the ballast, ignitor and ground wires down.

I used a short length of metal (plumbing department) to secure the ballast. The ignitor had a notch that made it easy to bolt down. The ground wires from both electrical cords are screwed to the base of the box.

Cut a short length off the socket (female) end of the extension cord and wire it appropriately (again - see diagram). Wire the remaining electrical cord, including the grounded male plug to the other end of the box.

Use a tie wrap to bundle up the wires in the box and try to keep them away from the ballast, which will heat up during use.


TEST IT!
If you've done everything right, it should light.


Now, build a reflector and you’ve got a nice little custom grow light.

Safety Warnings:
Always wire the male plug to the bulb socket and the female receptacle to the ballast to avoid possible electrocution! Always use an all metal project box which already has ventilation cooling slots, or if your project box has none, please cut adequate cooling slots, or drill several vent holes in the ballast enclosure (project box) to allow the heat to escape the box. Not adding the cooling slots or holes, could result in failure of the insulation and/or the transformer. Also, please be sure the enclosure is located in a well ventilated area to aid cooling.
 

mogie

Well-Known Member
How do I convert a home security light into a remote ballast grow light?

Contributed by: Spliffco, Inc.

For some reason growlight manufacturers are completely ignoring the small, personal grower. A quick look around Overgrow and you can see some very respectable bud being grown under 150's, and even 70 watt HPS lights. But the smallest ready made remote ballast growlight you can buy is a 250 watter, and they usually cost well over $150 (US).

So, as usual in the medicinal herb growing world, you need to take matters into your own hands.

Here’s how to turn a 150 watt HPS security light available at most Home improvment stores, into a nice remote-ballast grow light.


Materials & Tools:

MATERIALS
Regent GT150H, (About $79)
Heavy Duty extension cord of suitable length
One heavy duty grounded electrical plug end (male)
Electrical box
Electrical box plate
Romex cable connectors (3)
Wire nuts
Bolts, nuts washers
Strip of metal to secure ballast
Project case from Radio Shack ($6.99) #270-253A

TOOLS
5/16 nut driver (for removing parts from the casing -- regular pliers will work)
Philips head screwdriver
Regular screwdriver
Hammer
Power drill and assorted bits
Metal file
Wire cutters
Utility knife or wire stripper
Diagonal Pliers
Pliers

Wiring Diagram
Be careful...


Remove guts

Remove the guts from the casing - bulb socket, ignitor, light sensor socket, ballast. The ballast was glued to the casing. I heated the casing for a couple of minutes on an oven burner (high), and when it was getting too hot to hold, I put it on the floor and wedged a hammer between the ballast and casing and popped it out gently.


REMOVE LIGHT SENSOR

These security lights are designed to automatically turn on when it gets dark, so there is a built in light sensor that needs to be removed.

Remove all wire nuts.

Disconnect the white wire that comes out of the sensor (currently connected to all 3 other white wires).

Disconnect the black wire that comes out of the sensor (currently connected to the black “power in” wire).

The red wire coming out of the sensor is currently connected to the black wire coming out of the ballast. Remove the red wire, and then connect the black wire coming out of the ballast to the black “power in” wire.

Reattach wire nuts (there were 5 originally, now you only need 4).

Refer to the wiring diagram!


WIRE THE SOCKET

The socket on this particular light had some metal wiring connectors that stuck up and made it impossible to attach to the electrical plate without some modification (sorry no photo). Just pull the black and white wires off of the connectors, and cut the connectors down flush with socket base with diagonal pliers. Now loosen the connectors (screws inside the socket), slip the wires under them and tighten them back down. Please use some plastic electrical tape on the end of the socket to prevent any chance of the metal from the connectors making contact with the electrical box cover plate.

Secure the cord in the electrical box with a romex cable connector and wire it to the socket: black to black, white to white, secure with wire nuts. Some electrical boxes have a green screw inside to fasten ground wires, use that if yours has one, otherwise fasten the green ground wire to the box using one of the cover plate screws when you tighten the cover plate.


WIRE THE REMOTE BALLAST

Hopefully you can see the wiring clearly in the photo, but if not, refer to the wiring diagram for details.

You’re going to have to cut some holes in the Radio Shack project box for the power cords and some bolts to hold the ballast, ignitor and ground wires down.

I used a short length of metal (plumbing department) to secure the ballast. The ignitor had a notch that made it easy to bolt down. The ground wires from both electrical cords are screwed to the base of the box.

Cut a short length off the socket (female) end of the extension cord and wire it appropriately (again - see diagram). Wire the remaining electrical cord, including the grounded male plug to the other end of the box.

Use a tie wrap to bundle up the wires in the box and try to keep them away from the ballast, which will heat up during use.


TEST IT!
If you've done everything right, it should light.


Now, build a reflector and you’ve got a nice little custom grow light.

Safety Warnings:
Always wire the male plug to the bulb socket and the female receptacle to the ballast to avoid possible electrocution! Always use an all metal project box which already has ventilation cooling slots, or if your project box has none, please cut adequate cooling slots, or drill several vent holes in the ballast enclosure (project box) to allow the heat to escape the box. Not adding the cooling slots or holes, could result in failure of the insulation and/or the transformer. Also, please be sure the enclosure is located in a well ventilated area to aid cooling
 

mogie

Well-Known Member
I am one of those people that need pictures. Guess that means I'm not the brightest bulb in the pack.
 

green_nobody

Well-Known Member
you know guys, that is a nice little project you came up with but lets face that cost of this, i would guess 95bucks for materials and a good hour of work time for a electrical noob plus a slight chance of a good electrical shock... so that hour adds another 10-20 bucks;)

so for about 100bucks you get a pre-set up fixture, with safety glass and a big reflector and a blast designed for the job, belief this or check that link High Tech Garden Supply

so why that hassle if you not happen to have one of these sitting around which normal people, even us growers, don't have usually?;)

i rather grow some than play with wires all afternoon to get stressed out on that shit:D
 

mogie

Well-Known Member
I check out the salvation army almost weekly. On tues. it is 10 cent day. For 10 I pick this kind of stuff and play with it. Amazing what you can find.
 

green_nobody

Well-Known Member
okay mogie, but they got normally only food and closing there, at least when i handed out soup last time... never seen there building supplies, especially not HPS fixtures:D but maybe you go to a different one then i do;)
 

DoobsDay

Well-Known Member
you know guys, that is a nice little project you came up with but lets face that cost of this, i would guess 95bucks for materials and a good hour of work time for a electrical noob plus a slight chance of a good electrical shock... so that hour adds another 10-20 bucks;)

so for about 100bucks you get a pre-set up fixture, with safety glass and a big reflector and a blast designed for the job, belief this or check that link High Tech Garden Supply

so why that hassle if you not happen to have one of these sitting around which normal people, even us growers, don't have usually?;)

i rather grow some than play with wires all afternoon to get stressed out on that shit:D

a 5 year old could could do the wiring, its pretty straight forward. is 30 mins of your time really that valuble?

for the person who is sketched about ordering off the internet and dosent want to get ripped off from a hydro store this is a good alternative.
 

trusten

Well-Known Member
how do i get a reflector/hood for the light/ballast? since i plan on getting that 150 hps this saturday?and how do i get the light to hold it self underneath the hood/reflector
 

green_nobody

Well-Known Member
maybe if you are that paranoid about online shopping, but especially this hydro store isn't really much of an risk, jesus video once ordered a hps bat-wing there they had run out of and the updated him to air-cooled for the same money. and their price tags are the lowest i have seen on my research so far too.
if you would have said be afraid to be ripped of at ebay i sure would be with you on that, been burned there more then once but made also a few real bargain deals too;)

so in the end its always a risk you take, if it is to lose money, get a shock weal fumbling around with wires or whatever maid happens, nothing is as dangerous as life:D
 

green_nobody

Well-Known Member
how do i get a reflector/hood for the light/ballast? since i plan on getting that 150 hps this saturday?and how do i get the light to hold it self underneath the hood/reflector
some security lights come with a reflector, others as the one mogie used have something like a reflector which is pretty useless:-? on way would to get one from a hydro store, but then you could buy a complet set straigth away, or you go with mogies directions how to build one from a few days ago.

https://www.rollitup.org/do-yourself/8854-diy-reflector-hood.html
https://www.rollitup.org/do-yourself/8502-build-my-own-cool-tube.html
https://www.rollitup.org/do-yourself/8503-build-my-own-cool-tube.html

and there are mor of these since mogie can't stop really;)
 

trusten

Well-Known Member
what about those people who are under 18 and live with there parents and there parents let them grow but there parents won't order another 400watt hps light system cuzz the last one they orderd for 145bucks i couldn't get to work cuzz i didn't know i hada do some rewireing and it took 2weeks and 4days to arrive.so that might be why one can't order online products
 

green_nobody

Well-Known Member
as long you got a bank account you can technically order what ever you like to order... there is also the option with many businesses to pay on delivery and hydro shops are all over the place too
 

green_nobody

Well-Known Member
and as you ma noticed, for your reflector question i posted some links to mogies threads about that lately.

uh, and by the way, if you are still under age, what do you do in this forum?:twisted:
 

trusten

Well-Known Member
thanks green nobody is it possible to use the hood of a flour workshop light? cuzz i have no welding tools and the cool tube sound to complicated for my baked brain
 

green_nobody

Well-Known Member
due i would do that, the socket in this would fit to start with since those hps need a E40 socket instead of the normal E27, this E40 is almost twice in diameter, it just won't fit. there was yesterday a reflector construction from mogie around made from just folded sheet metal, just search for it dude, it has to be somewhere
 
Top