Cloning Cannabis (How to)

FrostickZero

Well-Known Member
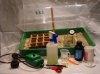
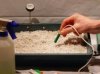
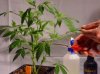
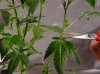
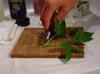
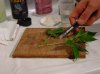
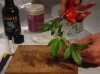
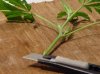
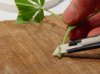
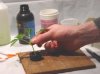
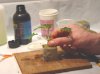
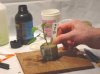
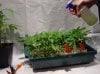
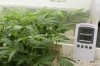
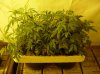
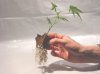
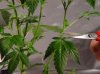
Asexual Propagation of marijuana (cloning) is not difficult if the correct procedure is followed. We've put together this tutorial to make it even easier. The main thing to remember when taking clones is to have all your equipment ready on hand, and to work quickly and carefully.

Once a clone has been cut from the mother plant it becomes vulnerable to drying out, so the speed of the process from cutting to planting is of foremost importance. If the Kiwiseeds method below is followed, 100% strike-rates will be obtained.

d58939z110b13c324dz7e98_278_208.jpg
 

FrostickZero

Well-Known Member
Below is a list of the essential equipment needed to successfully propagate cannabis from clone. If these instructions are followed 100% strike rates will be achieved.

2.jpg

01. Propagator with bottom heat or
02. Heat pad + propagator
03. Thermostat controller
04. Soil thermometer
05. Perlite
06. Large jiffy pots + seed-raising mix or
07. Rockwool starter blocks
08. Fine sprayer
09. Identification labels
10. Sharp blade + sharp scissors
11. Rooting gel or powder
12. Cutting board
13. Small glass of water
14. Flourescent lighting
 

FrostickZero

Well-Known Member
Firstly cover the bottom of the propagator with 3cm of wet perlite and set out the jiffy pots or pre-soaked rockwool cubes.

Start by setting up on a clean surface with plenty of room to work on and at a good height, somewhere nice and light but not under direct light from grow-lamps, and not in the hot sun. Put the propagator to one side (to the right if you are right handed) and the cutting board directly infront of you, with the blade and scissors on it. Put a small amount of rooting-gel or powder in the cap and set this nearby along with a glass or beeker of water, and a waterproof pen and labels. Fill a fine sprayer with cold water and have this handy.

3.jpg 4.jpg
 

FrostickZero

Well-Known Member
Chose healthy branches from mother-plants that have been in 18 hours light or more. If the plant you want to clone is a seedling it must be old enough to have hardened off a bit (stems become harder and less fleshy) this is usually around 4-6 weeks, sometimes shorter if you are using perfect growing conditions. The branch must have the end growing tip and atleast one more leaf and node below it, preferably two. Use a sharp pair of scissors or blade and make the cut as cleanly as possible just above or just below below the node.

5.jpg

If you make your cut right above a node on the branch then two new branches will sprout out as if it had been pinched. If you continue in this fashion then your mother will produce many new branches, all of which will become potential clones in the next week or so. If you are only wanting best quality clones, cut the branch through or just under the node. The node is a solid bundle made up of cells perfect for forming new roots, almost like a nerve centre. Fast growing cannabis plants, seedlings, or indica types can often have a large hole running through branches and stems. If it's cut and cloned at this point air can get trapped in side and because the stem is thin and fleshy the cutting has a good chance of rotting. Always cut these plants just below the node. Remember to cut the motherplant back to the next growing tip.

6.jpg
 

FrostickZero

Well-Known Member
After taking the cuttings from the mother plant time is of the essence if we don't want any extra stress caused to the clone. Cuttings can be cut and put straight into water or very humid environment (your mister bottle is your best friend here) until there are enough to process and set, or they can be set into the growing media straight away. First though we must prepare the cutting for planting. Below shows how this process should be done if the cutting was cut below a node. If it was cut above a node then just make sure the cut is clean and on an angle.

7.jpg 8.jpg

Now that you have cut the plant the cutting has no roots, therefore cannot take up water and is vulnerable to drying out. Leaves transpire (let moisture out) so by trimming the leaf in half we halve the area of transpiration and give the cutting a chance to make roots. This may seem a little harsh slashing all it's leaves like this, but don't worry, it's all for the good of the clone. Cut up to 2/3rds of the bigger leaves off but don't cut or damage the growing-tip. This technique also saves room in the propagator and allows for more clones to fit.

9.jpg 10.jpg
 

FrostickZero

Well-Known Member
We want as much chance of roots growing from our clone as possible, and one of the ways we do this is by scaring the stem where we want this to happen. By slicing away a thin layer of the outer stem we increase the surface area of places that may produce roots. Later this scar area is dipped in a rooting gel or powder containing hormones. This encourages root formation further.

11.jpg

Using a clean sharp blade (or I find one side of a sharp pair of small scissors work well) start about 6mm from the end of the cutting and slice away a thin layer. Be careful not to cut into the stem too far. As soon as you've done this the cuttings should be placed in a beaker or glass of water with the cut submerged so they don't dry out. Spray the cuttings again with fine mist. Process a few cuttings like this until enough are done to move on to the next step. Don't cut too many though. Remember the quicker the time between taking the cutting from the plant to setting it in the grow medium the better.

12.jpg
 

FrostickZero

Well-Known Member
Another way to help the cutting form roots is to use some form of rooting hormone. There are many types on the market and they normally come in a powder or gel form. Powder form is the oldest style, the cheapest, and works well. In the last few years rooting gel has become popular, and I for one love it. I also think it's best for beginners as you only need to dip the cutting and plant it. With the powder form a wet cutting tends to end up with too much stuck to it, and it is nesessary to tap the cutting to shake off the excess. If this isn't done these powders can form a kind of plaster round the base and this isn't good.

13.jpg

Tip some of your rooting powder or gel out into the lid of the container. Take your prepared cuttings one by one and dip them in just to just 1cm from the end. Plant immediately (if using powder tap off the excess first)

14.jpg
 

FrostickZero

Well-Known Member
Immediately after dipping the clone in the root hormone it should be planted. The gel or powder has sealed the wound and now it's important to get it into the growing medium as soon as possible to ensure no bacteria or fungus's can infect it. Your rockwool blocks should have been pre-soaked as described in water with a PH of 5.5. We also highly recommend adding to the pre-soak a product such as Hygrozyme, a pure enzyme culture that fights harmful bacteria and encourages a healthy root-zone. Once the blocks have soaked shake them lightly to remove excess moisture. Push the prepared cutting into the small hole already made in the rockwool block. It should pushed to the end of the hole and then a bit extra so it sits firmly in place and doesn't flop around. If your clone is very thin it pays to make another smaller hole with a satay stick or similar and use this instead of the factory made hole.
15.jpg

Make sure to always label cuttings well. Create a system for yourself and stick to it. Have a note-book and keep information in it.

16.jpg
 

FrostickZero

Well-Known Member
Now it's time to set the prepared cuttings into the propagator tray. Make sure the wet perlite is atleast 1cm deep and nice and even. If using a propagator without drainage holes in the bottom, make sure there is no excess water floating around, as clones will rot if they get too wet. If you're using a tray with bottom drainage holes make sure you use plenty of perlite so there's enough moisture, otherwise the bottom heat will dry out young roots. If doing large amounts it's better to fill the tray with blocks then set the cuttings. As you go mist the cuttings frequently to keep humidity levels up.
17.jpg

When you have finished place a soil thermometer like the one shown into one of the blocks. push it in until the end of the probe is at the bottom of the block. Put the lid of the propagator on and close any vents. If you're using a heated propagator plug it in and set it (or your thermostat controller) to 25degrees. If using a heatpad plug it in to your thermostat controler and insert the probe under the cuttings in the perlite. Set the dial for 25 degrees. After a while check your sloil thermometer to see if the temperature is good, if not adjust as needed.

18.jpg
 

FrostickZero

Well-Known Member
After 3 or 4 days you should open the vents on your propagator lid a little. After a further 4 days they can be opened fully. Your cuttings shouldn't wilt at all. They should always stand straight and tall. If they do wilt because you opened the lid too quickly, replace it again and the cuttings will recover in a few hours. After 8-10 days the top can be taken off completely but then you'll need to make sure the humidity is 70%+ in the cloning chamber.

19.jpg

Flourescent lighting is perfect for cloning cannabis. We find 4-5 tubes per meter works out great. Use number 33 Cool-White flourescents as these seem to work the best. Install the bulbs atleast 40cm above your propagation bed.

20.jpg
 

FrostickZero

Well-Known Member
If all these steps have been followed correctly cuttings should have roots visible out of the bottom of the rockwool or other media 10-14 days after setting, depending on the variety. (Sativa strains tend to be far quicker to set roots than Indicas from my experience) After about 10-12 days a light feed can be beneficial including a rooting stimulent to increase root growth. Spray on foliage also. If using nutrient don't feed at higher than 1.0 EC.
21.jpg

Once your cuttings have a good amount of roots they need to be transplanted into a bigger pot or container.

22.jpg
 

White Widow Woman

Well-Known Member
Hey FrostickZero - been watching your thread as you've been writing it...lol Just kept reloading the page... Well I think you did an awesome job! This is going to be great for the newbies!!!


:peace:
WWW


EDIT: Sorry, I see that you are still finishing up! Hope I didn't break your train of thought...
 

FrostickZero

Well-Known Member
Hey FrostickZero - been watching your thread as you've been writing it...lol Just kept reloading the page... Well I think you did an awesome job! This is going to be great for the newbies!!!


:peace:
WWW


EDIT: Sorry, I see that you are still finishing up! Hope I didn't break your train of thought...
well that's my goal, I may be growing for a few months my self but what ever I learn I want to share with other people because well its not easy to remember this all the time and thanks, na this Thread is 100% done its here for any one that needs it and leave comments if they want
 

FrostickZero

Well-Known Member
Nice thread! I allways leave mine under the dome untill transplant can that be bad?
well it can put them into shock because its like you going from a realy hot place to realy cold place as fast as taking the clone out of the dome into your grow area so its better to get them use to the enviroment air slowly to help make sure that they don't go into shock

Thanks, I'm hopeing to have 1 page that can like every one to my ''How to'' Threads
 

markieeee

Well-Known Member
hey man.. thats an awesome writeup.. i have'nt been having very good success.. only about 4/8 get rooted.. i also noticed you mentioned satay sticks. could you by any chance be in asia? lol
 

markieeee

Well-Known Member
oh k. heh. anyways.. good job again on the writeup. gonna try this tonight and see what results i'll get by the beginning of next week. rep points comin your way!
 

FrostickZero

Well-Known Member
oh k. heh. anyways.. good job again on the writeup. gonna try this tonight and see what results i'll get by the beginning of next week. rep points comin your way!
haha cool and thanks, gonna try to do a 500 clone setup if possible to people that say I can't and I have a goal in mind I will try to complet that goal even if I have to keep trying but I will
 

Little Tommy

Well-Known Member
Great Tutorial - I know that I was initially very intimidated by cloning. This addresses all the important issues in a simple, easy to understand way.
 
Top