Med pressure Aero

Bob Smith

Well-Known Member
Cool. I'm going to use more of an open netting I think, so maybe I'll set it at 24" and expect the plants to grow through it. It's mainly there for support.

I did an experiment with pex tubing and got some run-on with a mister. The rest I only know from reading about others, probably using (gah) vinyl. Since the misters have such a low flow, it doesn't take much expansion of the tubing to make them run on. I've had bigger problems with trapped air than tube expansion. You'll have to try and see I guess. I gave up and will be using anti-drip valves from now on.

I don't own a PPM meter yet. I'm afraid to see just how much calcium is in my well water. It's gotta be high in minerals because it tastes great lol. I bottle it and take it to work. It leaves behind calcium deposits anywhere it evaporates. Plants don't seem to mind though. I thought I saw a lockout from too much calcium once, but it went away with the next res change.

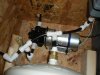
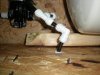
It's a shame you glued up your pipes before deciding to switch. You could have sprayed lengthwise into a separate pipe that tee's into your main stack.

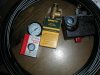
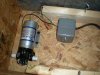
I also don't trust the pump switch. Do you have a pressure relief valve?
Yeah, the anti-drip valves are definitely gonna be in my future - that's for sure - I'm sure there will be a little bit of drip with the length of runs I have, so I'll just deal with it in the meantime.

And what do you mean by "sprayed lengthwise into a separate pipe that tee's into your main stack"? I've actually thought about increasing the height of each pipe by 1.5' and placing a mister at the top, allowing the mist more room to disperse before encountering roots.

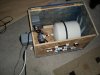
Yes on the pressure relief valve; solenoids and accumulator tank should be here today, and then I'm just waiting on the pump to get here in the middle of next week.

1.21.11 004.jpg1.21.11 005.jpg1.21.11 001.jpg1.21.11 002.jpg1.21.11 003.jpg


Mike Young

Well-Known Member
One quick thought on that. As the roots start to fill out, and believe me they will, less & less mist is going to be able to travel down the vertical pipe to the lower plants. Something to consider. My 1 month old veg plant has already grown roots down the 2' length of my pots. And my micron size isn't as good as what yours will be. I'd take a pic, but completely removing the pot is no longer an option.
 

Bob Smith

Well-Known Member
Yeah, I've already realized that my tubes are much too small to "properly" deliver mist to all the plants.............gonna have a mister at the top feeding the top three plants, and then another mister feeding the bottom three plants.............might add another mister to each column as well, depending on how things go (for 45 total misters).

Will have to feed more than "optimal" to ensure that all plants get quality nutrition, so I highly doubt I'll have the ultra white HP aero roots that everyone shoots for.

If it gets really bad, then I can pretty quickly convert back to a reciruclating LP aero/NFT setup.

It's all an experiment, gonna have some fun with it...............just gonna try to harvest 90 healthy plants, no more, no less.
 

Deximus

Active Member
And what do you mean by "sprayed lengthwise into a separate pipe that tee's into your main stack"? I've actually thought about increasing the height of each pipe by 1.5' and placing a mister at the top, allowing the mist more room to disperse before encountering roots.
Yea, basically that thought, except instead of going straight up, Tee off at an angle halfway up your column. Imagine that your center coupling had a pipe on it instead of a plant, with a mister at the end of the pipe. I guess you could still do it if you can get creative with a hole saw ;) There would still be a pipe diameter problem... don't know if the mist would strike all the sidewalls. Depends on the size of the cone the mister produces. Just a thought.
 

Mike Young

Well-Known Member
Bob. How's the project coming along? In a perfect world you have all your parts and are finishing up the final touches. Hope you're making good progress. Can't wait to see that beast in action!
 

Bob Smith

Well-Known Member
It's coming, but unfortunately we don't live in a perfect world...........one of my John Guest fittings was cracked, so I ordered three more second day air...........also should've received my new pressure switch yesterday (turns out the original one I ordered was only for air, doh), but God decided to dump almost 2' of snow on us, so no UPS delivery yesterday.

Assuming I get the pressure switch and fittings delivered today, the system should be setup by tomorrow (most of it will be done tonight, but random wiring and other shit will run into tomorrow)...............hope to get clones in there by early next week after a couple of days of testing it out.

I've been taking pictures along the way, just haven't been uploading them - I'll throw in a shitload of pics when I'm done, and I'm gonna make a movie summarizing my entire grow room that I'll post as well........

Just as a "preview", I'm doing my best to make a copy of this box, but I'm nowhere near as skilled as he is with wood/metal/electric..........doing my best, though - it's post #355:

http://www.gardenscure.com/420/aeroponics/133136-project-forget-fogger-im-going-hp-36.html
 

Mike Young

Well-Known Member
Wow! I can see why you would want to emulate his design. That is a thing of beauty. All you wanna-be aero builders (myself included) need to check out the link bob posted. That is some serious skills put to good use right there.
 

Bob Smith

Well-Known Member
I'm actually making pretty good progress - will post some pics later on today or tomorrow...............just about done the box.
 

Deximus

Active Member
Very clean! LOL at the quick connects though. I was going to use quick connects too, until I priced them out. I realized I could rebuild with rigid PVC about 10x over for the price of fittings. I bought a backup pump instead, since that is probably more likely to fail than anything else. If I had the spare change, it certainly saves time and offers more flexible layouts though.

He's probably losing some accumulator volume to air. The air trapped in the tubing between the pump and accumulator has nowhere to go, so it'll be forced into the accumulator when it turns on. Probably not a significant thing though. I like creating a high point so all air rises to one place.. but maybe that's just me being anal.

Delrin deteriorates when exposed to mineral acids (phosphoric, sulfuric eg. "ph down"), chlorine, and hydrogen peroxide. It deteriorates to failure even with low tap water chlorine levels. One or more of these is usually present in hydroponics :( I avoided that plastic. It's often used as the ball (black color) in low priced ball valves. I didn't want to find out how long it would take to fail.

I'm probably going to have to do something similar with a box to keep the pump noise down.
 

Bob Smith

Well-Known Member
Here's some pics..........still got a ways to go, but I'm getting there - clearly my handy skills are nowhere near his level, but I'm doing my best.

And yeah, these quick connect fittings are expensive......prolly into just the fittings for $500.

Break time's over, back to work..............ugh.

1.28.11 026.jpg1.28.11 029.jpg1.28.11 030.jpg1.28.11 028.jpg1.28.11 017.jpg1.28.11 002.jpg1.28.11 014.jpg
 

Mike Young

Well-Known Member
Yeah, I imagine all that pvc wasn't too cheap either. You're blazing one hell of a trail with this one. That coliseum looks awesome. I just sat & stared in awe at it for like 5 minutes. Trying to imagine what it would look like at my house. Can't even fathom what it's gonna look like with 90 flowering ladies in it. What's the diameter of the whole thing? Pretty small footprint of 90 sites.

Get back to work!
 

Bob Smith

Well-Known Member
I initially built it using all 4" parts, and that came out to a 7' diameter (5.5' interior diameter)...........since I'm running 4 600s and not 4 1Ks, I decided a couple of weeks ago to switch it up and build the base with 3" fittings (columns and wyes are still 4"), so the diameter is now 5' (3.5' interior diameter).

Just in PVC, probably a couple of grand (not counting several hundred dollars of fuckups along the way).

Probably into my whole room for somewhere in the $15K range (likely more, in all honesty)..................it's an expensive hobby, that's for sure :)
 

Mike Young

Well-Known Member
Ouch! Yeah, I tend to downplay the cost of things as well. Especially when talking to the woman about it. Nowhere near 15K though. I try my best to use stuff I already have lyin around.

I made the switch to 12/12 yesterday. I figured since this grow has not worked out to plan, I just get a harvest under my belt and see if next time I can't get a more even canopy. I need to trim the stuff below the net, but I'm waiting for a couple areas to come up first.

38 days-4.jpg38 days-3.jpg38 days-2.jpg38 days.jpg
 

Bob Smith

Well-Known Member
Plants look really nice and healthy, good job.

As far as your screen goes - I'd make a screen for each plant (or, if possible, figure out a way to raise the middle plant to the same height as the tall plant) - when scrogging, you want as even a canopy as possible, and that's just not gonna be possible with the height variation between those two plants.

Anyhow, here's the box - just need to run to Home Depot and grab an electrical box to mount the timer in and I'm pretty much finished......


1.29.11 006.jpg1.29.11 002.jpg1.29.11 005.jpg1.29.11 004.jpg1.29.11 001.jpg1.29.11 003.jpg
1.29.11 007.jpg
 

Mike Young

Well-Known Member
Looks good. The osb ain't quite as pretty to look at, but it's about functionallity, not smooth routed corners. Can't wait to see it in action!
 

Bob Smith

Well-Known Member
Mike, are you running a chiller with your system?

Dex, what about you?

I have two chillers I could use (a 1/8th and a 1/15th, would most likely use the 1/15th because it's only gonna be like 10 gallons in my reservoir), but I'd love to be able to get away without using one (and the associated electrical costs, including a pump running 24/7 to feed it) - I mean, even if I chill my water down to 65F, by the time that water is drawn through my pump, accumulator tank, and then through the hoses, it will have been out of the reservoir for an hour or two and gotten to room temperature...........so what good is chilling it?

If the chilling is only to keep pathogens from flourishing in my reservoir, I have other ways to handle that problem.............and there's so much oxygen available to the roots at all times (both when misted and when not misted) that I can't see anerobic bacteria having the chance to flourish, no matter what the water temps.

Just rambling, would love to hear your thoughts on the matter........
 

Mike Young

Well-Known Member
My res doesn't get above 68 degrees. Even when the room hits 80. It is made out of pretty thick fiberglass, and the wood top is 1 1/4" thick. I think you could get away with insulating your res, and/or keep it out of direct view of your lights. Wrap any exposed black lines with reflective tape. What temps are you seeing now?
 

Bob Smith

Well-Known Member
Not setup yet, but I have a feeling that my rez temps will be in the mid 60s because I have 50' of stainless steel pumping 50F water through it when lights are on (drain to waste watercooled CO2 generator setup).

Just curious why my rez temps would mean anything if running HP aero...........I really can't see how it matters what the temp of my reservoir is because the water will be ~room temp by the time it hits the roots.
 
Top