Stealth Hydro Bubbleponics 1st Grow

Jmade

Active Member
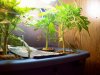
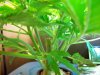
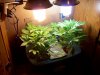
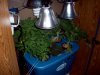
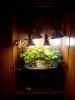
This is my First grow, I bought a Stealth Hydro bubbleponics system, with all female PPP seeds. I was inspired by and followed Roseman and purpdaddys guide.

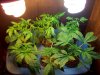
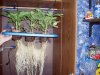
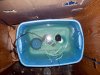
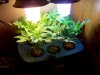
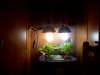
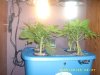
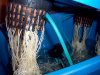
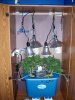
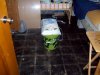
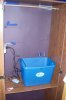
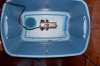
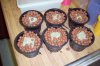
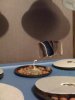
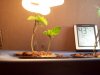
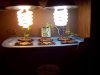
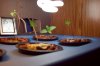
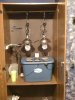
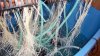
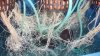
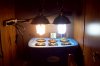
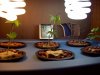
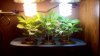
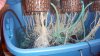
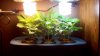
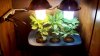
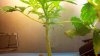
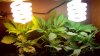
I set the Tank inside an old wooden cabinet that I have, it fit perfectly, Inserted a Dowel rod to mount the lights on, chains to hang them. things got off to an interesting start. we prepped the seeds inside the rock-wool cubes, put styrofoam discs on top of the cubes, the door had warped overtime having the cabinet letting a little bit of light in. the next day or so I had a sprout up and out looking for light, I also think that I may have had the lights up too high for the start, they started growing and shooting up way too fast, their stems couldn't hold the weight. We (my Dad and I) lowered the lights and used to stakes to help support the plants, now they have pretty big stems and seems to be taking off quite well. I picked up a water thermomitor @ a pet shop store to track the water temp, which has been great and we also put a humidifier inside the bottom of the cabinet to bring up the humidity levels. everything seems to be going good now. I have been reading and reading and scouring, I am not quite sure where to go next. My goal was to try to prep and plan everything out to have the easiest grow. So I started with all Female PPP seeds. after reading I'm not sure if the tank can now handle all six girls. I also am having a hard time understanding, executing the proper steps for Sea of Green growing with this tank. We are now at Day 28. Any and all help would and will be greatly appreciated. Thank you
 

Attachments

Roseman

Elite Rolling Society
It is not too late to do some Topping and Fiming:


Essentially there are the same, "Pruning" and "Topping", just two different commonly words used. It is also known to some as "Pinching" as well. In this page it will be refered to it as "Topping"

Topping is done to increase yield and make them bushy, bushy, promote "branching", and increase the overall yeilds of the plants. With higher overall yeilds, a grower will successfully harvest many more budds, or floral clusters, and from smaller, bushier and more compact plants.

To the indoor grower that does not use this technique, but allows their plants to grow tall, it can be a waste of their artificial lighting, and growing spaces potential. With its own natural growth pattern, and without the benifit of topping, your lady will have one main central "khola" budd, at peak flowering. Several other small branches will grow outwards, down its main stalk, with much smaller budd topps.

The natural growth pattern is to grow upwards at its main stalk. From this main central stalk will begin to grow side branches. The side branches come out as tiny shoots with leaves, and usually there are a pair of them on opposite sides of the main central stalk.

When the seed leaves have long dyed off on the main stalk. The first true seed leaves commonly can or will, wilt, dry up, or dye off of the plant as well. Once healthy new vegative growth begins the rate of growth can be very fast, with excellent lighting supplied.

As the new growth increases the light reaching the lower portions of the plants becomes less. Thusly it is common to see first leafs wilting and dying ect. Growers that see leaves wilting or dying, ect, will opt to pulling them off of the plants.

The main central stalk is topped of just above the branches that are coming out below it. A pair of scissors or your fingers can be used. Once the topping is done you can remove the two upper fans leaves as well. This will aid in the light getting to the newer vegative growth, and other shoot tips, down the main central stalk.

There are no rules to where you top your plant or how old it needs to be. As long as your plant has shoots protruding further down the main stalk it is able to be topped. When topped the growth of the plant will be concentrated towards the new, younger vegative shoots.

Once you have topped your plant(s) the younger shoots will rapidly begin growing. With the removal of the main central stalk the lower braches grow more. With topping completed we keep the plants on their regular lighting and feeding schedules.

Now each new shoot tip will essentially grow as the main stalk did, however the growth is not concentrated to only one central stalk. So as each new shoot grows outward new shoots will grow from each one of them stalks as well.

Therefore topping can be done again, and again, and as each shoot becomes a growing tip with other shoots forming down its stalk, it is removed. By completing these topping or pruning tactics, a grower can acheive any desired height, or desired bushiness, they desire in their plants.

I TOP and FIM, at the 2nd, 3rd, and 4th week, (I do a rapid Hydro grow) . Look at the results in the pic above my signature. There's a Uncle Ben on this site that has a tutorial about creating extra stalks and branches by using the same method.


Here is a link about topping -
Uncle Ben's Topping Technique to get 2 or 4 MAIN colas
 

Roseman

Elite Rolling Society
You are going to need more Height Space if you plan to VEG them to maturity for 5 weeks, or you need to start 12/12 very soon and do a SOG grow. You will yield much less with SOG, but you will get it faster.............you will get much more yield if you vEG 5 weeks, but it will take longer and you wil need more HEIGHT space.
Study this :Roseman and purpdaddys guide for my Bubbleponics setup from Stealth Hydroponic it is a condensed version of out 400 page thread.
 

Jmade

Active Member
Thanks Roseman, Last night I started to trim... I might not have known exactly what I was doing, but from what It looked like to me was that the area hitting the leaves is smaller than I thought, all the plants are overcrowding one another. I trimmed the tops down to hopefully expose more of the light to the rest of the plant, these PPP's are awesome to grow with!

We have been having a problem with the Humidity, but we got a humidifier and that will hopefully help with some of the wilting.

I'm thinking that I'll go another 6 days then change the water, and start Bloom?

We'll see how it works out, I'll keep it posted
 

Attachments

purpdaddy

Well-Known Member
hey man i was looking at your setup and your gonna need waaaay more light..They also look a lil nute burnt..they will shake bak though...looks better since you topped!
I would invest in sum more cfl"s..Trust me you gonna need em
 

Jmade

Active Member
First,

Thanks purpdaddy for stopping by and taking a look,

I wouldn't have ever imagined that I could be growing if I hadn't of read You and Roseman's guides. Thanks!

I got back up to my closet with full intentions of changing water and starting boom...

it was a disaster.

due to me location I am not able to visit but once every few days or so. my dad was looking after them, but he took off on vacation. I was thinking that we were going to be overcrowding the tank when I realized that usually people don't start with 6 fems. but I was trying to see what I could do.

The plants were touching the lights, the roots had taken over everything. I had a mess. the water looked and smelled terrible, It was like everything i had read about going wrong did. I even saw a couple of spiders (small whitish/clear) around my tank.

I had already bought a couple more CFLs for growing
Question: should I get the same size? I bought 2 150 Watt CFL 2700k or should I take them back and just buy another 300? or 2 300?

I broke everything down and cleaned it all out and removed the 2 smallest plants

Now I'm going to admit that I did all this kinda spot on, no time to jump online and read more about tackling every problem, I might have fucked the entire operation up. but I guess thats another reason why I tried this, to see what I could do, or what would happen. I have never grown any plant since like kindergarden in a 2-liter jug.

I cut/untangled to roots to get them apart from one another to re arrange them
Was this OK?

cleaned everything with hot water and ran the pump for a while afterward

changed out the water put some more grow nutes in but didnt add the entire bag, (eyeing out the -2 plants)

it smells better, and I'm hoping it will allow for more room and I'm hoping the lights should work better, it was pretty evident that these chicks were fighting each other for everything. Maybe now they can calm down and grow

My sister stopped by and checked on things for me the other day, she said they were looking good, she's gonna send me a few pics and I'll try to get them up here. (I have a pretty rad family)

if all goes well I am going to change to bloom and 12/12 in the next couple days.

Should I / Could I trim as switching to bloom?

Thanks for keeping up - you guys rock!
 

Attachments

Roseman

Elite Rolling Society
It is OK, it is fine that the roots get all tangled. Everyone's roots get all tangled up, it is OK.

And those plants have been ready for full strenght nutes for a very long time.
 

Roseman

Elite Rolling Society
IF you have the height space, you need to wait a while to start flowering, to get more yield.

Have you added any extra air stones?
 

Roseman

Elite Rolling Society
Diagnosis and Recuperation Guide


Both new leaves and mature leaves are the best indicators to determine how healthy your plants are. Any problem or illness will first manifest itself in the appearance of your leaves. These problems almost always originate from the plant's environment, PH imbalance or over-feeding and under feeding. These problems always result in what is called "nutritional lock-out".

Nutritional Lockout
Allow us to GIVE you a simplified definition of NUTRIONAL LOCKOUT.
Can you imagine sitting a plate before a child at dinner time, with his most favorite food, hot dogs, ketchup and french fries? But also on the plate is a major portion of steamed broccoli, which he is just not fond of and insists on nibbling on. Now imagine telling that child, "you can not eat the hot dog and fries if you do not eat all the broccoli too". NUTRITONAL LOCKOUT is when the child responds with "well then, I just won't eat!"

Most Hydro nutes nutrients are both nutritionally and PH balanced. But after being in your tank for 5 or 6 days, and being eaten from for 5 or 6 days, they become imbalanced. Perhaps you are growing plants that ate all the nitrogen first and just snacked around the iron, magnesium and calcium, or visa versa. The results are discoloration in the leaves, yellowing or rust spots, or curling up of leaf tips. It also becomes apparent when your plants were consuming a gallon or half gallon of water every day, and then suddenly when you check the levels the next day, they did not drink any water at all. This is NUTRITIONAL LOCKOUT.

Instead of giving lengthy descriptions of indications of overfeeding, underfeeding, ph imbalance, environmental problems and Nutritional Lockout here, it is easier to just give the remedy. Here we will refer to this remedy as THE RECUPERATION AND RECOVERY REMEDY.


THE 8 STEP RECUPERATION AND RECOVERY REMEDY

1. Check the roots. If they are discolored, reddish or brown, or present an unpleasant odor, you have a problem. If they are weak, soft or mushy, you have a problem. Also while checking the roots, observe the temperature of the water. If it is warmer than "luke warm" you have a problem. This problem is probably what is referred to as "root rot" or a disease known as PYTHIUM. Remove the dead brown roots by trimming them away with sharp scissors. Do not leave them in the tank.
2. Check the humidity and temperature of the grow area below the lights in the "growing zone" when the lights are on. A temperature of above 82 degrees or below 67 degrees will slow growth, but it is not a serious problem that will kill your plants. Temperatures below 62 degrees or above 90 degrees will stop growth. An extremely high temperature in the upper 90s or below 58 degrees can slowly result in death of your plants. The most efficient temps for growth are between 72 to 80 degrees. Any Humidity between 40 and 60 percent is acceptable and desirable.
3. Check the "lights off, nighttime" temperature. Most desirable is ten to 15 degrees cooler than the daytime "lights on" temperature, averaging 66 to 70 degrees.
4. Check the distance between the tips of the plant and the tip of the light bulb. If you observe yellowing or leaf curling tips, then move the lights one inch further away. A good rule of thumb if you use HID lights, is hold the soft palm of your hand at the leaf tip and see if the bulb is too warm to your hand. If you use Stealth Hydro's compact fluorescent bulbs, we recommend a distance of three or four inches for the 65 and 85 watt bulbs and 4 inches to five inches for the 105 watt bulbs. More mature plants can handle the bulbs slightly closer.
5. Check the position of your fans. Air movement is very necessary for the health of your plants, but too strong of a fan can cause wind burn. Direct your fan toward the tops of the plants and toward the lights. Never position the fan blowing strongly downward on the leaves.
6. Add 1/4 teaspoon of 3% hydrogen peroxide to a gallon of water and add it to the tank per 5 gallons already in the tank. Wait ten minutes and then turn the water and nutrition solution pump off to prepare to drain the tank. Poor at least a cup of clean water through each grow cup, onto each rockwool cube and through the hydroton rocks.
7. Drain or pump the tank empty as possible without damaging the pump by running it dry. Add two gallons of additional clean water with 4 teaspoons of hydrogen peroxide again and then drain it away too. Again, empty the tank as empty as possible without burning up your pump.
8. Add fresh PH balanced water and nutritional packets as prescribed. PH test it again.

The above 8 steps should repair and remedy any health problems that your plants experienced within the next two days. Now is the time to try and determine what caused the problem to start with, by investigating and researching typical hydroponics problems and illnesses. Here are a few DIAGNOSIS TIPS.


Typical Hydroponics Problems and Illnesses

Underfeeding and Weak Nutrition
The entire plant, both upper and lower leaves, will show lime or light green in color.
The plant will not eat, drink or show growth.
It is time to follow the 8 Step Remedy.

Overfeeding, Use of Too Strong Nutrients
The leaves will curl downward. They grow very dark dull flat green and then the tips show signs of burn.
It is time to follow the 8 Step Remedy.

Nutritional Lockout
You know that you have made recent PH adjustments. You might know you may have used too much of the PH Adjustment Solution. You may have failed to test the PH often enough. You notice the plants did not eat or drink because they did not consume the same amount of water they used yesterday. You see rust spots. The large lower leaves are prematurely dying and you are not in the BLOOMING or FLOWERING stage.
It is time to follow the 8 Step Remedy.

Wind Burn
You had the fan blowing downward toward the upper side of the leaves, instead of blowing up through the node spaces or toward the lights. You observe the leaves becoming dry or even crispy, perhaps shriveling, and the tips curling upward. The leaves do not appear glossy, moist and vibrant.
It is time to follow the 8 Step Remedy.

Water, Nutrition Solution or Roots Are Discolored Brown Or Have an Unpleasant Odor
You notice your water is becoming brownish in color, or smells distasteful. Your solution does not smell pleasant and appetizing like fresh lettuce. Your roots are not the same shade of white that they once were a week ago.
It is time to follow the 8 Step Remedy.
 

Jmade

Active Member
I finally got to visit and things are looking great, since I removed two, the roots are looking nice as well. I think I might have gotten a little too trim happy as it looks like a couple stems don't look too good. I heated the water up a little more when adding the nutes last time, hopefully that helped.

I don't really have a whole lot of room to grow anymore right now, this is sorta a test run to see what obstacles we may encounter, next time around we will defiantly have more room to grow larger and also start trimming sooner and help try to influence the grow.
 

Attachments

Jmade

Active Member
I switched to Bloom and added 2 additional CFLs half the power as the ones that the kit come with they are rated for 150W of regular output, but the same temp 2700K i believe

I have them on a 12/12 light rotation, I also put together a Odor stabilize mixing ONA with water then adding soil moist to absorb it, then blowing the air out of the bucket, it made a huge difference!

I have tried a couple different air stones, from some pet shops and stores but none put out like the one that ships with the kit, I'll check that air stone link out, thanks do you run the 12" and the original one that came with it or ?
 

Attachments

Jmade

Active Member
it is extremely captivating! i would highly recommend it, Roseman and Purp daddy's guides with the kit make it easy enough for you not to destroy the entire process
 

SMOK3R

Active Member
I have tried a couple different air stones, from some pet shops and stores but none put out like the one that ships with the kit, I'll check that air stone link out, thanks do you run the 12" and the original one that came with it or ?
Yes run both

Lookin good
 
Top