Construction of a Grow Cabinet - a work in progress

khujo

Well-Known Member
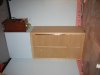
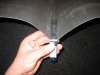
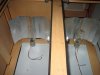
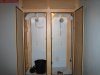
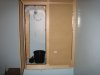
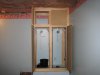
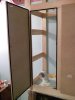
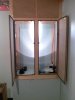
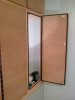
Its been a looooong time since i've documented a grow so i may be a bit rusty. The cabinet Im in the process of building will be used for flowering and cloning. Heres a breakdown of materials.

1" x 4" pine
1/8" hardboard
1/2 particle board
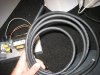
4 inch abs/pvc conduit and 90deg. elbows
90 cfm bathroom fan (high quality<--IMPORTANT)
36" continous hinge (x2) small cabinet hinges (4)
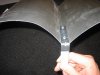
rubberized foam weather stripping

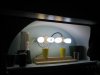
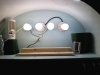
the lights Im using are:
veg - 40 watt cfls (x4)
flower - 250HPS + 175MH + 60 watts t8 floro tube side lighting

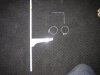
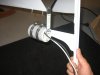
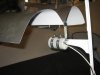
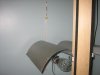
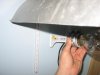
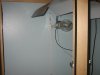
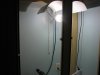
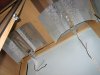
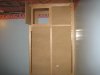
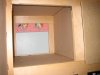
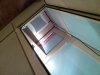
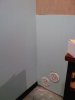
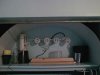
I cant figure out how to make the text appear beside the thumbnail. oh well. the big box of empty space under the cabinet actually serves a couple purposes. Its actually housing for my sump. also, it hides my 2 four inch intake ducts. The 4th picture is the intake on the indise of the box, and the 5th picture shows how these ducts are conceled underneath the grow box.

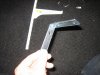
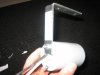
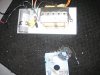
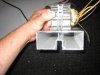
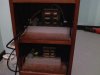
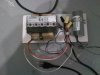
the ballasts are simple replacement kits from a local electrical supplier in which i bolted to some pieces of extruded aluminum. very cheap. the kits were $50 for the HPS and $35 for MH. the large base sockets were expensive at $20 a pop

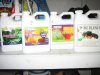
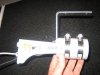
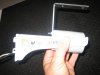
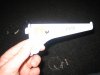
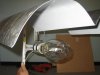
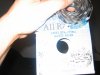
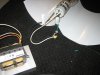
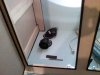
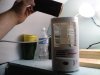
the last pic is of a mini carbon scrubber i thought id share with you guys. this little bastard is tiny, but works suprisingly well!!!

well thats is for now. i'll soon have some shots of the lights and how im going to mount them in the cabinet. just trying to fabricate the reflectors and the socket brackets at the moment.

Oh yeah and the seeds sprouted this AM too!!! SWEEEEEEEET. see you guys soon
 

Attachments

khujo

Well-Known Member
here are the sprouts i was talking about. Planted them in 2 part sultz seed starter 2 parts pearlite one part vermiculite.

2 of the seedlings are under 164 watts cfl.

two 42 watt soft white, and two 40 watt cool white...

the nutes are for later but im showing them off now :)
 

Attachments

khujo

Well-Known Member
im trying to post more pics but its says a security token is missing??? wtf does that mean?
 

khujo

Well-Known Member
the following fixture was made from parts from a hardware store. total assembly time is about 10 minutes. seriously, you couldn't ask for a simpler system. its dirt cheap too. i spent $20 on materials for 2 lights.
the materials are as follows.

shelf brackets and mountsing strip
L bracket
hose clamps
#8 nut and bolt
self tapping screws
small piece of sheet metal

the pictures tell the rest. hope this helps someone.
 

Attachments

khujo

Well-Known Member
I'll show you guys how i built the ballast, too. Its really cheap, the ballasts run VERY cool, and its very safe. The extruded aluminum that the ballast is mounted to is acting as a giant heatsink. the transformers stay so cool you can rest your hand on them. not 1000 watters though :)

materials:


Ballast kit - from local electrical supplier, 120V
extruded aluminum framing <---this is the only thing you might need to be ambitious about obtaining. but local builders, glass/aluminum shops, metal fab shops, even scrap yards will all have it, you just have to look and ask around
16 gauge wire (400 watts and over should use 14 gauge imo)
3 prong plug i used an old computer ac cord but ther 18 guage and its risky for bigger lamps, its risky period, dont do it actually, just get the male plug and buy the wire buy the foot, its cheaper and safer.
metal strapping - commonly in the plumbing section
Self-Tapping screws
 

Attachments

nemad

Well-Known Member
wow. looks proffesional. just what i wanted to see.
i like your reflector idea.

cant believe theres no coments at all..

keep us updated please :)
 

smelldatskunk

Active Member
yah man. that set up is small but official like a referee wistle!haha keep up the good work and show us the progression
 

khujo

Well-Known Member
nemad - ya i know, right?

I mean i pissed off some kid named whulkamania or some shit, maybe thats why no ones responding to my thread. lol.

AH WELL....

time to keep things rollin'. I'll do this for an audience of 2 for sure. and thanks guys for the posts. means a lot. :bigjoint:

Okay. Lastnight i installed the HPS light and the MH into the cabinet. I bought a sweet little batwing reflector from a hydro shop near by. (i was in there yesterday and this guy was buying 1000 watt MH ballasts and bulbs and said they were for his 'tropical fish' and 'live underwater plants', LOL) Anyway, the reflector i got was a speckled aluminum. The store owner swore up and down that its better than the polished aluminum and the white reflectors. anyone ever heard of the speckled alum. reflectors? are they efficient or do they break up the light to much?
i see them in like commercial fixtures and stuff and always thought they were garb. Well the one i got was HUGE. i cut it in two and mounted them on the L brackets. they look sharp if nothing else :)

Also the seedlings are looking pretty good, i'll have some pics up of them later. All thats left to do now is a final silicone caulk on the seems and hang some mylar. Oh yeah, and wire up the cloning chamber. (top left door) I might make it a mother chamber too. not sure. The small door on the right isn't a seperate chamber. it opens and acts as a service panel for the exhaust fan.
When i designed the box i should have put the two small doors on the bottom of the box. Im worried that the heat from the lamps will be too much underneath the cloning chamber. No ventilation is installed in the little clone chamber either. Im not sure if i should duct it to the main flower area, or get a seperate fan. or maybe i should say fuck the mother chamber and make the whole cabinet a flower box. I'll show you the pics and you can see it better. any feedback about this would be great. thanks

now the pics
 

Attachments

stoverdro

Well-Known Member
Its looking good!
I think with very little experience that theheat coming up form underneath could be to much or just perfect.That is with a fan.your gonna need some air moving in my opinion.
Well ill keep looking at this one keep up the work and cant wait to see the babies grow.
Im assuming your growing in soil? (hint the pot lol)
 

khujo

Well-Known Member
yep. soil. or soiless i guess you could say. Im going to be feeding nutes through the waterings. The exact mix is in an earlier post. Im not sure what type of mix im going to use when i transplant though. I have lots of new peat moss, pearlite and vermiculite. also blood meal and bone meal. Now, im kinda discouraged from home mixes because i mixed my own soil for the first time (usually i buy pro-mix, or shultz, and add pearlite) I used a mix with 2 part peat, 1 part pearlite, 1 part vermiculite. The seedlings did NOT respond well. at all. I watered with CLEAN dehumidifier water and no nutes. I think i need more pearlite. i dunno

Now im using 2 part shultz, 2 part pearlite, 1 part vermiculite, and watering with dehumidifier water and the seedlings are growing strong and healthy, so far.
 

stoverdro

Well-Known Member
Alright cool.well i hope the babies keep growing strong and healthy!
I know what blood meal is but what is bone meal? sorry if this is a dumb question but im new to the concept of growin and dont know it all ya know.
 

nemad

Well-Known Member
for seedlings dont use anything but clear soil. when theyre ready to transplant then add everything you want to add.

look at the video "ready set grow" at youtube. there is everything you need. in my opinion best marijuana growing information source.

about your grow box: those lights wont make too much hot in that small chamber? maybe seedlings didnt survive in such temperature.

hovever, i cant understand everything you just wrote, english isnt my first language & im baked as fuck! lol

dont worry about whulkmania or whats his name. hes just a kid buying cheap pc-case grow boxes for big money and getting ripped all the time. im not sure did he even grew anything in his life.

about mother-plant. i had such a idea too but i decided to use all my space for flowering only. so im getting more bud and when i see its getting to the end im growing new grow.

how will u use those upper chambers? for clones or smth?
 

khujo

Well-Known Member
LOL. i was waiting for a comment on the lovely wallpaper border. That was the hardest decision to make, pink alladin or yellow winnie the pooh!

NEMAD - thanks for the link i will check it out for sure. The lights may be too hot for the cabinet, yes. I did a test run last night for 2 hours and it got up to 36C in there WHOA!!! i might have to remove the 175 MH and put some 4' t8 floro tubes. (32 watts) i have four of them to equal 128 watts. The room temp was 30C and the cabinet was 36C, so an increase of 6C...when the winter comes i might be able to get away with using both lights.

The upper chambers is what im stuck on. only the left side is actually a chamber. the right side is just a small door that opens (its not a seperate chamber, its an easy access for the fan in the top right corner of the box.
i really dont know what to do. help me out someone. If i take out the mother chamber and clear up more room in the box it will help with the temps. OR i could keep the small chamber in the box, remove the halide lamp, and add some floros. then use the MH for veg. I really wanted to flower with both lamps though, that was the idea. Im thinking im going to take out the small chamber and just use the entire box as a single flower chamber. Its kinda pointless having 4 doors on the frigen thing but plans change, right?

and to think i originally wanted 4 chambers. hence the 4 doors. oh well, live and learn.
 

royaltenenbaum

Active Member
i like the use of the shelf bracket to hold the lights too. pretty clever. a nice and easy way to securely move the lights around.
 

stoverdro

Well-Known Member
Well about the temp situation...that really sucks specially putting the time to put the 4 doors on it ya know. If thats what you got to do to get the temp down than i would sya do it. I liek the thought of using both lights to....well let us know what your gonna do!
 

khujo

Well-Known Member
NEMAN - i'v been watching the the videos you reccommended and they are great!!! thanks man.

STOVERDRO -ya it does kinda suck eh. its nice i guess because it will make it easier to clean and maintain the fan, but i mean i wasted money on extra weather stripping, hinges, and roller catches for the 2 small doors that i really dont need.

so ya I took out the small chamber last night. now its a big 5 foot flower box with four doors on it. lol. Thats okay, the temps are way down even with the 2 lamps. 250HPS and 175MH. now that the small chamber is gone, ive got an extra 1 and a half cubic feet of space. The air flow is soooo much better, not to mention i'll be able to grow more bud :)

thanks for the help guys. I'll have the pics of the revised cabinet up in a few seconds
 

stoverdro

Well-Known Member
Well at least you got the temps down and now you got some extra height for the plants...
to bad about putting the 2 doors on in that you didnt need. But accessing the fan is def a plus. well hope all works out well and waiting for the pics
 

smelldatskunk

Active Member
yah sounds good so far! I was thinkin bout the heat issue you poasted and thought you could direct the heat up and away. Your chamber to the left will vent up into the small chamber above and inside the chamber you can add a carbon filter which will take most, if not all smell away. this will be benificial to you if your not storing your nutes or clones in the area above. Plus your exaust and filter will be hidden from view! maybe take it further and direct the heat strate up into the roof then you might still have room for things in the compartment!i dunno just a thought, you seem to know what your doing so you will figure it out.
 

khujo

Well-Known Member
thanks for the advice man. i'm kinda just piecing things together as i go along so any advice at all is beneficial.

thanks again
 
Top