Heya Everyone;
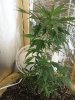
My first grow. Exciting, but scary! I got my first plant from a guy I know, so I'm going to try my best and "reward" him in a few months. I'm not sure of the type, but I'd sure like to know!
I promise to do everything I can to make this plant survive and thrive.
OK... so I've had the plant for a week now, and it's growing. Transplanted it into a 12" pot. Until up to this time, I was using a 4-tube floro and a desklamp with the plant out in the open, but today I went and made some low budget purchases . It's time to get serious about caring for the plant. I've seen to many waste away on window ledges in small containers.
So I chose to make a grow box in my ensuite bathroom for a few reasons:
1) Privacy. No guests would ever dare enter my bedroom, nevermind my ensuite.
2) Security. It's on a second floor, so there's no peeping toms, and no one questions a locking master bedroom door.
3) Odor and heat control. The exhaust to the outside is the highest point of my roof, furthest away from any neighbour. There's an A/C vent directly in behind where I'm planning to place the box.
4) Ideal location for a one plant grow. I'm not a huge operation, so I don't need a dedicated room.
5) GFI electric socket. Just added protection in case... errr.... which one is the HOT lead again??!! .
.
Went out today and got some supplies:
-2x 7/16 chip board - the sheet come in 4x8, so I asked the Home Depot guy to slice it down the middle for me. Perfect. Easy to lug home, and the exact dimensions I'm looking for. Used the skill saw to make additional cuts.
-4, 8feet 2x2's. Should have made it 5. I considered using 2x4's , but with adequate bracing, combined with the skin tension of the chipboard, this should be enough, and make for a less heavier box.
- Screws, lots and lots of screws. Here's what I got
100x #8, 1-3/4 - for attaching outer panels to frame
50x #10, 3-1/4 - for added structural support when going though 2 members of the frame, OR when going through 2 members of the frame AND a sheet of chipboard.
50x #8, 2-3/4 - for going though multiple 2x2's when hanging shelves, lighting beams, etc.
- 3 yards of electrical wire, 12-2 awg, 3 wire.
- 2 industrial plugs
- mechanical timer
- indoor/outdoor temp sensor (i'd like to read the temp without opening the door. also has a max/min function.
- personal desk fan
- 3 electrical boxes for light bulb socket.(walmart)
- 3 light bulb sockets (got these at walmart)
- 2x45W cfl
- already had 1x27W cfl
- already had 2x4" computer fans and 1amp 12V power supply
- already have some low voltage cable.
- already have a 4x40W floro ballasts and fixture, replace the shit cord and properly checked the grounding.
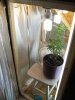
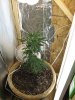
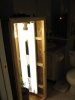
I figured a design that was 2x2x4.5' feet would be ideal... why? Because it's self-contained, somewhat lightweight ( in case of an emergency move), and it fit's my one and only plant.
I feel it's a pretty clever design, so take a look at my photos.
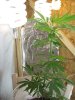
I'm having some nitrogen diffeciencies at the moment, so I'm going to post something on a different thread about that.
Let me know what you guys think, and I'll post a little bit about the construction later.
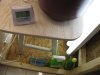
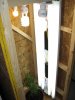
BTW, i'm trying to think of some kind of baffle to mask the light from the air intake at the bottom.. also, I'm trying to think of some kind of way to mask the light from the electrical punch-out. any ideas?
My first grow. Exciting, but scary! I got my first plant from a guy I know, so I'm going to try my best and "reward" him in a few months. I'm not sure of the type, but I'd sure like to know!
I promise to do everything I can to make this plant survive and thrive.
OK... so I've had the plant for a week now, and it's growing. Transplanted it into a 12" pot. Until up to this time, I was using a 4-tube floro and a desklamp with the plant out in the open, but today I went and made some low budget purchases
. It's time to get serious about caring for the plant. I've seen to many waste away on window ledges in small containers.So I chose to make a grow box in my ensuite bathroom for a few reasons:
1) Privacy. No guests would ever dare enter my bedroom, nevermind my ensuite.
2) Security. It's on a second floor, so there's no peeping toms, and no one questions a locking master bedroom door.
3) Odor and heat control. The exhaust to the outside is the highest point of my roof, furthest away from any neighbour. There's an A/C vent directly in behind where I'm planning to place the box.
4) Ideal location for a one plant grow. I'm not a huge operation, so I don't need a dedicated room.
5) GFI electric socket. Just added protection in case... errr.... which one is the HOT lead again??!!
.Went out today and got some supplies:
-2x 7/16 chip board - the sheet come in 4x8, so I asked the Home Depot guy to slice it down the middle for me. Perfect. Easy to lug home, and the exact dimensions I'm looking for. Used the skill saw to make additional cuts.
-4, 8feet 2x2's. Should have made it 5. I considered using 2x4's , but with adequate bracing, combined with the skin tension of the chipboard, this should be enough, and make for a less heavier box.
- Screws, lots and lots of screws. Here's what I got
100x #8, 1-3/4 - for attaching outer panels to frame
50x #10, 3-1/4 - for added structural support when going though 2 members of the frame, OR when going through 2 members of the frame AND a sheet of chipboard.
50x #8, 2-3/4 - for going though multiple 2x2's when hanging shelves, lighting beams, etc.
I can't stress enough people.. you MUST drill pilot holes when attaching 2x2's to other things. These boards are just not flexible enough and they will split. It's a pain in the ass, but it's worth it, cause you actaully get a stronger and more flexible attachment.
- PL Premium caulking-style adhesive. If you really want it strong. My design is strong enough, you don't need glue. I want the option of easy tear-down in case it needs to be relocated, though, the uniformed public may just beleive it's a shipping crate or something.
- 3 yards of electrical wire, 12-2 awg, 3 wire.
- 2 industrial plugs
- mechanical timer
- indoor/outdoor temp sensor (i'd like to read the temp without opening the door. also has a max/min function.
- personal desk fan
- 3 electrical boxes for light bulb socket.(walmart)
- 3 light bulb sockets (got these at walmart)
- 2x45W cfl
- already had 1x27W cfl
- already had 2x4" computer fans and 1amp 12V power supply
- already have some low voltage cable.
- already have a 4x40W floro ballasts and fixture, replace the shit cord and properly checked the grounding.
I figured a design that was 2x2x4.5' feet would be ideal... why? Because it's self-contained, somewhat lightweight ( in case of an emergency move), and it fit's my one and only plant.
I feel it's a pretty clever design, so take a look at my photos.
I'm having some nitrogen diffeciencies at the moment, so I'm going to post something on a different thread about that.
Let me know what you guys think, and I'll post a little bit about the construction later.
BTW, i'm trying to think of some kind of baffle to mask the light from the air intake at the bottom.. also, I'm trying to think of some kind of way to mask the light from the electrical punch-out. any ideas?
Attachments
-
 93.5 KB Views: 466
 -
 123.2 KB Views: 408