Johnny's doing it again

JohnnyPotSeed1969

Well-Known Member
Some of you may know me, others may not. I've been on the site for about a year and a half, and I must say there is a wealth of information available here for those who are willing to ask questions and read.

This will be my third attempt at growing, and hopefully my first successful attempt at growing from start to finish. To recap, my first attempt was a DWC experiment using Rubbermaid storage bins with net pots in the lid. This grow was cut short due to a sudden move, and it wasn't practical to move my flowering plants, so I had to regrettably kill them off about half-way through flowering.

After a short break of about 6 months and another move, I gave it another go with the remaining seeds I had, and a couple of bagseeds. This time I switched to using 5 gallon bucket DWC which worked great, but all the surviving plants ended up being males. During this grow, I learned some of the limitations of the setup I had, so I took some time off and planned my next grow.

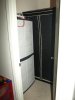
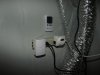
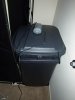
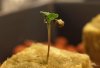
That brings me to now. I have just ordered my new beans, and with a little luck, they will arrive safe and sound along with the rest of the gear I need to complete this grow. So, I've made some upgrades to my grow room and my setup. While I liked the 5 gallon bucket grow, I kept experiencing major Ph fluctuations because of the small amount of water in each container. In addition to this, I had some minor temp problems, and discovered that I needed a better ventilation/filtration system.

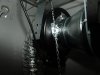
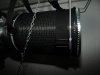
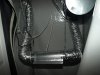
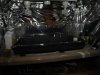
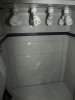
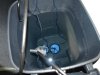
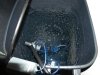
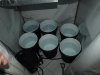
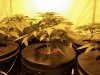
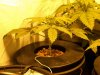
So, I bought an actual axial fan rated at 435 cfm, and constructed a home-made carbon filter. Those duct booster fans you get from the Home Depot might work fine for a small cupboard grow, but are useless in a tent situation such as mine. Additionally, I have constructed an Ebb n Flow system from my 5 gallon buckets. I went with Ebb n Flow for a number of reasons. First off, having a larger reservoir will help to eliminate wild Ph fluctuations. Secondly, by actively circulating my nute soup throughout the whole system, conditions are more identical for each plant, helping add predicatbility and stability. Thirdly, moving 5 gallon buckets with full sized plants in and out of my grow area became a pain in the ass. I almost broke off some branches many times trying to maneuver the plants and buckets trying to check Ph and nute strength. Finally, DWC's major weakness is that in the event of a power outtage or air pump failure, roots dangling in un-oxygenated water will die quickly.

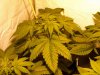
The next post will be coming shortly and I'll provide pics of my new setup, as well as further explain everything. Hang on tight, eye candy is one the way!

:peace:
 

JohnnyPotSeed1969

Well-Known Member
Okay, this racing 119.jpg is my overall setup here, it's a hydrohut within a closet. Next to it you'll see my propagation/mother chamber.

Next is the axial fan, this thing rocks! racing 121.jpg Well worth the money to get one of these. I picked it up for pretty cheap off the net, less than $90 for it.

Next pic is my home made carbon filter. About an hour's time and less than $50 to put together. racing 122.jpg

Net you see the whole system. I'm drawing air in through the filter which is attached to the fan. The fan pushes air through my cooltube and out of the hut. racing 123.jpg

I'm using a 6 bucket Ebb n Flow system utilizing a control bucket which I built myself. I'm running the whole thing off of two 18 gallon Rubbermaid containers which are stacked and using a float valve in the lower res. I have 6 inch circular air stones in both reservoirs to keep things oxygenated between cycles. racing 124.jpg

It's important to keep wiring off the floor, so I made a little control board for my HydroHut which consists of a MDF board attached to the outside of the tent with screws drilled through the inside to attach my power strip and thermometer. Nothing special. racing 125.jpg

Here you see the cloning/seed propagation chamber. I've got an agricultural heat mat under there with a decent humidity dome. racing 127.jpg

Lastly, this is my mother/makeshift veg chamber. It's not very big, but will become useful later on after I really get things cranking. racing 128.jpg

That's pretty much the nuts and bolts of the operation. I'm using a 600w Eye Hortilux bulb, and a magnetic ballast. Next upgrade will be to a digital ballast to save $$ on the electric bill and reduce the amount of heat in the actual grow space.

With the door closed to the closet and the tent closed, it's virtually impossible to hear anything out of the ordinary. I reckon I'll probably have to leave the closet door open to facilitate maximum airflow and keep temps down, but it won't be so bad. Before I invested in a quality fan, I had to keep the tent open in order to keep internal temps down, which kinda sucked since this closet is in my bedroom. It's tough to sleep 600 watts of HPS light blazing into the room.

Anyway, that's it for now. More to come as I complete final assembly of the Ebb n Flow system, and of course as soon as my beans get in, I'll update.

:peace:
 

JohnnyPotSeed1969

Well-Known Member
Well, while I'm waiting for my gear and beans to arrive, I thought I would share some of the details of my system. As earlier stated, I'm using 5 gallon buckets for my Ebb n Flow system. In order for that to become a reality, I needed to create a controller bucket which would regulate the water level in my buckets.

International Cannagraphic Magazine Forums - Ogre's DIY Ebb & Grow / Multi-Flow Controller Tutorial

That is the link to the thread which I used to construct my controller bucket. It's a very straightforward tutorial. It would not necessarily consider it to be an easy build, but if you are comfortable with wiring, then it isn't really very difficult. All told, it took me maybe 2 hours or so to put together. It even gives you parts lists with links to where you can purchase most of the stuff needed. It cost me around $150 to build, which is much cheaper than you can purchase them pre-made.

Now, I also mentioned that I made my own carbon filter. Again, this was a rather easy build. Materials are fairly cheap, and all of them save the carbon and the stockings can be found at either Home DePot or Lowes.

- Another carbon scrubber design(can filter style) Marijuana Growing

This is a pretty easy build too, only takes about 20 or 30 minutes. The best part is that it works pretty damned good and is much cheaper than you'll find anywhere on the net. I modified the design a little bit by using aluminum tape on the inside where the collar for the inner tube meets the reducer, thereby sealing the whole thing off and preventing any pieces of carbon from getting sucked into my fan.

Speaking of my fan, I picked it up here: Valueline 6 Inch Centrifugal Inline Fan - Businesslights.com These come with a 5 year manufacturer's warranty. They are solid units that move A LOT of air.

So, I hope that this gives some of you ideas out there. I would have gone with a traditional Ebb n Flow table, but I don't have the good fortune of living within 150 miles of a hydro shop, and there is no way to have a 3' x 3' tray and reservoir shipped to your door in a stealthy manner. Not to mention, I already had the buckets, so why not use them?

Updates as my gear arrives

:peace:
 

JohnnyPotSeed1969

Well-Known Member
I received my beans today and started germing them and soaking my rockwool cubes. I'm finishing up my reservoir in the morning, and I'll post some more pics once I test out the ebb n flow setup for leaks and such.

:peace:
 

JohnnyPotSeed1969

Well-Known Member
Okay, so I filled my reservoir, which is a 45 gallon rubbermaid trash can (with wheels) that I picked up from Wal Mart for pretty cheap. evenflo 004.jpg

All I did was drill some holes in the lid for my water lines, the power cord and my air lines. As you can see, I've got 2 6'' air discs at the bottom which do a pretty good job of keeping things fresh. evenflo 001.jpg

evenflo 002.jpg

Just a cheap air pump I picked up from Wal Mart that's rated for 20-60 gallons.

I did a test run of the ebb n flow controler, and things worked pretty good. I had one small leak which is easily fixed. One problem I ran into was the fill line ended up with a siphon, which caused the controler to continue draining constantly. However, I think that is as a result of unplugging the fill pump just afer it turned on (essentially priming the pump). I won't know for sure until the silicone dries (for the leak).

evenflo 003.jpg

Using 160 gph pumps, it took 23 minutes to fill the 7 buckets, and I estimate it would have taken around 20 minutes to drain. There is about 2-3'' of standing water in the bottom of the buckets, but that won't be a big deal as the plants will suck it up once the roots get that long. I plan on flooding every 5 hours. Now I'm just waiting for my beans to crack so I can get them in my cubes.
 

JohnnyPotSeed1969

Well-Known Member
Okay, in looking back, I realized that I had earlier posted that I was using 2, 18 gallon rubbermaid storage containers with a manual float valve in the bottom unit. This float valve was designed for a reverse osmosis storage tank. Reverse osmosis is a notoriously slow process, hence the low flow rate for the valve.

As you can see, I've switched to a larger unit. When I actually assembled and tested this 2 reservoir design, I ran into a huge problem; that being that the float valve did not flow well enough to prevent a massive flood from my drain pump pumping water into the top reservoir. Ergo, I switched to the larger reservoir design which suits me better. Now, I can potentially leave town for a few days and not have to worry about running out of water and/or nute/Ph problems occuring since my reservoir is so much bigger and resistant to such changes.

:peace:
 

JohnnyPotSeed1969

Well-Known Member
5 of 6 seeds cracked. Put those 5 in cubes under CFL's today, and threw another bean in a wet paper towel to bring the number up to 6. Now it's just a waiting game. Gotta make sure things don't dry out while the tap root does its magic and the seed casing drops off and we have cotyledons. Pics when something interesting happens :)

:peace:
 

JohnnyPotSeed1969

Well-Known Member
Okay, so that slow-ass bean has cracked, and one of the ones which did isn't doing anything in the cubes. Today I turned on my light to test what temps will be like, and so far we're holding steady at 86 degrees. We're having a late fall heat wave in the area, so I expect that temps will drop a little bit. This is a far cry from the last time, considering I couldn't close the tent fully without murdering my plants. So far, the fan upgrade has been worth it. I'll do another leak test of the ebb n flow system a bit later in final preparation for the transplant from my propagation chamber to the tent.

:peace:
 

JohnnyPotSeed1969

Well-Known Member
An important lesson learned today: I was doing final testing of the system in preparation for putting the plants in my tent when disaster struck. One of my brand-spanking new water pumps conked out on me. Not a good thing when I rely on both pumps to not only control the ebb n flow, but to drain and fill my reservoir as well. Always plan for the unexpected and make sure you have backups for your essential gear.

:peace:
 

JohnnyPotSeed1969

Well-Known Member
Okay, purchased a new, heavy-duty pond pump to replace the broken unit. Turns out the old pump still works, it just doesn't have the ability to push the water as high as I need for it to go anymore. So, I put it at the bottom of my reservoir and I'm using it to keep the water agitated in addition to the two six inch air disks at the bottom. Say goodbye to stagnant water :mrgreen: I am doing a final test of the system; lights on, multiple ebb n flow cycles. So far, temps have maxed out at 77 degrees, which is just about where I want them. Most of the beans have sprouted and become seedlings. I've still got them in the propagation chamber for now; most of them have not sprouted roots yet. Anyways, here are some pics of my weird seedlings. Enjoy!

:peace:
 

Attachments

JohnnyPotSeed1969

Well-Known Member
Update. I ran the system for 24 hours without a problem. Max temps reached 80 degrees, and dropped to around 73 with lights off. Now I'm just waiting for some roots to pop from the cubes before we transplant to the hydro system.

Had a slight problem with pump siphon on my fill pump. Water kept running even after the pump was shut off. I addressed the issue successfully and you can see the results here: https://www.rollitup.org/hydroponics-aeroponics/128028-stopping-pump-siphon.html

There seems to be a slight issue with this batch of seeds I ordered from Nirvana. Not the best germination rate I've ever seen. Some of the ones that did germ looked like alien babies. See the third pic in my last post. Yellow weirdness crept across some of the young seedling. Some of them simply could not "open" the seed pod all the way. I suspect that this was the cause of the yellowing, which resulted in the cotyledons dying off before they could see the light. Anyways, I started germinating my last 3, anticipating that some won't make it.

:peace:
 

jchesmore722

Active Member
that sucks about your seeds man. good luck, with the others.

im trying to plan a grow myself, its so much more work than i anticipated, not to mention money. Probably cause i want to do this perfectly and i am trying to make sure nothing can go wrong to kill my plants. i want to be able to raise them in perfect conditions.

its very addicting, i cant stop reading the forums, i learned so much in the past month or two.

this was very detailed and it seems like your setup is well thought out. good luck and keep us updated
 

JohnnyPotSeed1969

Well-Known Member
Thanks man, and good luck with your grow too!

Okay, I've transplanted the young ones into their new habitat. I was waiting for prolific root growth from the cubes before I transplanted because I didn't want them to die off. I've also started them on a 1/2 strength nutrient regimen. Currently, I've got the system set to flood every 4 hours for about 10 minutes. Once the roots reach the bottom of the buckets I'll cut it back to every 8 hours, since there will be some water left in the bottom of the buckets to keep the roots from drying out. Anyways, enough yammering, I know you guys only read these things for the pics. The first pic is of the overall layout. The next three pics are the three seedlings which did not die off. The last three are the ones I germed to replace the ones that did die off. 5 out of the 6 were pretty lanky, so I buried them deeply in the net pots, mostly so the roots would get damp during the flood cycles. Well, that's all for now, more to come in the next week.

:peace:
 

Attachments

JohnnyPotSeed1969

Well-Known Member
All 6 of them made it through the night, so their first test they passed with flying colors. I was worried there might be an issue with wilting, but thankfully that was not the case. I've got the HPS about 32'' above them, and will start gradually lowering it after it kicks back on. We're on 18/6 currently. I plan on vegging for about 3 weeks, at which point I'll take clones and put this batch into flowering. I didn't buy feminized seeds, so I'm hoping for a high male/female ratio here.

:peace:
 

JohnnyPotSeed1969

Well-Known Member
Not much to report here. Just some root growth and the adjustment period to the new surroundings. Tomorrow I'm changing my nutes again, switching over to aggressive vegetative growth formula, so I hope to see quite an explosion of growth over the next week. Thus far, Ph and PPM's have been much more stable than my DWC attempt. Switching methods to allow for a larger reservoir seems to be a smart move. I won't be posting any more pics until after the holidays, and there's not really much to see at the moment anyways.

:peace:
 

JohnnyPotSeed1969

Well-Known Member
Okay, so for the holidays I went out of town for almost 6 days. There is no one else I trust my grow to, so I did the best I could to fully automate this system to grow acceptable dope with minimal effort. Needless to say, when I arrived home again and checked on the girls, I was pleasantly surprised.

Growth had at least tripled since when I left. There was prolific root growth, and all vegetation appeared to be nice and green, overall pretty healthy looking. Temps maintained an even level, and Ph had only drifted up about .4 points; from about 5.6 to 6.04, while ppms decreased slightly. This suggests that my plants are enjoying their atmosphere.

I was highly nervous about leaving my op unattended for so long, but when I began to design this system, it was so that I could leave it alone for a few days with minimal impact. I'm hoping that the rest of this grow goes this well.

I plan on switching to 12/12 in two weeks at the most, somewhere around 12''. I'm going to clone all the survivors, and separate any boys from girls since I started with seeds. Then I'm going to veg in my propagation/cloning chamber while the first batch finishes flowering so I can get a somewhat perpetual system going here.

Anyways, here's some pics. All 6 are looking better than I could have hoped. :mrgreen:

I'll continue to post pics about once a week or so, and any updates if need be.

:peace:
 

Attachments

JohnnyPotSeed1969

Well-Known Member
Soo, things have been pretty steady so far. As you can see by the pictures from this week, growth has not been slow. I've just been leaving things alone for the most part. My last grow I smothered with attention, but this one I've been content just to peek in on them once or twice a day.

I imagine that I only have another week of full on vegetative growth to go before I can take clones. At that time, these will be right around 12". My last grow I let go till about 18" before I switched to 12/12, and had they both not been males, it would have been a precarious situation.

Anyways, with only a little more than an hour of "daylight," I have yet to change my tank for the week. This current batch of nutes has been in there two weeks now, something that would not have been possible with my last DWC attempt and yet another reason why I chose to switch to ebb n flow. At any rate, I appear to be developing a slight Nitrogen deficiency so it's time for a fresh tank. I'm running low on nutes, so I'll be putting in orders for a gallon each of General Hydroponics Micro, Grow, and Bloom. Maybe some Flora Kleen and Flora Shield for good measure.

Anyways, the pics are in the same order as last time, so as to make it easy to see who's who. Personally, #5 looks really pretty to me, hopefully it's a female because it's growth is very nice and uniform. Well, that's about it for now. I was hoping to get an upgrade for the grow room, like a nice continuous ph/tds/ec/temp meter for my tank, just to make taking readings a lot easier, but with all the nutes and additives, I'll probably have to wait for a while for an upgrade, but at least I'll have what I need. Okay guys, :peace:
 

Attachments

JohnnyPotSeed1969

Well-Known Member
Okay, so I changed out my tank and thoroughly cleaned it. Ph had drifted up less than half a point over the week. I did some trimming, snipped off the lower 1/3 or so of them in order to force less lateral growth since I have more vertical than horizontal space to work with. Put in my order for new nutes, plus the Flora Kleen and Flora Shield just in case I have issues with root rot or nutrient lockout.

I was almost out of micro and bloom today when I changed, so nutrient strength is much less than I would like, but it will temporarily solve the nitrogen defficiency issue which was just starting to happen. I also switched my pump timers to go off every 8 hours instead of every 4 while root growth was establishing itself. Hopefully the increase in oxygen to the roots will result in even more explosive growth. Anyways, pics are in the same order as always. More updates when my nutes get here.

:peace:
 

Attachments

Top