20 site clone machine

WHAT IS YOUR FAVORITE WAY TO CLONE

  • HYDROPONIC CLONER

    Votes: 33 21.9%
  • ROCKWOOL CUBES

    Votes: 52 34.4%
  • AEROPONICS CLONER

    Votes: 33 21.9%
  • PUT CUTTINGS IN SOIL

    Votes: 33 21.9%

  • Total voters
    151

grodrowithme

Well-Known Member
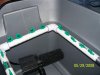
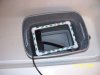
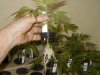
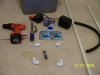
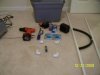
this is a very simple easy and cheap to build cloner and works very well ive gotten 1000s out of mine. listed below are the materials and tools you will need to build this setup


material's
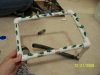
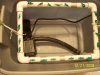
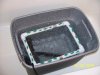
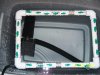
1. 10 gallon rubbermaid container

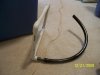
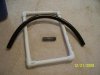
2. get about 10 feet of half inch pvc pipe the reason i say 10 and you only need 5 is you may mess it up or you may want to build another 1

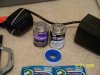
3. pipe cleaner (primer) and the glue (CEMENT) and plumber tape

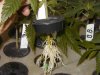
4. 20 net pots (i will check not 100% but i think there 1 inch)

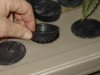
5. 20 neoprene collars to fit

6. 20 sprinkler head tips the little plastic 1s you screw in to pipe dont matter what kind AS LONG AS THEY SPRAY 360 DEGREES

7. 3 half inch 90 degre elbows (the little L shape pipe connector)

8. 1 3 way with female adapter on the bottom you will have a square in your hand and 1 corner will have a piece to screw in a male hose adapter pointing down

9. 1 male hose adapter (pipe clamp if you want)

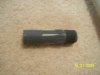
10. 4 foot (cut to size) 3 quarter inch black tubing for pump to pipe

11. 250 gph submersible pump

NOTE: ITEMS 1 THROUGH 9 YOU CAN GET AT HOME DEPOT OR LOWES 10 & 11 A POND GARDEN SHOP IS YOUR BEST BET OR A PLACE THAT SELLS FOUNTAINS AS THATS ALL THE PUMP IS IS A FOUNTAIN PUMP

TOOLS:

1. hacksaw

2. hole saw or jig saw something to cut your top for the net pots

3. tape measure

4. sharpie

5. siccors

6. a work area so you dont make a mess glueing the pipe together


7. an electric drill and a bit to match your sprinkler size
 

Attachments

grodrowithme

Well-Known Member
1st step

cut your pipe assuming you got every thing i told you these measurments will be right you can change the size by getting bigger rubber maid cut pipe bigger and get bigger pump

cut 2 pieces 12" long

cut 2 pieces 8 inches long

use hacksaw or electric saw whatever you got

heres the messy part the cleaner and glue do these 1 at a time (MAKE A LITTLE MARK ON THE END OF YOUR PIPE AND A MARK ON YOUR ELBOWS LINE THEM UP TO KEEP IT STRAIGHT)

clean and glue each pipe together 1 end at a time (dont clean and put glue on both ends take time and line up plus it drys pretty fast)

you should now have a square in your hand and ready to drill holes

only use 16 sprinkler heads 5 on each 12" sine and 3 on each 8" side all you do is drill the hole and screw them in it should now look like the first 2 pics
(NOTE I DONT GOT MY 8" SIDES IN YET)

NOW TAKE THE PLUMBER TAPE AND WRAP IT A COUPLE TIMES AROUND THE MALE HOSE ADAPTER NOW SCRE IT IN TIGHT TO THE FEMALE (PIECE POINTING DOWN ON 1 OF YOUR CORNERS)

connect the 3 quarter inch tubing to the other end of the male adapter
you can put your pipe clamp on here if you want if not stick other end of tubing to pump sit in tub situiate it theres 2 little holes in the handle (GET THE FOUNTAIN CLAY FROM THE POND GARDEN STORE TO COVER) run some wire through the wholes to hold it up and in place cover on both sides with fountain clay

your done with that part now time for the lid
 

Attachments

grodrowithme

Well-Known Member


please no 1 post in here i got 1 more set to go and it will be done then all ?s and comments are welcome i will have it finshed monday night for sure thanks check out my journal in the mean time tell me what you think thanks fo not posting till im done
 

grodrowithme

Well-Known Member
i got a video of the first 1 i made ima try and post it so yall can see it this is the simpliest cloner u can make or buy or use the highest thing is the pump it is about 60 to 65 the same cloner sells at my localhydro shop for 400.00 you can build this 1 for like 100 to 120 luckliy my wife runs a pond garden store and i get really good deals i get my pump for like 30 or 35

note these are pictures and video of the first 1 i built but it is the same the exact same thing built the same exact same way enjoy till i get it finshed tomorrow


OK I HAD TO PUT THE VIDEOS ON YOUTUBE THEY ARE APPROVING IT AND I WILL POST THE LINK
 

Attachments

grodrowithme

Well-Known Member
ok here is the rest of it the lid and your ready

match your net pots with the holesaw you use cut it out put em en and your good to go also there is a pic of the cord coming out as you can see i cut out a little notch so it fits in it perfect you should also cover it in the fountain clay to

http://www.youtube.com/watch?v=IhEqv0gcilM

theres a short clip of it working it wont let me post the pics right now will try again later thanks for the patience
 

grodrowithme

Well-Known Member
it still will not leat me post these last pics ive been having such trouble uploading album and post pics any 1 having the same problems or does any 1 no why its not working
 

TheFaux

New Member
Hey bro, you coul always lose the net cups and stick with the neoprene. I don't understand why the pre-fabbers use them as the roots only get tangled and they block out some water. Also, maybe you could just use like 4 misters to get the same results?
 

grodrowithme

Well-Known Member
its still not letting me post the last pics sorry for all of you who are waiting to see how to finish the top and stuff i will try 1 more time to night


FDD do you know why its not letting me put up these pics
 

grodrowithme

Well-Known Member
i have the pics to upload to show people the finished product but its still being weird thanks to all with patience
 

tat2ue

Well-Known Member
I built one similar to yours but I took a pair of sissors and cut the bottom two thirds of 2 inch net pots and put them in the lid and put my neoprene collars in them. It makes it a heck of a lot easier to get them in and out of the lid with any damage to the stem or roots.
 

Attachments

grodrowithme

Well-Known Member
i dont cut the bottom off i cut it up the side and cut the bottom out of it i leave it whole and cut it up the side and th circle out the bottom for the same reasons cause it was hard to get them out
 

mrduke

Well-Known Member
how long do you have to leave these in here? how easy is it to transplant to hydroton? should they be trans.ed when they look like TAT2UE's? i'm gettin ready to build one of these and start to clone.
 

tat2ue

Well-Known Member
I use tap water that has been sitting in buckets for at least 24 hours to remove the chlorine. Then I add Clonex rooting solution and then adjust the ph to around 5.5 to 5.8
 

tat2ue

Well-Known Member
what do you mix in your water? super thrive? rooting powder? nutes? also what ph?
I usually let them go about 2 weeks (like the one in my pic) so the roots get thick and full and then I center them in my net pot and add the hydroton. Then they go straight to the flower room into one of my 8 foot ebb and flow tables
 

mrduke

Well-Known Member
hey tat what kinda light do you use with your cloner would a 2' 24w cfl be enough? might be building one of these next week.
 

whatapothead

Well-Known Member
bought all my supplies yesterday. will be building a 50 site one from a 35gal rubbermaid and a 330gph pump. all cost me $100 with a few tools i wanted to make it easier as well.

thanks for the water solution.

how far down should the rectangle pvc be from the lid? or does that kind of depend on the sprayers? i won't have net pots, just neoprene discs.
 
Top