DIY COB reflectors

FranJan

Well-Known Member
^^^^There's a smart little mod. And you know what's good about that too, they help shield the COB from your eyes when you work around them and if your tent or whatever you use to hold your lights up collapses it will help prevent your COBs burning a hole in the floor or God forbid lighting something on fire. I ruined two bedsheets and almost a bed when I was testing my Vero 18s, I can't imagine the damage a 3590 or a Vero 29 would of done.
 

churchhaze

Well-Known Member
I have 4 brown marks on my floor in a square pattern from leaving a vero 18 UFO killer at 500mA on the wood floor for just 30 seconds or so.

Definitely a fire hazard, even at low output.

^^^^There's a smart little mod. And you know what's good about that too, they help shield the COB from your eyes when you work around them and if your tent or whatever you use to hold your lights up collapses it will help prevent your COBs burning a hole in the floor or God forbid lighting something on fire. I ruined two bedsheets and almost a bed when I was testing my Vero 18s, I can't imagine the damage a 3590 or a Vero 29 would of done.
 

FranJan

Well-Known Member
I have 4 brown marks on my floor in a square pattern from leaving a vero 18 UFO killer at 500mA on the wood floor for just 30 seconds or so.

Definitely a fire hazard, even at low output.
Yeah I've definitely been looking at my COBs as unacceptable as far as fire hazards go. Been thinking about an enclosed lens and just accepting the loss of output as fire insurance. Think I'm going to stop by the houseware section of some store soon. The Ledil option would be $50.00+ and I just don't want to eat that when I can just spend Christmas in my brother in laws basement smoking bowls whilst polishing little bowls. I can already hear my phone conversation with my Mom sometime this weekend. It'll be like this.

"Hello Mom, It's your beloved son Fran. So I've finally figured out what you can get me for Christmas. Yeah just get me a gift card from Bed Bath and Beyond. Yeah, it's for new sheets and kitchen bowls. Uhmmmm, don't ask."
 

SupraSPL

Well-Known Member
Melted a little hole in my carpet while working with an overdriven CXA1512. I wonder if the CXA3070 at 1.4 would ignite plastic tarp or carpet. Maybe a canvas drop cloth would be an option.

I always hang the modules with chain or galvanized wire, so I figure either the entire structure would need to come down or both chains would have to break for it to fall. Also like MC130p pointed out, the wires would pull loose. So in my case the best thing I could do for fire safety is reinforce the strength of the wood frame that supports all the modules, probably a worthwhile thing to do.

Another thing we could do is add bumpers to the surface of the modules so if it fell face down the bumpers would keep the COBs from touching the ground. The dangerous heat is only in the first few mm in front of the emitter.
 
Last edited:

stardustsailor

Well-Known Member
Yeah I've definitely been looking at my COBs as unacceptable as far as fire hazards go. Been thinking about an enclosed lens and just accepting the loss of output as fire insurance. Think I'm going to stop by the houseware section of some store soon. The Ledil option would be $50.00+ and I just don't want to eat that when I can just spend Christmas in my brother in laws basement smoking bowls whilst polishing little bowls. I can already hear my phone conversation with my Mom sometime this weekend. It'll be like this.

"Hello Mom, It's your beloved son Fran. So I've finally figured out what you can get me for Christmas. Yeah just get me a gift card from Bed Bath and Beyond. Yeah, it's for new sheets and kitchen bowls. Uhmmmm, don't ask."
LOL!
:lol::lol::lol::lol::lol:

Well,Fran,I gave it a try ..
Actually it did not took me long ..Probably less than two hours of my life ...
Other things troubled me ,to be honest ..
Follow on, to see by yourself ...

The parts list a used :

2x INOX bowls ( 50 mm Dia. base ,40 mm height ,90 mm DIa opening.)
1x 3mm HSS drill (for the screw -holes )
1x 32 mm Hss drill cup (for the LES opening )
1x 6mm HSS drill (for cleaning the edges of the 3mm holes )
1x High Temperature glossy white spray can
15 gr Citric Acid (steel passivation bath ,in order paint to adhere somewhat better )
150 ml distilled water
180-600-2500 grit sand papers and a tad of WD40
Fat/paint Solvent (Acetone used )

I've started from here :
PC201952.JPG

In order to make these DIY ~ 80° COB led reflectors ...
PC201953.JPG

PC201954.JPG

PC201957.JPG

They still need some paint job and furnacing to be completely finished ...

Two issues :

1)Because firstly the light was designed and afterwards came the reflectors ....
Of course they do not fit !
:cuss::cuss::cuss::cuss::cuss:
PC201960.JPG
Murphy's F&^$*&^%##$^ laws !!!

2 ) ...Hm...For a high tech solid state horticultural light ...
When upside down .....
It kinda looks ....
More like a high-tech camping stove ,'doing' eggs ...
PC201961.JPG

:shock:.....

At least I've made myself a pair of reflectors for the next fixture ...
:P


Cheers.
:peace:
 
Last edited:

salmonetin

Well-Known Member
...i like your diy reflectors (old and news)...heatsink size needed for 4 cobs with this reflectors... maybe with 200mm silent fan?...
...maybe 4 its too much... ...3 cobs with reflectors and 200mm silent fan... in my mind i see your heatsink with moore fins for moore individual channels for cobs ...rectangular form off course...but then air go on front and rear side...:roll:... maybe add an deflector for air on front side...

...off course i love campings stoves too... ...even with moore cups and eggs...;)

saludos
 
Last edited:

stardustsailor

Well-Known Member
Hm...
Did some testing with one of them installed ...

But firstly ,one another issue that 'poped-up ,has to be adressed..
Those reflectors can be used only with the molex EZ connector ...

:cuss::cuss::cuss::cuss::cuss:

PC201965.JPG

Temporarily ,in order to test them and see at least ,the pattern made ....
Spacers used ...
PC201975.JPG

And on with the test ....

PC201966.JPG

PC201973.JPG

PC201969.JPG

Pretty much a light cone ...

Measured the Diameter (all ,semi-shade included ) and the distance .
Did couple of different distance measurements ...
Tan = H/ R ...
Results ...
Angle of cone ...84°-90° ...
A bit the spacers ,a tad the white light dispersion ,a bit more the measurement errors...
Most probably a 85°-90° reflector...
Cool ..

Cheers.
:peace:
 

SupraSPL

Well-Known Member
SDS... Awesome job bro!! I think a set of righteous reflectors could increase the yield from that lamp by 30% (especially in my tents which have walkways on 2 sides). I would be interested to see if you can confirm that satin white reflects more light than glossy? (~5% more light from my testing)
 
Last edited:

FranJan

Well-Known Member
Amazing SDS, I just love the way you build things. It's like, "snap" and it's done 8). Almost like you're one of Santa's elves that got banished for getting high with one of his magic reindeer on Christmas Eve and now you just chill with humanity :). LOL

Now I'm not saying this model exactly but could someone just install the COB directly onto a pan or bowl made from the materials like this one uses? It would probably cost too much and the effort to find the right bowl might be Herculian, but could you run a COB on something like this? Or if you can find an all Al bowl like SDS is using and just install it on there? Once these Christmas crowds die down I'm heading straight to Chinatown in Manhattan where they have restaurant supplies stores on every block. I can see that conversation too :roll::
"What's that? No, I don't need a massage from some 17 year old girl, I'm looking for a frying pan so my fried eggs won't fry?"
The poor guy is gonna think I'm stoned and he'll be right :)!

http://www.ebay.com/itm/251751174342?redirect=mobile

"This versatile, medium-sized skillet features durable, hard-anodized construction crafted with copper to promote optimum heat control, and its double full cap base includes a copper core layered between aluminum and magnetized stainless steel"
 

stardustsailor

Well-Known Member
Amazing SDS, I just love the way you build things. It's like, "snap" and it's done 8). Almost like you're one of Santa's elves that got banished for getting high with one of his magic reindeer on Christmas Eve and now you just chill with humanity :). LOL

Now I'm not saying this model exactly but could someone just install the COB directly onto a pan or bowl made from the materials like this one uses? It would probably cost too much and the effort to find the right bowl might be Herculian, but could you run a COB on something like this? Or if you can find an all Al bowl like SDS is using and just install it on there? Once these Christmas crowds die down I'm heading straight to Chinatown in Manhattan where they have restaurant supplies stores on every block. I can see that conversation too :roll::
"What's that? No, I don't need a massage from some 17 year old girl, I'm looking for a frying pan so my fried eggs won't fry?"
The poor guy is gonna think I'm stoned and he'll be right :)!

http://www.ebay.com/itm/251751174342?redirect=mobile

"This versatile, medium-sized skillet features durable, hard-anodized construction crafted with copper to promote optimum heat control, and its double full cap base includes a copper core layered between aluminum and magnetized stainless steel"
Pretty cool .Still needs additional fins,though ..
Or water -cooling ...
A giant reflector +MCPCB ...

Pretty interesting idea ..
This might be the start of a
DIY avalanche ,who knows ...

Com' on ,by now ,at least I should have earned the title of a 'Skilled DIYer ' ...
And..
Come to thing about it ...I also look like an elf ..
..Sort of ..

Cheers.
:peace:
 

stardustsailor

Well-Known Member
SDS... Awesome job bro!! I think a set of righteous reflectors could increase the yield from that lamp by 30% (especially in my tents which have walkways on 2 sides). I would be interested to see if you can confirm that satin white reflects more light than glossy? (~5% more light from my testing)
Thats is a tad complex ...
As a general rule for white paint finishes ...
(perecentages are not real mean values,but relative only for comparison resons )
It goes like this :

White paint finish ---- Light Absorption ---- Diffuse reflection ---Specular reflection

(Way rough guide ..Lots of salt grains along with ,said the Doc...)
1) Matte-----5%----- 90% -----5%
2) Satin-----3% -----80%-----17%
3) Semi-gloss-----3% -----47% ----- 50%
4) Full Gloss -----1%-----9% ------90%

As you see the more to the matte the more the light absorbtion ...
But ..Due to extreme diffusion ,light power is more evenly distributed ,
while on full gloss ,due to extreme specullar diffusion ,you can have extreme differences in power distribution of incident light ('projected' base of the light cone ),within the cm range or even the mm range !

I like the full matte option ,or a compromise ,the satin option .
But I could not find any high-Tempo white paint ,like that .
Onbly glossy for the time being ...

And ...
Another idea ..
A tad more " high-bayish" solution ...
PC201978.JPG

Still clearance between bowl and solder joints is unacceptable .
The molex connectors seem a 'must' with " bowl-reflectors"

Cheers.
 

stardustsailor

Well-Known Member
With a shielding angle of ~74°-80° ,those small stainless steel reflectors ,project the light ,
at a approx conical shape ,with an cone angle of 80°-90° (~4 mm spacing provided from Array -reflector bottom . )

So,more or less ,the "bowl-shaped or conical -shaped " D.I.Y reflectors with white reflection surface ,
they emit a cone of light ,with the angle oif cone being similar or enogh close to the shielding angle of reflector ...
shielding angle.JPG


mat.JPG

lambsurf.JPG
 

stardustsailor

Well-Known Member
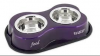
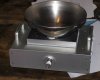
In detail the "DIY INOX peanut bowl COB-LED reflector method"

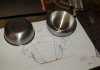
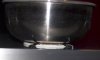
1) Measure and mark ,the LES opening and attachment holes at the inside of the bowl's base.
Be as precise as possible at that step.

2) Drill the attachment holes (usually a 3 mm HSS / Cobalt / Titanium drill -bit needed ) .

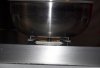
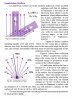
3)Drill the LES opening . ( A 30-32 mm Dia. drill /saw Cup will be fine.Use low rpm. I used something these ones :
saw cup.jpg

4 ) Make sure that all the drilled openings have smooth edges ,free of metal-work spikez,chipz,etc
Use a 180 grit sand paper .

5 ) Sand paper the whole inner reflective surface .
Make sure you do a good job.
Use 100-200 grit .You want a rough finish ..


6) Clean & Degrease with a solvent .

7) Dip the reflector in a warm bath (50°-70° ) of 10% w/w citric acid solution.
(Citric acid is sold at most super markets ,usually where salt,pepper and rest are located.. _)
Leave for 30 minutes.Wash with clean water and degrease once again.

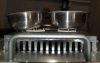
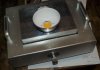
8 ) preheat reflector(s) at 40-50 C ,at kitchens oven,...

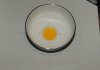
9) Paint a first thin layer( 25-50 micron ) of HIgh Temperature White . (preferably matte or satin finish )

10 ) bake at ~70 C for 30 min ..

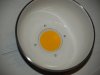
11 ) paint second layer,a tad thicker .(50-70 micron )

12) bake at 100C for 15 min .


Optional steps:
13) paint 3rd layer ,a thick one (80-100micron )
14 ) bake at 150 C for 8-9 min .

---

Leave to cool down and dry for 48 hours .
Re-bake at 100 C for 15 min.
(making sure most VOCs are outgassed )

Reflector(s) ready for use.

Cheers.
:peace:
 
Top