dankasaurusrex
Well-Known Member
First off, hello to the Rollitup Family! I'm so happy to see this site up after the bastards took down Overgrow.com.
Secondly, this is just an attempt to help anyone looking to do a DWC and provide you instructions to do it on your own if you’d like. Whereas I am a tremendous geek and keep as meticulous of records both on paper and via photographs as possible, I’m no professional grower. If I’m stating something wrong in here, then feel free to correct me. There’s probably at least one thing even the most experienced of us growers can learn from anyone. Yes, I’ve learned stuff from complete beginners before.
My setup is in my garage in the SF Bay area. I’m a prop 215 patient and grow primarily for my own consumption. Everything read in the following grow/build journal I did 100% legal thanks to the great state of California’s legal and medical system.
So here are the materials you’re going to need.
(4) 10’ long 2x4s - $10 at Home Depot
(6) 8’ long 2x4s –$18 at Home Depot
(6) 4x8ft sheets of 3/8” plywood –$60 at home depot
(7) 2x1 board for framing the doors out on the inside - $8
Nails or screws to put it together with. – ($10). I must admit however I had the luxury of a framing nail gun and have an air compressor, so it went together much faster than had I used screws and a drill drive.
(2) Rubbermaid 18 Gallon Tubs (see photos) - $14
(1) Plastic spigot for draining the tub. -$3 at homebrew store
(12) Ft of food grade soft tubing to hook to the spigot and my fill pump $12
(20) Ft of panda film - $20
(1)HPS setup (I went with a NextGen 400 Digital ballast, Hortilux bulb, and CoolTube reflector) but there are many many options out there. - $280 You can certainly save a buck by using traditional ballasts, but having used both....I'm a believer in the digitals.
(1) 160cfm computer fan for intake -$10
(1) 8 inch clamp fan for under the canopy - $8 at Walgreens
(1) 16” wall mount oscillating fan $36
(1) 8” 500 cfm booster fan from amazon.com - $41 http://www.amazon.com/gp/product/B0007N73EQ/ref=ox_ya_oh_product
(1)6”to 8” sheet metal flange at home depot -$5
(1) Box of hydrofarm ducting - $10 or so. I will use standard insulated ducting going forward. Much less noise and sometimes even less expensive from hardware stores.
(1) bag of Hydroton
(1) General Hydroponics dual diaphragm air pump -$59. Pricey, but worth every penny.
(1) Petco 4 way pump, $28. This is for redundancy just in case your main pump has an issue. You can never have too much air with DWC. This pump puts out roughly 1/2 the air of the gen hydro pump. You can just tell by looking at the bubble stones.
(4) grow disc – airstones -$25 total. Doesn’t have to be grow discs, but I prefer them because they are heavy enough to stay on the bottom.
(2) Heavy airstones -$10 this is for the redundant pump. I use an aquarium T to take it down to a 2 outlet pump and run two extra airstones off of it. This is how you will see in my photos I have six holes drilled for air hoses.
(1) Carbon filter. ($40) I use an Odorsok because it has lower CFM requirements and I’m only using a booster fan. After this crop I’m going to upgrade to a more industrial exhaust fan. Perhaps something from CanFan, but I'll cross that bridge when it comes.
(1) 4x3 piece of rubber matting got at home depot ($6)
(1) 4.5ft segment of chicken wire. Next round I will look for something with slightly bigger holes for the buds to come up through. - $5
(4) 4”netpots - $5
(2) Handles for the cabinet - $2
(4) Heavy duty hinges for the doors - $13
(2) 50lb magnets for the doors $10
(1) Latch for the padlock ($5)
(1) Padlock ($5-$30 depending on your level of paranoia)
(1) Cheap fish pond fountain pump to refill your reservoir - $30
Here’s the tools you need or would be ideal:
A Dremel.
This tool is worth its weight in gold when needing to make small holes for electricity to come in, ducting, and when cutting holes for the netpots. Literally cuts the time in 1/10th. I have a good friend that uses a drill and hole saw which works actually a bit better. But I have a dremel, so that's what I used.
A circular saw. If you draw up your dimensions in advance they will cut the pieces for you for a small price at home depot. I did this and it probably saved me 2 hours of measuring, marking, checking, cutting, messing up, etc… Not to mention they use on the of best saws money can buy, so the cuts are clean. If not, it’s perfectly cool to cut your own wood. it obviously ust takes more time.
A good staple gun. Hanging Panda film is quite a bit faster with a staple gun. I use the thickest panda film my grow shop sells, if using thin film….then put a piece of duct tape on it before stapling that piece up.
Duct tape – Dark or reflective tape to cover the container. IF THIS IS NOT DONE, ALGAE WILL GROW!! Why is it in all capital letters? Because dummy….this is an important step! just kidding on the dummy part. But seriously, you’ll have an algae farm going if you don’t cover as much as humanly possible of your reservoir with duct tape or something that will keep the light out. Sadly, I know this from experience. Take my loss and turn it into your gain!
White duct tape – Seals up Panda film, looks great, and is more reflective than standard duct tape.At one point I considered covering my growroom walls with it. I love it that much!
A PH Meter ($85 for the Oakton I have), a PPM Meter (I have two, both were around $30) they are not as accurate compared to the high end Hanna testers, but are always within 30-40ppm when I test them in a calibration solution and are easy to re-calibrate. I don’t push my plants in DWC too hard, so this works just fine.
A magnification loop – I personally believe in the ¾ Trichs being cloudy or amber before harvesting. Let's please not turn this one into a huge debate. I've read great arguments for when to pull your crop. This works great for me. If something else works better for you, I'm certainly interested in hearing about it. But don't want to try and claim mine is gospel......it just works well for me
A good knife – Too many uses to mention.
Additional tub the same size as your res for pre-mixing nutes.
Here are the nutes that work for me:
1st off, my home H20 is under 65ppm so it's pretty clean. I am experimenting now with distilled H2O to see if I can tell a difference. I'll keep you posted as to what my charts turn up!
I use General Hydro Flora Nova series. Why? Because General Hydro has done what they do for longer than I have been alive. The Flora Nova solution is one part, so I can have a few beers while mixing nutes and not have an awwwww shit moment (again, learned from experience). I usually keep it in a pan of hot (not boiling or anything, just faucet hot) for 20 minutes before mixing and shaking it. It seems to make it less gooey! Ultimately I must admit I'm lazy to a certain degree and like the one shot factor of the Flora Nova. For what it's worth I've used the 3 part solution for a while now and believe the Flora Nova is much better. But again. That's just my experience.
I use Botanicare CalMag
I use Bob’s Brew for my H20 conditioning. Check out the link below.
http://bobsbrew.net/products/watermax/
I use General Hydroponics Kool Bloom during flowering.
More on nutes in a bit. Now let’s get down to the nitty gritty.
First Frame out your closet. Mine is 10ft tall in my garage. The actual cabinet floor is raised 2 feet off of the floor for storage, but mostly because it’s much easier to deal with hydro solutions and testing when not having to hunch over.

Also, but putting it 2 feet off the floor you can use a standard 8x4 sheet of plywood for both the front and back and just cut the one in front in half and you've got your doors! Next I run all the exension cords in to the box (I use one thick gauge one and smaller power strips and such inside. One note on power strips, most of the time they have lights on them. Do yourself a favor and tape them in the on position with some electrical tape to keep lights out during your dark period. After electrical is in place I hang my panda film and put a rubber mat on the bottom as well as cut the hole for my lung box and run my ductiing.
I've also built out a "lung box" to handle all exhaust fans for which I can install noise/smell reduction materials and ventilate the hot air out the top where it rises naturally.
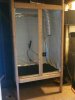
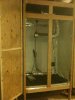
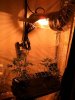
Here's a shot of me testing the setup from a ventilation and lighting perspective. Also, note the 2x1 boards I used to frame the inside of the door. Without these, it's very difficult to screw hinges in place to hold your doors in tact.
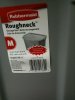
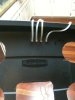
Here's a shot of the tub I use for a reservoir. It's an 18 gallon Roughneck by Rubbermaid. I've tried all sorts of different tubs and buckets. This is hands down the best for my particular setup.
Then I draw the holes for the netpots and use my dremel to cut them out. Be very careful here. You want a VERY tight fit. I have a Chemdawg D plant that got angry and pushed my netpot down in the reservoir once it found out it couldn't penetrate the screen as much as it wanted to!! The hole was just a tad too big and the result was me having to do some serious Macgyvering (that's a word right?) to make it workout. Luckily, all is well")
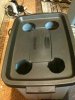
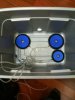
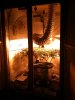
Next I cut a porthole to add H2O and Nutes through, for which I cover with a black rubber flap when not opened to keep light out, as well as holes for my airtubes to the airstones. I also cut a 1" hole for the spigot and use silicone to seal it along with the rubber gasket it comes with and thread and screw. It has never once leaked on me.
And of course here's what the bottom of the tub ends up looking like. My next setup will be 4 large discs and I'll run a t out of each pump to have four very powerful inputs.
Next....the grow process.
I use 4" netpots with Hydroton. FLUSH YOUR HYDROTON. Flush it in a strainer, float it in some water, ph it down to around 5.8 to 6. Let it sit and make sure it's stable. I've skipped this step and had my PH all over the place. I usually just flush it under hot water initially in a net pot, then soak it for 15-30 minutes.
Using the exact Roughneck I use (18 gallons). I fill each and every time to the 12 Gallon Mark. This ends up putting your netpots about an inch above the water. If it's the very first week or so, you can go ahead and bring it up to the bottom of the netpots to promote extra root growth. But beware, because too much H20 on that poor little clone or seedling can cause stem rot and kill it. But with the pumps I'm using, there's plenty of splatter to keep the bottom of the netpots moist. So I usually keep my 1" rockwool cubes either from seed or clone near the top of the netpot. I do not however transplant until there is nice root growth out of the bottom of the cube.
Initially I add FloraNova Grow to about 200ppm, then add 1/8 cup or so of Cal Mag, and 12ML (one per gallon) of Bob's Brew. Bobs brew is the shit. For those of you who have not used it, I strongly advise checking it out. It acts in a similar manner to Hydrogen Peroxide, but doesn't harm your plants, keeps the water smelling and looking clean, and keeps your roots pearly white. The company claim is that it helps prevent Calcium and Manesium lockout. I'm a believer. Again, that worked for me. Don't take it as gospel.
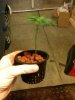
At week one my girls looked like this (willies wonder for those of you who are curious):
At Two weeks they looked like this: (1st Willies 2nd one is Chemdawg D)
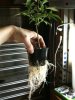

As you can see, Bobs brew is giving me nice white roots. Healthy as can be!
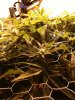
After vegging for another week or so, I installed a chickenwire screen. I've now learned that I should have gotten screen with larger holes because some of the buds are actually fat enough that they are getting cut off. Go with the 2"square screen. Or you can do what I do, which is use my tin snips and just make room where buds need more room to come through.
Chickenwire is certainly cheap enough. Here's a shot of the chickenwire in on day 1
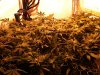
Here's what the screen looked like at the end of week 1. I installed it 18 inches above my reservoir , but in the future will probably go 12-13 inches or so as I mostly prefer indicas. 18 is a safe distance for Sativas.

Here's a shot of the screen a week or so later
I cannot express how this is the most labor intensive part of doing a scrog grow. Once the canopy gets thick, you need to thin it out. start from the bottom as the lower branches won't get enough light to produce substantial buds anyways. If you don't get appropriate airflow both above and below you will end up with powdery mildew and a host of problems. Trust me when I say, airflow is very important to a scrog grow.
Here's a shot on day 1 of 12/12:

One interesting note about my grow setup is that I only cycle my water 5 times per grow. Twice in veg. Twice in flower. and one flush. The rest of the time I just add nutrients or H2O or both if/when needed.
For flowering I usually start out at around 450ppm at a ph of 5.8. Most of this is Flora Nova and cal mag, but I do add some Koolboom as well. As time goes by and the plants start developing nice buds I bump my PPMs up to around 800. I get there with the following recipe:
12 gallons of H20
1/4 cup of Flora Nova Bloom (this brings my ppm to 460)
1/4 cup of Cal Mag (this brings the ppm to 585)
1/2 cup of Liquid KoolBloom (this brings the formula ppm to 800 even)
20 ML of Bob's Brew (brings it up to a total of 846)
I then measure my ppm and take a ph reading every day. The PH rarely fluctuates period, It is almost always at 5.8 or 5.9. The plants are drinking 3-5 gallons of H20/week. My growroom temps being in the garage are in between 62 and 70 at the highest. I watch it closely, if the ppm skyrockets by 100 or so then they are drinking lots of H20, if it drops significantly but H20 doesn't I'll add some more nutes and a bit more H20.
Please beware. I personally have found DWC to be very unforgiving when ppms start jumping over the 1000 mark. I have a friend who grows blue dream and that particular variety seems to take any ppm you throw at it. Even approaching 2000 But alas, not all MJ is created equal. So be careful.
Here's 1 month later:
And here is the very latest I have about 3-4 weeks before they're ready!:

Process wise, when I empty my reservoir I hook up the food grade tube to the spigot I've installed from the beer store and run it out my garage side door. In ten minutes or so it's mostly drained. I then take an identical tub. Fill it up to 12 gallons, mix my nutes, correct the PH, use my cheapo fish pond pump to pump it in my reservoir through my portal (some folks just pour through the hydroton, I found this to be messy personally. But it does does work.
I vent all exhaust through my cool tube using 6" ducting routed to a 6" to 8" converter then into my booster fan and out through an OdorSok which I also put a block of Ono inside of. I have drilled in the very top of the closet a number of portholes and have a small fan blowing air out of the lung box.
This works great for a number of reasons. First, I can stuff soundproofing materials all round the top and inside of the lung box and keep noise to an absolute minimum. It's more quiet than a running refrigerator which I have running right by it. I used varying sizes of weather sealing to keep the doors light proof. If you buy big enough magnets, it really doesn't matter. I can't believe sometimes the effort it takes just to open the darn doors with these things!
These are 50lb magnets (if I remember correctly)

I'll do my best to keep you guys posted as to how this grow goes. Hopefully you have enjoyed my post and pics. Feel free to ask any questions and of course if I'm doing something wrong please speak up. I'm certainly not perfect.
Just a geek that likes to puff the chronic. Peace everyone!
Secondly, this is just an attempt to help anyone looking to do a DWC and provide you instructions to do it on your own if you’d like. Whereas I am a tremendous geek and keep as meticulous of records both on paper and via photographs as possible, I’m no professional grower. If I’m stating something wrong in here, then feel free to correct me. There’s probably at least one thing even the most experienced of us growers can learn from anyone. Yes, I’ve learned stuff from complete beginners before.
My setup is in my garage in the SF Bay area. I’m a prop 215 patient and grow primarily for my own consumption. Everything read in the following grow/build journal I did 100% legal thanks to the great state of California’s legal and medical system.
So here are the materials you’re going to need.
(4) 10’ long 2x4s - $10 at Home Depot
(6) 8’ long 2x4s –$18 at Home Depot
(6) 4x8ft sheets of 3/8” plywood –$60 at home depot
(7) 2x1 board for framing the doors out on the inside - $8
Nails or screws to put it together with. – ($10). I must admit however I had the luxury of a framing nail gun and have an air compressor, so it went together much faster than had I used screws and a drill drive.
(2) Rubbermaid 18 Gallon Tubs (see photos) - $14
(1) Plastic spigot for draining the tub. -$3 at homebrew store
(12) Ft of food grade soft tubing to hook to the spigot and my fill pump $12
(20) Ft of panda film - $20
(1)HPS setup (I went with a NextGen 400 Digital ballast, Hortilux bulb, and CoolTube reflector) but there are many many options out there. - $280 You can certainly save a buck by using traditional ballasts, but having used both....I'm a believer in the digitals.
(1) 160cfm computer fan for intake -$10
(1) 8 inch clamp fan for under the canopy - $8 at Walgreens
(1) 16” wall mount oscillating fan $36
(1) 8” 500 cfm booster fan from amazon.com - $41 http://www.amazon.com/gp/product/B0007N73EQ/ref=ox_ya_oh_product
(1)6”to 8” sheet metal flange at home depot -$5
(1) Box of hydrofarm ducting - $10 or so. I will use standard insulated ducting going forward. Much less noise and sometimes even less expensive from hardware stores.
(1) bag of Hydroton
(1) General Hydroponics dual diaphragm air pump -$59. Pricey, but worth every penny.
(1) Petco 4 way pump, $28. This is for redundancy just in case your main pump has an issue. You can never have too much air with DWC. This pump puts out roughly 1/2 the air of the gen hydro pump. You can just tell by looking at the bubble stones.
(4) grow disc – airstones -$25 total. Doesn’t have to be grow discs, but I prefer them because they are heavy enough to stay on the bottom.
(2) Heavy airstones -$10 this is for the redundant pump. I use an aquarium T to take it down to a 2 outlet pump and run two extra airstones off of it. This is how you will see in my photos I have six holes drilled for air hoses.
(1) Carbon filter. ($40) I use an Odorsok because it has lower CFM requirements and I’m only using a booster fan. After this crop I’m going to upgrade to a more industrial exhaust fan. Perhaps something from CanFan, but I'll cross that bridge when it comes.
(1) 4x3 piece of rubber matting got at home depot ($6)
(1) 4.5ft segment of chicken wire. Next round I will look for something with slightly bigger holes for the buds to come up through. - $5
(4) 4”netpots - $5
(2) Handles for the cabinet - $2
(4) Heavy duty hinges for the doors - $13
(2) 50lb magnets for the doors $10
(1) Latch for the padlock ($5)
(1) Padlock ($5-$30 depending on your level of paranoia)
(1) Cheap fish pond fountain pump to refill your reservoir - $30
Here’s the tools you need or would be ideal:
A Dremel.
This tool is worth its weight in gold when needing to make small holes for electricity to come in, ducting, and when cutting holes for the netpots. Literally cuts the time in 1/10th. I have a good friend that uses a drill and hole saw which works actually a bit better. But I have a dremel, so that's what I used.
A circular saw. If you draw up your dimensions in advance they will cut the pieces for you for a small price at home depot. I did this and it probably saved me 2 hours of measuring, marking, checking, cutting, messing up, etc… Not to mention they use on the of best saws money can buy, so the cuts are clean. If not, it’s perfectly cool to cut your own wood. it obviously ust takes more time.
A good staple gun. Hanging Panda film is quite a bit faster with a staple gun. I use the thickest panda film my grow shop sells, if using thin film….then put a piece of duct tape on it before stapling that piece up.
Duct tape – Dark or reflective tape to cover the container. IF THIS IS NOT DONE, ALGAE WILL GROW!! Why is it in all capital letters? Because dummy….this is an important step! just kidding on the dummy part. But seriously, you’ll have an algae farm going if you don’t cover as much as humanly possible of your reservoir with duct tape or something that will keep the light out. Sadly, I know this from experience. Take my loss and turn it into your gain!
White duct tape – Seals up Panda film, looks great, and is more reflective than standard duct tape.At one point I considered covering my growroom walls with it. I love it that much!
A PH Meter ($85 for the Oakton I have), a PPM Meter (I have two, both were around $30) they are not as accurate compared to the high end Hanna testers, but are always within 30-40ppm when I test them in a calibration solution and are easy to re-calibrate. I don’t push my plants in DWC too hard, so this works just fine.
A magnification loop – I personally believe in the ¾ Trichs being cloudy or amber before harvesting. Let's please not turn this one into a huge debate. I've read great arguments for when to pull your crop. This works great for me. If something else works better for you, I'm certainly interested in hearing about it. But don't want to try and claim mine is gospel......it just works well for me
A good knife – Too many uses to mention.
Additional tub the same size as your res for pre-mixing nutes.
Here are the nutes that work for me:
1st off, my home H20 is under 65ppm so it's pretty clean. I am experimenting now with distilled H2O to see if I can tell a difference. I'll keep you posted as to what my charts turn up!
I use General Hydro Flora Nova series. Why? Because General Hydro has done what they do for longer than I have been alive. The Flora Nova solution is one part, so I can have a few beers while mixing nutes and not have an awwwww shit moment (again, learned from experience). I usually keep it in a pan of hot (not boiling or anything, just faucet hot) for 20 minutes before mixing and shaking it. It seems to make it less gooey! Ultimately I must admit I'm lazy to a certain degree and like the one shot factor of the Flora Nova. For what it's worth I've used the 3 part solution for a while now and believe the Flora Nova is much better. But again. That's just my experience.
I use Botanicare CalMag
I use Bob’s Brew for my H20 conditioning. Check out the link below.
http://bobsbrew.net/products/watermax/
I use General Hydroponics Kool Bloom during flowering.
More on nutes in a bit. Now let’s get down to the nitty gritty.
First Frame out your closet. Mine is 10ft tall in my garage. The actual cabinet floor is raised 2 feet off of the floor for storage, but mostly because it’s much easier to deal with hydro solutions and testing when not having to hunch over.
Also, but putting it 2 feet off the floor you can use a standard 8x4 sheet of plywood for both the front and back and just cut the one in front in half and you've got your doors! Next I run all the exension cords in to the box (I use one thick gauge one and smaller power strips and such inside. One note on power strips, most of the time they have lights on them. Do yourself a favor and tape them in the on position with some electrical tape to keep lights out during your dark period. After electrical is in place I hang my panda film and put a rubber mat on the bottom as well as cut the hole for my lung box and run my ductiing.
I've also built out a "lung box" to handle all exhaust fans for which I can install noise/smell reduction materials and ventilate the hot air out the top where it rises naturally.
Here's a shot of me testing the setup from a ventilation and lighting perspective. Also, note the 2x1 boards I used to frame the inside of the door. Without these, it's very difficult to screw hinges in place to hold your doors in tact.
Here's a shot of the tub I use for a reservoir. It's an 18 gallon Roughneck by Rubbermaid. I've tried all sorts of different tubs and buckets. This is hands down the best for my particular setup.
Then I draw the holes for the netpots and use my dremel to cut them out. Be very careful here. You want a VERY tight fit. I have a Chemdawg D plant that got angry and pushed my netpot down in the reservoir once it found out it couldn't penetrate the screen as much as it wanted to!! The hole was just a tad too big and the result was me having to do some serious Macgyvering (that's a word right?) to make it workout. Luckily, all is well
Next I cut a porthole to add H2O and Nutes through, for which I cover with a black rubber flap when not opened to keep light out, as well as holes for my airtubes to the airstones. I also cut a 1" hole for the spigot and use silicone to seal it along with the rubber gasket it comes with and thread and screw. It has never once leaked on me.
And of course here's what the bottom of the tub ends up looking like. My next setup will be 4 large discs and I'll run a t out of each pump to have four very powerful inputs.
Next....the grow process.
I use 4" netpots with Hydroton. FLUSH YOUR HYDROTON. Flush it in a strainer, float it in some water, ph it down to around 5.8 to 6. Let it sit and make sure it's stable. I've skipped this step and had my PH all over the place. I usually just flush it under hot water initially in a net pot, then soak it for 15-30 minutes.
Using the exact Roughneck I use (18 gallons). I fill each and every time to the 12 Gallon Mark. This ends up putting your netpots about an inch above the water. If it's the very first week or so, you can go ahead and bring it up to the bottom of the netpots to promote extra root growth. But beware, because too much H20 on that poor little clone or seedling can cause stem rot and kill it. But with the pumps I'm using, there's plenty of splatter to keep the bottom of the netpots moist. So I usually keep my 1" rockwool cubes either from seed or clone near the top of the netpot. I do not however transplant until there is nice root growth out of the bottom of the cube.
Initially I add FloraNova Grow to about 200ppm, then add 1/8 cup or so of Cal Mag, and 12ML (one per gallon) of Bob's Brew. Bobs brew is the shit. For those of you who have not used it, I strongly advise checking it out. It acts in a similar manner to Hydrogen Peroxide, but doesn't harm your plants, keeps the water smelling and looking clean, and keeps your roots pearly white. The company claim is that it helps prevent Calcium and Manesium lockout. I'm a believer. Again, that worked for me. Don't take it as gospel.
At week one my girls looked like this (willies wonder for those of you who are curious):
At Two weeks they looked like this: (1st Willies 2nd one is Chemdawg D)
As you can see, Bobs brew is giving me nice white roots. Healthy as can be!
After vegging for another week or so, I installed a chickenwire screen. I've now learned that I should have gotten screen with larger holes because some of the buds are actually fat enough that they are getting cut off. Go with the 2"square screen. Or you can do what I do, which is use my tin snips and just make room where buds need more room to come through.
Chickenwire is certainly cheap enough. Here's a shot of the chickenwire in on day 1
Here's what the screen looked like at the end of week 1. I installed it 18 inches above my reservoir , but in the future will probably go 12-13 inches or so as I mostly prefer indicas. 18 is a safe distance for Sativas.
Here's a shot of the screen a week or so later
I cannot express how this is the most labor intensive part of doing a scrog grow. Once the canopy gets thick, you need to thin it out. start from the bottom as the lower branches won't get enough light to produce substantial buds anyways. If you don't get appropriate airflow both above and below you will end up with powdery mildew and a host of problems. Trust me when I say, airflow is very important to a scrog grow.
Here's a shot on day 1 of 12/12:
One interesting note about my grow setup is that I only cycle my water 5 times per grow. Twice in veg. Twice in flower. and one flush. The rest of the time I just add nutrients or H2O or both if/when needed.
For flowering I usually start out at around 450ppm at a ph of 5.8. Most of this is Flora Nova and cal mag, but I do add some Koolboom as well. As time goes by and the plants start developing nice buds I bump my PPMs up to around 800. I get there with the following recipe:
12 gallons of H20
1/4 cup of Flora Nova Bloom (this brings my ppm to 460)
1/4 cup of Cal Mag (this brings the ppm to 585)
1/2 cup of Liquid KoolBloom (this brings the formula ppm to 800 even)
20 ML of Bob's Brew (brings it up to a total of 846)
I then measure my ppm and take a ph reading every day. The PH rarely fluctuates period, It is almost always at 5.8 or 5.9. The plants are drinking 3-5 gallons of H20/week. My growroom temps being in the garage are in between 62 and 70 at the highest. I watch it closely, if the ppm skyrockets by 100 or so then they are drinking lots of H20, if it drops significantly but H20 doesn't I'll add some more nutes and a bit more H20.
Please beware. I personally have found DWC to be very unforgiving when ppms start jumping over the 1000 mark. I have a friend who grows blue dream and that particular variety seems to take any ppm you throw at it. Even approaching 2000 But alas, not all MJ is created equal. So be careful.
Here's 1 month later:
And here is the very latest I have about 3-4 weeks before they're ready!:
Process wise, when I empty my reservoir I hook up the food grade tube to the spigot I've installed from the beer store and run it out my garage side door. In ten minutes or so it's mostly drained. I then take an identical tub. Fill it up to 12 gallons, mix my nutes, correct the PH, use my cheapo fish pond pump to pump it in my reservoir through my portal (some folks just pour through the hydroton, I found this to be messy personally. But it does does work.
I vent all exhaust through my cool tube using 6" ducting routed to a 6" to 8" converter then into my booster fan and out through an OdorSok which I also put a block of Ono inside of. I have drilled in the very top of the closet a number of portholes and have a small fan blowing air out of the lung box.
This works great for a number of reasons. First, I can stuff soundproofing materials all round the top and inside of the lung box and keep noise to an absolute minimum. It's more quiet than a running refrigerator which I have running right by it. I used varying sizes of weather sealing to keep the doors light proof. If you buy big enough magnets, it really doesn't matter. I can't believe sometimes the effort it takes just to open the darn doors with these things!
These are 50lb magnets (if I remember correctly)
I'll do my best to keep you guys posted as to how this grow goes. Hopefully you have enjoyed my post and pics. Feel free to ask any questions and of course if I'm doing something wrong please speak up. I'm certainly not perfect.
Just a geek that likes to puff the chronic. Peace everyone!
Attachments
-
 97.2 KB Views: 158