Doobieus
Well-Known Member
Ok so here's my very first tutorial, hope it doesn't disappoint lol.
Anyhow I've seen 2 main designs for a Home made AC, one design is the well known copper make shift radiator on a fan outside of the cooler, the other doesn't utilize a copper radiator at all, but lasts longer cooling wise and doesn't have that messy condensation. I have been overlooking these designs and have been re-designing them for awhile now.
After all the brain storming and re-designing I have come up with what I will call "The Doobieus Cooler". It takes both designs and combines them into one. Stays cooler longer, and no messy condensation.
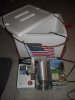
All materials can be found at Walmart, and the cost is less than $40 (Prices may vary depending on state and tax).
What you will need:
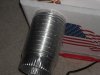
- 4 inch ducting
- Copper tubing (I just used a scrap piece)
- Fan at 10 inches max
- Fish water pump/Aquarium pump
- Styrofoam cooler (Or any cooler really)
- Duct tape (The god of ghetto lol)


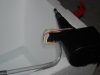
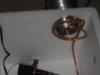
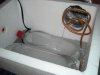
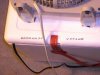
Step 1: Clog the water pump as shown, if I had some silicone I would just have given it a nice blast of that to clog it.


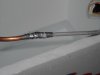
Step 2: This part is kind of a hassle, but get some pliers and pinch the copper tubing until it squeezes into the plastic tubing that comes with the pump, then duct tape to ensure a good seal.


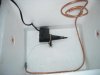
Step 3: Set the pump inside and line the bottom of it with the copper tubing (Be careful and gentle while bending it), bend it back up and bend the end into a coil (Make sure the coil's end is pointing DOWN or else you'll have a watery mess lol). The coil is where the duct will be. (Note: If I had more copper tubing, I would have lined it far more, I will probably buy some more later down the line and re-vamp it, but this setup works well too, I'm just a perfectionist).


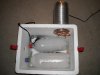
Step 4: Make sure the ducting is even with the coil, get the ducting and press it against the cooler to make a mark, cut out the circle, and place the ducting in the hole as shown.


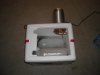
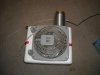
Step 5: Cut the lid to accommodate your fan.


Step 6: Put 2-4 frozen 2 liters inside.


Step 7: Put lid on.


Step 8: Put fan on lid and turn on.


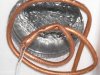
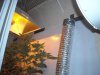
Some pictures of it in action, note the condensation on the copper tubing.


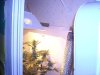
Some pictures of it in the grow room, yeah I know the setup looks ghetto but money's tight lol. I plan to eventually hook it up to the HPS, but for tutorial purposes this will work.


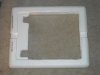
A picture of writing I put on the cooler to prove that I made it lol, yeah that was an after thought and Step 5 was also taken after the fact but whatever lol.

I hope this tutorial helps people with heat issues, happy growing and toking to all.

Anyhow I've seen 2 main designs for a Home made AC, one design is the well known copper make shift radiator on a fan outside of the cooler, the other doesn't utilize a copper radiator at all, but lasts longer cooling wise and doesn't have that messy condensation. I have been overlooking these designs and have been re-designing them for awhile now.
After all the brain storming and re-designing I have come up with what I will call "The Doobieus Cooler". It takes both designs and combines them into one. Stays cooler longer, and no messy condensation.
All materials can be found at Walmart, and the cost is less than $40 (Prices may vary depending on state and tax).
What you will need:
- 4 inch ducting
- Copper tubing (I just used a scrap piece)
- Fan at 10 inches max
- Fish water pump/Aquarium pump
- Styrofoam cooler (Or any cooler really)
- Duct tape (The god of ghetto lol)
Step 1: Clog the water pump as shown, if I had some silicone I would just have given it a nice blast of that to clog it.
Step 2: This part is kind of a hassle, but get some pliers and pinch the copper tubing until it squeezes into the plastic tubing that comes with the pump, then duct tape to ensure a good seal.
Step 3: Set the pump inside and line the bottom of it with the copper tubing (Be careful and gentle while bending it), bend it back up and bend the end into a coil (Make sure the coil's end is pointing DOWN or else you'll have a watery mess lol). The coil is where the duct will be. (Note: If I had more copper tubing, I would have lined it far more, I will probably buy some more later down the line and re-vamp it, but this setup works well too, I'm just a perfectionist).
Step 4: Make sure the ducting is even with the coil, get the ducting and press it against the cooler to make a mark, cut out the circle, and place the ducting in the hole as shown.
Step 5: Cut the lid to accommodate your fan.
Step 6: Put 2-4 frozen 2 liters inside.
Step 7: Put lid on.
Step 8: Put fan on lid and turn on.
Some pictures of it in action, note the condensation on the copper tubing.
Some pictures of it in the grow room, yeah I know the setup looks ghetto but money's tight lol. I plan to eventually hook it up to the HPS, but for tutorial purposes this will work.
A picture of writing I put on the cooler to prove that I made it lol, yeah that was an after thought and Step 5 was also taken after the fact but whatever lol.
I hope this tutorial helps people with heat issues, happy growing and toking to all.