Carbon Scrubber

potroastV2

Well-Known Member
So you are having a problem with the marijuana odour and want to fix it so a priest can sit in the next room and not know you are the leading provider in your state for marijuana. Well its not going to work that good the home made jobs are not for the pro's but then again pro's can afford to go buy one :p

The Shopping List
  • 1 roll - ¼” hardware cloth - look in the wire and fencing sections of home improvement stores
  • 1 - 4” to 6” aluminum duct adapter
  • 2 – 6” aluminum duct end caps (actually, you need a 4” and a 6”, but no one seems to carry a 4”, so I made one by carefully disassembling a 6” end cap cutting the end plate down to 4”, then re-assembling it.)
  • 1 – 4” aluminum duct starter collar
  • 2 – pair of womans pantyhose, I prefer black because activated carbon is black and it won’t look so crappy….it looks cool.
  • 3 or 4 boxes – good quality activated carbon for fish tanks. (The actual amount you need depends on how big you make your filter.)
  • 2 or 3 – 4” stainless duct clamps (those worm gear hose-type clamps- I used 3)
  • 2 or 3 - 6” stainless duct clamps (those worm gear hose-type clamps – I used 3)
  • 1 – tube of high strength duct sealant/epoxy - sets up strong and seals really well - usually found in the same section of the store as the ducting
  • a handful of batting material (cotton, etc – look in the quilting or fabric section at wal-mart, etc.)
Now for the Assembly
  1. Disassemble a 6” end cap by drilling out the rivets. Cut the end plate down to a 4” circle with tin snips, etc. Wrap the edging back around the end plate and cut it to length leaving a bit of overlap. Clamp the two pieces together and seal with the sealant, allowing it to dry overnight. You should be left with something that looks exactly like the 6” end cap, but is only 4” in diameter.
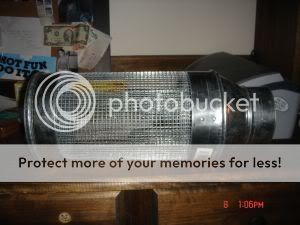
  2. Cut a piece of hardware cloth the length you want your filter and the appropriate width to wrap around the starter collar and end cap with a small bit of overlap. Wrap the hardware cloth around the end cap and starter collar and use a 4” hose clamp at the midpoint of the cloth to hold the 3 pieces together.
  3. Cut a section of pantyhose to make a continuous tube, and pull it over the 3 pieces you just assembled. Add a hose clamp to each end to hold the pieces firmly together. You should be left with something that looks like a 4” version of the above pic with out the reducer, of course.
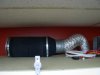
  4. Insert the assembly you just made into the large end of the 4-6” reducer. It may take some force to get the starter collar to snap in properly, but it will. I then sealed the joint with sealant/epoxy.
  5. Cut another piece of hardware cloth the proper length and size to go around the 6” end of the reducer and the 6” end cap, plus a little overlap. Install it with a 6” clamp at the midpoint.
  6. Cut another tube of pantyhose and fit it over the outside of the unit. Be careful not to rip it or get a runner (heaven forbid!) Install the outer two hose clamps as in the pic.
  7. Loosen the end hose clamp and you should be able to remove the 6” end cap without the thing falling apart at all. Add a few inches of batting material to the inside of the unit at the reducer end….this area will not have any airflow anyway and the batting will take the place of some activated carbon, thereby preventing wasted carbon.
  8. Fill with carbon almost to the top, then top off with more batting.
  9. Replace the end cap and tighten the hose clamp. Hook up to your duct work and enjoy the odor-less-ness!
The final product should look something like the picture below, sorry about the lack of step by step pics, but I do not need to make another one. One of these days I will get around to it.

Carbon Scrubber


This does work if you can follow directions if you can not follow the directions you should go door to door and ask people for money.
 

Attachments

skunkushybrid

New Member
I'm not too sure about this Rollitup. Especially when towards the end of the first paragraph you state that it isn't going to work very well. It seems simple to you because you've done it. I think more pictures in the different stages of assembly would serve better to help a layman like myself. To be honest, I think we'll take our chances with this 1st crop and buy all the right kit later. Our grow room doesn't even have an exhaust system. The thing we have going for us is the locale, in a high rise, in one of the highest crime-rate areas in this country. The smell of skunk is everywhere. I like to think of it as an educated risk.

The next one is going to much better, we're going aero. Different place everything. Most of the money we get from this crop will go straight into the next one.
 

potroastV2

Well-Known Member
hey skunk,

Sorry again about the lack of pictures I just havn't needed to make another one carbon scubbers work very well and they should be looked at for your next op.
 

Tanya

Active Member
More pics of the stages would be fab-a-doodle-tan-bloody-tastic

..(^^,).

xTANYAx
 

skunkushybrid

New Member
Carbon filters are a must for our next crop. There'll be no skimping or cutting corners on the next one. We're going to spend 1200 quid, about $1800 on our next one. We're getting some original-cheese cuttings in exchange for some of our Jacks. I recommend the JTR to anyone, a plant that just wants to grow. After 3 and a half weeks they are well ready for flowering and we messed up quite a bit in the beginning, and they're in soil. A very strong, good plant. I'm glad we started with it. definitely going to buy some white russian seeds i've heard that the buds hold the highest thc content. Anyone know if this is true? I like the blueberry too, gotta get some of those, especially after clocking your picture rollitup. Did you take that photo while the bud was beneath a blue light? It's gotta be one of the most beautiful things I have ever seen. Yep, definitely buying a pack of them.
 

OKman

Active Member
Hey look, I was the guy who asked the question in the first place, not that skunky person. I must say I appreciate all the work put in and it has put me totally in the picture about what it is and how it works, ie the principle of the thing. Will definitely incorporate such a device in my set up, in fact will have to.

For those who may not understand fully as I didn't at first, it does have to be hooked up to an extractor fan so that all the muck and stench from the growing area gets sucked and absorbed into the carbon and not into your home. Also I expect you have to seal your growing area to keep the smell from leaking out and to keep the light out when flowering. Well! some people may not have realised that!! I see you can buy them. I've now learnt enough to feel confident about how I'm going to start growing and what items I need, thanks to this site which is really great and cleverly set up.

The funny thing is I got onto this looking for pain relief although not opposed to experiencing the higher states which I've never done, cos can't get any bud. Hope when I've spent all this time and money and months of waiting it's gonna be worth it!! Somebody tell me it will be please!

Anyway, see yer later. OKman. :smile:
 

Sublime757

Well-Known Member
i actually have the exact same one. i posted the first carbon filter how-to on OG about 2 years ago and your direction are pretty much the same. but you did make a few changes that i shouldve made in my originial one. good job by the way
 

growhappy

Active Member
for OKman it's worth it. the harder you work the sweeter the pay off. there's something special about reaping the rewards of your labor. i learned a lot with my first crop, it was a bit disappointing, but i'm into the second now and i'm looking forward to out doing myself. it is quite exciting, wish you luck. this site has been a big help.
 

GrizzSpitter

Well-Known Member
What's the cost on something like that? Might not be a bad idea, but he real deal's going for about $65 on ebay and I'm sure you could find something comprable if not better on CraigsList. I like the idea of making one myself (something about the ghetto rig aspect that gets me excited) but I like my ladies tall and with plenty of meat on their bones, and those are some pretty smelly girls to dance with if you catch my drift...
 

dadvocate

Active Member
another thing to remember is that every twist and turn you put in the exhause hose reduces the venting fan capacity. try to straightline it if you can.
hung over your lights, venting straight to the nearest wall works great.
you can hear the difference in fan output and effort as you're adjusting the tubing... thanks for listing all the steps out.
 

thnigthi

Active Member
I love it. This is way to simple. I'm not sure of the price, cause I'm in construction, and have aquariums, so I had some of the supplies on hand. In about 2hrs I built 4 of these. And, I made the last one using coffee cans. Hows that for ghetto, GrizzSpitter? I spent less then 50 bucks at WalMart. If you'll excuese me now, I'm going to install my Folgers filter, sit back and reflect on how much more I enjoy the fruits of my labor because of the small things like this.
 

Rudy18

Active Member
Thanks man, I wondered when the admin would be heard from, was starting to think fdd took it over for you because of all his posts.
 

MisterNiceGuy

Well-Known Member
I will be putting up a how to on the one i made, but mine consists of pillow fluff, a pringles can, mesh from a strainer and mesh from a trucker hat. Some tape and my computer fan. Works pretty well and fits above my lights during flowering. wicked
Activated carbon from walmart dot com for 7 dollors, so all in all cost me 7 dollors plus the pringles can. I eat the shit outa them pringles though!!
 

eyelessism

Active Member
thats awesome, looks easy enough too. if theres anyone on here from the uk do u know where i could buy the parts needed? what about b and q?
 
Top