BadKittySmiles
Active Member
Welcome to BadKat's CannaPharm. Featuring **Photo Tutorials** for: concenrated hash capsules,
"UV Reactive Glowing Hash Candy", and "Chocolate Covered Peanut Butter Canna 'Bombs'".
More soon to come...
I've shared this on other forums, and thought a few members here may find it useful


I'm BadKittySmiles, a seasoned grower, and practiced canna chemist,
chef, what have you.
I've been traveling the world for decades studying cannabis, its
growth, breeding, harvesting, processing, I've visited and lived
long term in several continents, established over a dozen small
(multi-room) grows, and I have participated and contributed to
various large organizations, warehouses and labs around the world.
Ive been working on a few photo-tutorial recipes that I know you
folks can easily make in your own homes, without the need for any
excessive or extravagant tools or materials. This will be something
of a journal, documenting various methods and recipes. I won't
talk too big or scare new or inexperienced folks away, I want to
encourage asking questions, no question is too simple, or in any
way stupid... as far as questions go, I only ask that you stay
somewhat on topic if posting in the thread, and off-topic PM's are
absolutely welcome if you're patient waiting for a reply lol. If
you've tried 'google' and the search feature here, and still need
further explanation, I'm not going to look down on you or make you
feel silly for asking

Were focusing on a few of my favorite recipes, to start with,
we're working on Canna Capsules.
I may only get through one recipe today, so Ill be reserving the
immediate additional few posts right away for the following
recipes... the photo portion Ive been working on since last
summer
 The writing portion, Ive dragged my heels on until this
very moment

Dont worry.. this will probably be my longest and most intensive
post for information purposes, much of it shouldnt need repeating
for the following recipes.

For people with varying resources and facilities, I've completed
-four- 4 full variations on making hash capsules. We'll be starting
with the optimal variations, and we'll work our way down to the
poor (or ill-prepared) mans caps.
Our aim here is to transform roughly 5.5 grams of quality hash
into 15 concentrated canna capsules, for a very intense and
narcotic effect (which takes into consideration my daily smoking
& edible-eating personal dose... yours should start at only .15g
per cap, otherwise you may not enjoy the very (too)intense
effects, and you could wind up spending the day, bent over a bin
or a toilet).
-------
What you'll need:
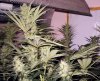
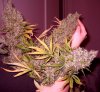
- Minimum 5.0 grams sifted hash, or fine kief. Were using hash collected from the strain
Devastating Train Wreck.
- Coconut Oil, 2.5 tsp- organic and mechanically extracted are good, naturally
heat-deodorized is ok. I recommend the brands 'Now', and 'Garden of Life'.
(Remember, if a single dose turns out much too strong for you, you can dilute it
further with extra coconut oil until you achieve the desired effect. There is no rush
so feel free to fill one capsule, try it before filling the rest, and see if changes are
needed. These start out strong. Some of you will require less product per-cap.)
- Pipette to fill your caps easily by hand, or of course a fancy cap-filling machine or tray.
- Empty Gelatin Capsules Can't be veg/V-caps unless you intend on using them immediately
- Optional oils, which as a patient with digestive-absorptive difficulties, I use for enhanced
mobility and absorption of cannabinoids.. a mix of heavier to lighter oils will create an
optimal and varied 'vehicle' for cannabinoids, cbd etc., however this is the perfectionist in
me, and a single, quality coconut oil source will do just fine for most folks. I use:
- Avocado - Almond - and -Castor- oils, in addition to the coconut, at an
unmeasured rate of just a few drops each, per 2 teaspoons of coconut oil.
Just be sure they are food grade.
If you are uncertain, contact the supplier or manufacturer, or discontinue use.
- Soy Lecithin: this is where the first two recipes differ.
I made two near-exact batches to show the results side by side, one with lecithin, one
without. It's cheap, easy to find, and it absolutely enhances the effects and absorption
of cannabinoids. Further explanation below.
- Ceramic oven-safe dish
- Foil
- Empty Pill Bottles
- Desiccant sachet
- size 00 GELATIN capsules.. they must be gelatin, if you use vegetarian,
they'll disintegrate before you can use them.
But if you must use V caps, you'll have to take them almost immediately, and I'd
recommend making your hash concentrate in advance, freezing it, and defrosting what
you need, as you need it, just enough to fill a days supply of caps.
You can use larger capsules, and fill them with different ratios, but only if you can handle
swallowing pills that large; many folks have difficulties with even the 00's, although they're
your average health-food sized cap.
--------
Preface.
Coconut oil is a solid at temperatures below around 76-78 degrees, making it perfect for
canna capsules. When blended properly, the cannabinoids are mixed evenly through the
oil and become unable to 'eat' through the gel cap, and due to the solidity of the oil they
can be stored safely for up to several weeks at room temp. I prefer freezing mine as it
not only greatly extends their shelf life, but there are many studies and recipes that
suggest a freezing action, as a step of the process, as it enhances the molecular
break-down of the cannabinoids making them more readily available to your body.
Soy Lecithin. It's used in food processing to make less sugar appear 'sweeter', less
chocolate more 'chocolatey', and in pharmaceuticals to enhance the effectiveness of
medications, it homogenizes and safely coats, then breaks down substances, into more
fine, smaller particulates, promoting vastly improved systemic bioavailability within your
body.
The difference is so great, that you can visually see the altered consistency between
oils/pills where lecithin was used, and when it was not. 'Liposomal' lecithin encapsulation,
simply put, breaks the glands down faster, making the heating process more efficient,
reducing the risk of damaging the material from possible over-processing. I recommend
using soy lecithin in all canna and hash oil recipes.
The glands, already being decarbed (preferably), are then broken down further, and are
delivered in a vehicle of lecithin oil, creating an intensely narcotic impact upon use.
Lecithin increases the availability of everything from sugars to vitamin C, to prescription
pain meds, and the increase in availability on contact is said to be between %15 and %75
depending on the substance, vitamin, or chemical. Meaning, the correct addition of lecithin
to for instance, vitamin C, reduces the quantity of ascorbic acid you need to consume in
order to achieve the same effect, by more than 50%. You can see how this applies to the
use of digestive-resistant canna in edibles.
While I can't give you an exact figure for increased availability for cannabinoids, knowing
it does vary for the home-user kitchen to kitchen, I can guarantee you that personally I
both see, and feel a difference when lecithin is utilized.
And when you can buy such large packets of it for just two or three dollars, whatever the
increase is, it's well worth it. If you'd like to get fancy, and possibly enhance the process
further, you can additionally use ultrasonic jewelry cleansers to mimic the lab-like process
of liposomal encapsulation, and utilize a briefer period of heating.
---------

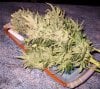
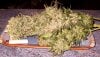
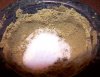
Ok! To start with you're going to want to weigh out at least 5.0 grams, of finely sifted hash
or kief. I usually use around 5.5-5.7 grams, for roughly 15 capsules, give or take a cap.
Find your oven safe ceramic dish, mine is used heavily and often so you'll notice
throughout my tutorials that I don't bother cleaning it.. why remove those glands after all,
when I can reduce their loss by leaving the same amount behind with each use
I just
pop it in the fridge when I'm done with it, knowing I'll be using it again in a few days or a
week.
Preheat oven, to 210 f.
Sprinkle your hash evenly over the dish, and double seal WELL, with aluminum foil. Set
a timer for 20 minutes, place the sealed dish on a baking sheet, in the oven, during
pre-heat.. it isn't entirely necessary, but heating slowly reduces the risk of shattering your
dish, and losing your precious material.
The same applies to the end of the heating, turn off the oven, open it briefly, then close
it and allow it to cool slowly within the oven for 10 minutes.
Total decarb time, 30 minutes (20 of which, the oven is on).
-----
Decarbing is a touchy issue for many folks, some know they need it but don't know the
methods and practices that cause decarbing, some aren't aware of it at all, others think
it's unnecessary and 'know' they get some amount of effect from eating bud on its own,
here's why: some herb, if it's old, commercial, over-dry, whatever the reason, for a variety
of reasons, some herb is already partially, or even full decarbed. The process begins
happening, very gradually, the moment you cut a plant down and begin depriving it of
water. The older the bud is, and the drier it gets, the more carbon dioxide and water vapor
is released, and the closer it is to removing the carboxyl group. It's something that is
almost never discussed publicly, but is frequently known in professional kitchens.
The fresher the herb, or the more moist the storage conditions, the more necessary and
extensive the decarbing process needs to be. Loose hash, separated from plant matter,
in general needs a bit less decarbing. With herb, depending on the age, I decarb for a full
20 minutes after the preheat, rather than including that warm up in my 20 minute time
frame.
A food dehydrator works just as well, if not better than heat at decarbing, it reduces the
risk of damaging your product with excessive heat. It's hard to tell when your decarb is
completed when using heat, usually gently browned herb is a good sign but it often
means you've taken it a hair too far, and some material in the middle may not be
completely decarbed.
-----
Once cooled, remove your dish.
Now, preheat your oven to 250 f, while you complete the following steps. Dont worry, it is
too hot, but youll be reducing the heat once youre ready to use it.
In every step of the way, in order to prevent the loss of potency via vapor escape, you
MUST wait for your sealed container to fully cool, prior to opening.
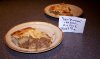
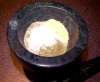
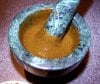
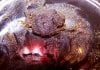
Unwrap your foil covered dish. Your hash should now have gone from a very pale sandy
amber, to a light but somewhat golden brown.

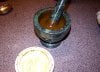
Mix ¼ teaspoon Lecithin to the hash, and blend well.
 This image has been resized. Click this bar to view the full image. The original image is sized 829x622.


Youre ready to add your coconut oil, but youll need to melt it first. Be careful doing so as
some containers have foil seals restricting microwave use, I find the safest ways of
melting your oil are just sitting it in front of a heater, or placing the entire (glass)
container in your oven, without its lid, at its lowest setting for a few moments.

----
Besides that its good for you, coconut oil is a solid at room temperature, making it an
ideal tool for hash encapsulation. If you use a liquid oil, its not just the oil that eats away
at the capsule in a matter of days or weeks, its the concentrated hash and cannabinoids,
that can eat away at the pill in a matter of hours =-O You can try to freeze them, but
often it isnt done quick enough and you end up with sloppy capsules. A recipe for
Sloppy Caps will follow : )
---
Mix your oily hash well, and then seal it up tightly with two layers of aluminum foil. Just to
reiterate: Wrapping in foil, during all heating stages, prevents possible vaporization of
your valuable potency.

Now place your covered dish on a baking sheet, and into the oven. Immediately reduce
the heat down to 220 f, and set the timer for 40 minutes. The initial burst of heat is
primarily to quickly heat the dish itself, by the time the oil itself begins warming up the
temperature should have fallen sufficiently.
After 40 minutes, shut off your oven, open it momentarily, then close it allowing your oil
to slowly cool. I do this to gently increase processing time, and as a preventative safety
measure against the dish breaking from the temperature change, spoiling the product.
Once completely cooled, or only warm to the touch (about a half hour) you can remove
the foil, and stir in an additional 1/8 of a teaspoon of lecithin.

If you are particularly meticulous about everything you do, like I am (lol), or if you would
like to use the capsules as soon as you have finished making them, this is when I
recommend taking the extra step of freezing your material, to aid in the breaking up of
the structure of your cannabinoids, which can increase their systemic bioavailability. Place
your sealed container in the freezer for 8 hours. I like freezing between periods of heat
because it results in a smoother liquid. Otherwise, you can simply freeze them once
capped.
Moving on : ) After youve mixed in your lecithin (or after youve removed your dish from
the freezer, and have given it ample time to reach room-temp) you will re-wrap it tightly in
foil, pre-heat your oven to 220 f, and place it inside during the pre-heat (particularly if
youve had it frozen, and only recently thawed), and set your timer for 40 minutes.
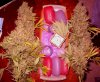
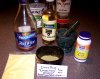
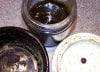
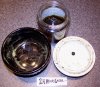
These are your materials for the next stage, minus the various pure oils:


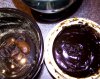
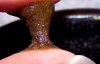
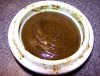
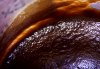
After allowing it to cool as described earlier, you should have something like this, a dank,
thick, viscous black-brown oil. It is exactly how a potent canna oil should look at its peak
potency, any less or lighter, indicates it could have endured more processing to reach its
potential.
I make both meticulous, and lazy-mans edibles, and there is a hugely profound
difference between the two, their effects, and the quantity of material required, for the
desired effect.
Take your cap in your hand, wrapped in a paper towel.
I do this because, my fingers are a bit warm, and when you add even gentle heat to a
capsule, just as you are attempting to seal it, the pressure fights with you and tries to
pop the cap off the end of your capsule resulting in a less-than-snug seal. Holding it in a
folded bit of paper towel, insulates it just enough to prevent this.
Now with your other hand, stir the oil gently with your pipette, as you first pinch, then allow
it to fill. Conveniently I have pipettes that measure in mls, each 00 cap holds just under
1ml. One tablespoon of material, will fill roughly 15 caps.

If youve ever made caps both with, and without lecithin, besides the end-effect this is
where youll notice that it really helps, as far as the processing goes. The lecithin acts as a
homogenizer, it blends the hash and oil more consistently, meaning youre not left to
navigate a thin surface oil containing some cannabinoids, and a thick hashy sludge at the
base, containing others. You end up with more consistent content per cap, more reliably
with lecithin.
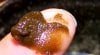
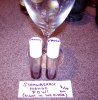
Carefully seal up the other end, and viola, youve made your first hash cap!

And the finishing shots a nice bottle of premium medicine, and a few comparisons
between caps made with and without lecithin.


Its immediately noticeable that the non-lecithin pills maintained a lighter color during the
same (if not more) processing, in spite of the addition of a lighter colored substance (the
lecithin), you can also visually see that the particulates contained within the oil of the
lighter non-lecithin caps, look slightly larger and less broken down, than those of the
darker lecithin caps.
And thats it for now, hope youve enjoyed glancing over this, or scouring over it if you plan on
making them yourself one day.
Good luck, and happy medicating!
"UV Reactive Glowing Hash Candy", and "Chocolate Covered Peanut Butter Canna 'Bombs'".
More soon to come...
I've shared this on other forums, and thought a few members here may find it useful
I'm BadKittySmiles, a seasoned grower, and practiced canna chemist,
chef, what have you.
I've been traveling the world for decades studying cannabis, its
growth, breeding, harvesting, processing, I've visited and lived
long term in several continents, established over a dozen small
(multi-room) grows, and I have participated and contributed to
various large organizations, warehouses and labs around the world.
Ive been working on a few photo-tutorial recipes that I know you
folks can easily make in your own homes, without the need for any
excessive or extravagant tools or materials. This will be something
of a journal, documenting various methods and recipes. I won't
talk too big or scare new or inexperienced folks away, I want to
encourage asking questions, no question is too simple, or in any
way stupid... as far as questions go, I only ask that you stay
somewhat on topic if posting in the thread, and off-topic PM's are
absolutely welcome if you're patient waiting for a reply lol. If
you've tried 'google' and the search feature here, and still need
further explanation, I'm not going to look down on you or make you
feel silly for asking
Were focusing on a few of my favorite recipes, to start with,
we're working on Canna Capsules.
I may only get through one recipe today, so Ill be reserving the
immediate additional few posts right away for the following
recipes... the photo portion Ive been working on since last
summer
very moment
Dont worry.. this will probably be my longest and most intensive
post for information purposes, much of it shouldnt need repeating
for the following recipes.
For people with varying resources and facilities, I've completed
-four- 4 full variations on making hash capsules. We'll be starting
with the optimal variations, and we'll work our way down to the
poor (or ill-prepared) mans caps.
Our aim here is to transform roughly 5.5 grams of quality hash
into 15 concentrated canna capsules, for a very intense and
narcotic effect (which takes into consideration my daily smoking
& edible-eating personal dose... yours should start at only .15g
per cap, otherwise you may not enjoy the very (too)intense
effects, and you could wind up spending the day, bent over a bin
or a toilet).
-------
What you'll need:
- Minimum 5.0 grams sifted hash, or fine kief. Were using hash collected from the strain
Devastating Train Wreck.
- Coconut Oil, 2.5 tsp- organic and mechanically extracted are good, naturally
heat-deodorized is ok. I recommend the brands 'Now', and 'Garden of Life'.
(Remember, if a single dose turns out much too strong for you, you can dilute it
further with extra coconut oil until you achieve the desired effect. There is no rush
so feel free to fill one capsule, try it before filling the rest, and see if changes are
needed. These start out strong. Some of you will require less product per-cap.)
- Pipette to fill your caps easily by hand, or of course a fancy cap-filling machine or tray.
- Empty Gelatin Capsules Can't be veg/V-caps unless you intend on using them immediately
- Optional oils, which as a patient with digestive-absorptive difficulties, I use for enhanced
mobility and absorption of cannabinoids.. a mix of heavier to lighter oils will create an
optimal and varied 'vehicle' for cannabinoids, cbd etc., however this is the perfectionist in
me, and a single, quality coconut oil source will do just fine for most folks. I use:
- Avocado - Almond - and -Castor- oils, in addition to the coconut, at an
unmeasured rate of just a few drops each, per 2 teaspoons of coconut oil.
Just be sure they are food grade.
If you are uncertain, contact the supplier or manufacturer, or discontinue use.
- Soy Lecithin: this is where the first two recipes differ.
I made two near-exact batches to show the results side by side, one with lecithin, one
without. It's cheap, easy to find, and it absolutely enhances the effects and absorption
of cannabinoids. Further explanation below.
- Ceramic oven-safe dish
- Foil
- Empty Pill Bottles
- Desiccant sachet
- size 00 GELATIN capsules.. they must be gelatin, if you use vegetarian,
they'll disintegrate before you can use them.
But if you must use V caps, you'll have to take them almost immediately, and I'd
recommend making your hash concentrate in advance, freezing it, and defrosting what
you need, as you need it, just enough to fill a days supply of caps.
You can use larger capsules, and fill them with different ratios, but only if you can handle
swallowing pills that large; many folks have difficulties with even the 00's, although they're
your average health-food sized cap.
--------
Preface.
Coconut oil is a solid at temperatures below around 76-78 degrees, making it perfect for
canna capsules. When blended properly, the cannabinoids are mixed evenly through the
oil and become unable to 'eat' through the gel cap, and due to the solidity of the oil they
can be stored safely for up to several weeks at room temp. I prefer freezing mine as it
not only greatly extends their shelf life, but there are many studies and recipes that
suggest a freezing action, as a step of the process, as it enhances the molecular
break-down of the cannabinoids making them more readily available to your body.
Soy Lecithin. It's used in food processing to make less sugar appear 'sweeter', less
chocolate more 'chocolatey', and in pharmaceuticals to enhance the effectiveness of
medications, it homogenizes and safely coats, then breaks down substances, into more
fine, smaller particulates, promoting vastly improved systemic bioavailability within your
body.
The difference is so great, that you can visually see the altered consistency between
oils/pills where lecithin was used, and when it was not. 'Liposomal' lecithin encapsulation,
simply put, breaks the glands down faster, making the heating process more efficient,
reducing the risk of damaging the material from possible over-processing. I recommend
using soy lecithin in all canna and hash oil recipes.
The glands, already being decarbed (preferably), are then broken down further, and are
delivered in a vehicle of lecithin oil, creating an intensely narcotic impact upon use.
Lecithin increases the availability of everything from sugars to vitamin C, to prescription
pain meds, and the increase in availability on contact is said to be between %15 and %75
depending on the substance, vitamin, or chemical. Meaning, the correct addition of lecithin
to for instance, vitamin C, reduces the quantity of ascorbic acid you need to consume in
order to achieve the same effect, by more than 50%. You can see how this applies to the
use of digestive-resistant canna in edibles.
While I can't give you an exact figure for increased availability for cannabinoids, knowing
it does vary for the home-user kitchen to kitchen, I can guarantee you that personally I
both see, and feel a difference when lecithin is utilized.
And when you can buy such large packets of it for just two or three dollars, whatever the
increase is, it's well worth it. If you'd like to get fancy, and possibly enhance the process
further, you can additionally use ultrasonic jewelry cleansers to mimic the lab-like process
of liposomal encapsulation, and utilize a briefer period of heating.
---------
Ok! To start with you're going to want to weigh out at least 5.0 grams, of finely sifted hash
or kief. I usually use around 5.5-5.7 grams, for roughly 15 capsules, give or take a cap.
Find your oven safe ceramic dish, mine is used heavily and often so you'll notice
throughout my tutorials that I don't bother cleaning it.. why remove those glands after all,
when I can reduce their loss by leaving the same amount behind with each use
pop it in the fridge when I'm done with it, knowing I'll be using it again in a few days or a
week.
Preheat oven, to 210 f.
Sprinkle your hash evenly over the dish, and double seal WELL, with aluminum foil. Set
a timer for 20 minutes, place the sealed dish on a baking sheet, in the oven, during
pre-heat.. it isn't entirely necessary, but heating slowly reduces the risk of shattering your
dish, and losing your precious material.
The same applies to the end of the heating, turn off the oven, open it briefly, then close
it and allow it to cool slowly within the oven for 10 minutes.
Total decarb time, 30 minutes (20 of which, the oven is on).
-----
Decarbing is a touchy issue for many folks, some know they need it but don't know the
methods and practices that cause decarbing, some aren't aware of it at all, others think
it's unnecessary and 'know' they get some amount of effect from eating bud on its own,
here's why: some herb, if it's old, commercial, over-dry, whatever the reason, for a variety
of reasons, some herb is already partially, or even full decarbed. The process begins
happening, very gradually, the moment you cut a plant down and begin depriving it of
water. The older the bud is, and the drier it gets, the more carbon dioxide and water vapor
is released, and the closer it is to removing the carboxyl group. It's something that is
almost never discussed publicly, but is frequently known in professional kitchens.
The fresher the herb, or the more moist the storage conditions, the more necessary and
extensive the decarbing process needs to be. Loose hash, separated from plant matter,
in general needs a bit less decarbing. With herb, depending on the age, I decarb for a full
20 minutes after the preheat, rather than including that warm up in my 20 minute time
frame.
A food dehydrator works just as well, if not better than heat at decarbing, it reduces the
risk of damaging your product with excessive heat. It's hard to tell when your decarb is
completed when using heat, usually gently browned herb is a good sign but it often
means you've taken it a hair too far, and some material in the middle may not be
completely decarbed.
-----
Once cooled, remove your dish.
Now, preheat your oven to 250 f, while you complete the following steps. Dont worry, it is
too hot, but youll be reducing the heat once youre ready to use it.
In every step of the way, in order to prevent the loss of potency via vapor escape, you
MUST wait for your sealed container to fully cool, prior to opening.
Unwrap your foil covered dish. Your hash should now have gone from a very pale sandy
amber, to a light but somewhat golden brown.
Mix ¼ teaspoon Lecithin to the hash, and blend well.
Youre ready to add your coconut oil, but youll need to melt it first. Be careful doing so as
some containers have foil seals restricting microwave use, I find the safest ways of
melting your oil are just sitting it in front of a heater, or placing the entire (glass)
container in your oven, without its lid, at its lowest setting for a few moments.
----
Besides that its good for you, coconut oil is a solid at room temperature, making it an
ideal tool for hash encapsulation. If you use a liquid oil, its not just the oil that eats away
at the capsule in a matter of days or weeks, its the concentrated hash and cannabinoids,
that can eat away at the pill in a matter of hours =-O You can try to freeze them, but
often it isnt done quick enough and you end up with sloppy capsules. A recipe for
Sloppy Caps will follow : )
---
Mix your oily hash well, and then seal it up tightly with two layers of aluminum foil. Just to
reiterate: Wrapping in foil, during all heating stages, prevents possible vaporization of
your valuable potency.
Now place your covered dish on a baking sheet, and into the oven. Immediately reduce
the heat down to 220 f, and set the timer for 40 minutes. The initial burst of heat is
primarily to quickly heat the dish itself, by the time the oil itself begins warming up the
temperature should have fallen sufficiently.
After 40 minutes, shut off your oven, open it momentarily, then close it allowing your oil
to slowly cool. I do this to gently increase processing time, and as a preventative safety
measure against the dish breaking from the temperature change, spoiling the product.
Once completely cooled, or only warm to the touch (about a half hour) you can remove
the foil, and stir in an additional 1/8 of a teaspoon of lecithin.
If you are particularly meticulous about everything you do, like I am (lol), or if you would
like to use the capsules as soon as you have finished making them, this is when I
recommend taking the extra step of freezing your material, to aid in the breaking up of
the structure of your cannabinoids, which can increase their systemic bioavailability. Place
your sealed container in the freezer for 8 hours. I like freezing between periods of heat
because it results in a smoother liquid. Otherwise, you can simply freeze them once
capped.
Moving on : ) After youve mixed in your lecithin (or after youve removed your dish from
the freezer, and have given it ample time to reach room-temp) you will re-wrap it tightly in
foil, pre-heat your oven to 220 f, and place it inside during the pre-heat (particularly if
youve had it frozen, and only recently thawed), and set your timer for 40 minutes.
These are your materials for the next stage, minus the various pure oils:
After allowing it to cool as described earlier, you should have something like this, a dank,
thick, viscous black-brown oil. It is exactly how a potent canna oil should look at its peak
potency, any less or lighter, indicates it could have endured more processing to reach its
potential.
I make both meticulous, and lazy-mans edibles, and there is a hugely profound
difference between the two, their effects, and the quantity of material required, for the
desired effect.
Take your cap in your hand, wrapped in a paper towel.
I do this because, my fingers are a bit warm, and when you add even gentle heat to a
capsule, just as you are attempting to seal it, the pressure fights with you and tries to
pop the cap off the end of your capsule resulting in a less-than-snug seal. Holding it in a
folded bit of paper towel, insulates it just enough to prevent this.
Now with your other hand, stir the oil gently with your pipette, as you first pinch, then allow
it to fill. Conveniently I have pipettes that measure in mls, each 00 cap holds just under
1ml. One tablespoon of material, will fill roughly 15 caps.
If youve ever made caps both with, and without lecithin, besides the end-effect this is
where youll notice that it really helps, as far as the processing goes. The lecithin acts as a
homogenizer, it blends the hash and oil more consistently, meaning youre not left to
navigate a thin surface oil containing some cannabinoids, and a thick hashy sludge at the
base, containing others. You end up with more consistent content per cap, more reliably
with lecithin.
Carefully seal up the other end, and viola, youve made your first hash cap!
And the finishing shots a nice bottle of premium medicine, and a few comparisons
between caps made with and without lecithin.
Its immediately noticeable that the non-lecithin pills maintained a lighter color during the
same (if not more) processing, in spite of the addition of a lighter colored substance (the
lecithin), you can also visually see that the particulates contained within the oil of the
lighter non-lecithin caps, look slightly larger and less broken down, than those of the
darker lecithin caps.
And thats it for now, hope youve enjoyed glancing over this, or scouring over it if you plan on
making them yourself one day.
Good luck, and happy medicating!