Has Anyone else Tried Air Layering?
- Thread starter Brick Top
- Start date
Brick Top
New Member
Can you define what this is & the purpose of it please, Im interested...
The information is not about pot plants but it works just the same with pot plants.
[SIZE=+3]AIR LAYERING FOR DIFFICULT-TO-ROOT PLANTS[/SIZE]
Everett E. Janne
Extension landscape horticulturist
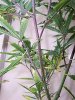
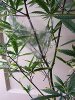
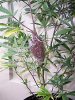
Air layering is a useful method of producing roots on the stem of indoor landscape plants that have become "leggy" through the loss of their lower foliage.
This method, believed to have been developed centuries ago by the Chinese, has been used successfully as a mean of propagating some of the more difficult-to-root plants. Because it required excessive care and patience, air layering was used only by the highly trained plantsman.
The procedure was to wound the stem or branch of a plant and enclose the wounded stem with moist sphagnum moss or similar rooting medium until roots develop from the wounded area. Success was dependent upon the ability of the propagator to keep the rooting medium moist until the roots were formed and large enough to support the new plant. Only since the development of polyethylene film has air layering become a practical method of propagation for the home gardener and amateur horticulturist.
Air layering seldom is used on plants that root easily by other less complicated methods, but it is useful for rooting ornamental plants such as ornamental figs, dieffenbachia, croton and others of a herbaceous nature. Woody plants frequently propagated in this manner include magnolia, holly, camelia, azalea and many of the fruit and nut bearing plants such as citrus, apple, pears and pecans.
For optimum rooting make air layers in the spring on shoots produced during the previous season or in mid-summer on mature shoots from the current season's growth. On woody plants, stems of pencil size or larger are best. The stem may be much thicker on the more herbaceous plants.
Steps for making a successful air layer are illustrated in the following drawings:


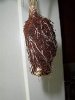
(b) Insert a wood sliver, toothpick or twisted piece of sphagnum moss into the wound to hold it open and prevent cut tissue from reuniting. At this point, the wounded area may be dusted with one of the commercial rooting compounds to speed up the rooting process. Such compounds, however, do not insure root production on difficult-to-root varieties.


Many plants are lost in the final stage of the process because the root system is not sufficiently developed to sustain the top portion of the new plant. By utilizing the plastic tent illustrated in figure 8 or by keeping the new plant in a humid environment, it is possible to develop a good root system on rather large cuttings. Once the plant is well established, it is best to harden off the foliage by gradually exposing it to normal atmosphere. This can be done by cutting a few holes every few days in the plastic tent to reduce the humidity until it is similar to the external atmosphere.
Attachments
-
 16.2 KB Views: 157
 -
 16 KB Views: 197
 -
 11 KB Views: 188
 -
 19 KB Views: 142
 -
 19.4 KB Views: 183
 -
 8.7 KB Views: 168
jtotheitothedblmwhy
Well-Known Member
Wow, so basically your getting clones without cutting them off right away? I think that was jist have them root still on plant. Thats amazing. I have no real information on this but ty bricktop for opening my eyes to this tech
blazinbudsforever
Well-Known Member
interesting indeed ...
FilthyFletch
Mr I Can Do That For Half
I have seen a few do it but what i usually end up hearing is its too much compared to regular cloning and the wound is open to the entire plant leaving it open for infection so those I have seen do it usually quit doing it. I do see at alot on hardwoods like trees at nurseries.
DuluthDankMaster
Well-Known Member
Don't quite kno how this thread came up, but I just made a thread about layering..I've never tried air layering but I'm goingt to try layering my next girl that gets going..I want to try air layering next summer on my outdoors
teddiekgb123
Well-Known Member
I love it. As a medical grower, numbers count for me. As soon as a clone sprouts one root it's considered a plant and if the cop wants to be a dick he might just count unrooted clones as plants knowing that you'll probably get off without charges but he gets to take everything that day. Probably not going to happen but who knows. So this way I can get a nicely rooted clone directly off the mother plant with no questions. I see all kinds of little logistical hassles with doing it this way though, so it may not be worth doing, but certainly worth trying. I like the idea that the future clone is still attached to the plant when it's growing it's roots because.........well no I think I changed my mind........I was going to say the roots might grow faster but I wonder if the plant will be more concerned with healing itself than making roots since it's still attached and doesn't need roots like a detached clone. hmm
I have seen air layering before, very interesting.
How quickly did it root?
Some people might think clones are as good but when you consider that you would take the air layers off, put them into a large container and have them growing immediately it could easily shave 10 days off a grow. I know some people have the luxury of a cloning area but some of us don't")
How quickly did it root?
Some people might think clones are as good but when you consider that you would take the air layers off, put them into a large container and have them growing immediately it could easily shave 10 days off a grow. I know some people have the luxury of a cloning area but some of us don't
tftx22
Member
I tried it this past grow and either I suck at it or it def. isn't worth the time to master. I read that all layerings will eventually root, the time it takes just depends on how well your attempt went...but idk. It seems impossible but I've only successfully cloned like 4 times and three of those were with an ultrasonic humidifier. This seemed like a sure thing now I'm attempting the other layering techniques. I have come up with a pretty decent theoretical layering technique. I'll post it if it ever works the way I want it to. my 2cents
cannawizard
Well-Known Member
**ill try this w/ one of the moms we got, and see how it goes.. thnx for the OPs input
Kaptain Kron
Well-Known Member
i like this technique works fuckin great, just get some of that cloning solution you can water with, use rockwool cube and have at it.
Justworkin
Member
In Michigan a fresh cutting is considered a plant...no roots doesn't matter it's a plant and the law with hit you every time if they can.
swaggersDlite
Well-Known Member
great way to get around plant limits for sure !!!
Uncle Ben
Well-Known Member
Good job by BT.
I wrote a ditty over 12 years ago and posted it at cannabis.com. Butcher Bob who recently joined RIU tried it and did a pictorial journal. PM him and if you're nice, he just might post it again.
I wrote a ditty over 12 years ago and posted it at cannabis.com. Butcher Bob who recently joined RIU tried it and did a pictorial journal. PM him and if you're nice, he just might post it again.
Air Layering is an almost foolproof means of doing asexual propagation. There is no stress to the mother plant, no humidity tents to fool with, easy and cheap. Gotta to luv it!
PLANT PROPAGATION by AIR LAYERING TECHNIQUE
1. While the plant is in its vegetative stage, select a location at the top of the plant, or any terminal growing location in which you would like to take a clone. Identify a node below this terminal growth to be used for the production of roots, and pinch or snip off the leaf petioles as close to the node as possible, leave alone until the next day to give the petiole wounds a chance to heal. This will be your future rooting site.
2. We will now trick this terminal area to redirect its food resources towards the making of new roots at our future rooting site, which will speed up the cloning process. There are two ways of fooling Mama Natur:
a. Slit the stem just *below* the rooting node site. Pry the slit open with a small piece of a toothpick, leaving the toothpick in place, or,
b. Here's a more efficient method. Using a single-edge razor blade make a cut all the way around the stem just below the node, and through the "bark" into the next layer which is called the phloem. You'll feel a little resistance when you hit it. The phloem is the tissue that conducts food from the leaves downward. Your goal is to cut off this flow of food just *below* your rooting site. Don't worry, you have not affected any growth below this area. Moving right along... make another cut about 1/2" or so below the first cut, and again guide the razor blade all the way around the stem. Join the two cuts with a vertical cut so that it looks like an < I >. The "bark" will now slip or peel off the stem all the way around. Using your fingernail, peel the "bark" off the stem, and lightly scrape the phloem tissue off the 1/2" or so of exposed stem. Don't overdue it or you will get into the xylem, which is the conduit that conducts water and nutes upward. This second method interrupts the transmission of food more efficiently than the first.
You have just created a condition in which the top terminal part is still receiving water and nutes, and the food manufactured by the upper leaves is being retained at and above the future rooting site. Neat huh!!!?
3. Dust the node site (located above the cut bark/phloem tissue) with Rootone F or anyone of your favorite cloning agents. Don't overdue it, this is powerful stuff, even if it *is* diluted with a carrier.
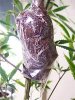
4. Wet a handful of spaghnum moss until it is saturated with water, tap water is fine, and wring out the excess. Wrap the moss around the node site. This is where your roots will show. Hold the moss in place and wrap CLEAR plastic (baggie plastic is fine) or Saran Wrap around the spaghnum moss several times and tightly secure it (wrap it) with masking tape at the top and at the bottom. This seal should be such that excess water can escape but moisture will be retained. Place the plant into your grow room under normal lighting conditions.
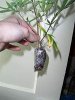
5. Roots will form quickly. When you see a flush of roots show up within the confines of the plastic wrap, clip it off just below the bottom of the plastic wrap, and bingo, you have a new addition to the household! Pass the cigars please.
6. Needless to say, carefully unwrap the plastic, cut off your new plant and pot it up.
Good luck and happy gardening!
Uncle Ben